|
| Voir le sujet précédent :: Voir le sujet suivant |
| Auteur |
Message |
bocorvin
Maniaco Posteur


Inscrit le: 17 Aoû 2015

Localisation: Hillegom
Âge: 79

|
 Posté le: 05/11/2025 16:04 Sujet du message: Slingby Hjordis, scale 1:5 with e-drive Posté le: 05/11/2025 16:04 Sujet du message: Slingby Hjordis, scale 1:5 with e-drive |
  |
|
|
Hello everyone,
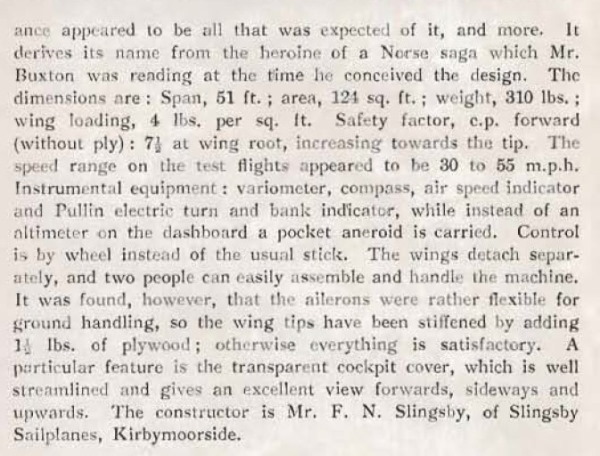
Why a new glider? I enjoy building, but also because I had some tense moments with slope flying, trying not to land down the slope. Changes to our field had also made towing more difficult. With some mixed feelings, I thought about a scale glider with electric drive. I found that a difficult compromise. Fortunately, there was is coincidence and also Martin Simons' book. It featured the predecessor of the Slingsby King Kite, the Hjordis.
The Hjordis has an almost round fuselage, which I thought would be perfect for a e-drive.
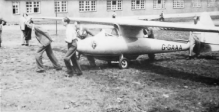
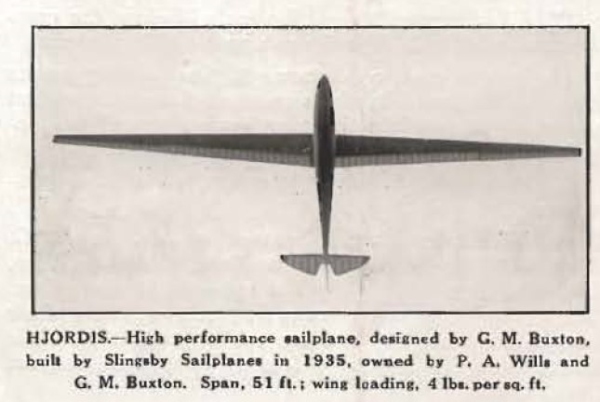
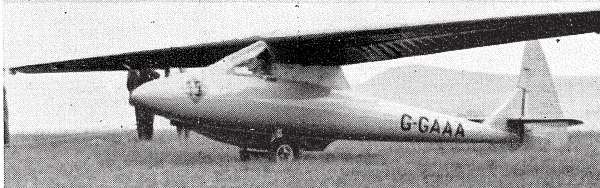
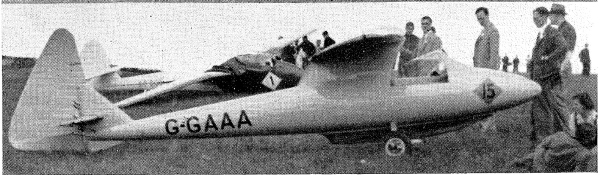
First, a some notes about the real Hjordis, a prototype, only one built. In England, the development of gliders was less spectacular than in Germany. Due to the peace treaty after WW1, a great deal of energy was put into the development of gliders in Germany. In England, this changed in the 1930s, resulting in this more or less successful attempt. Only one Hjordis was built, and it had its shortcomings. For the full story, see the link below.
https://all-aero.com/2025/04/11/slingsby-hjordis/
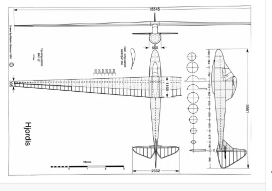
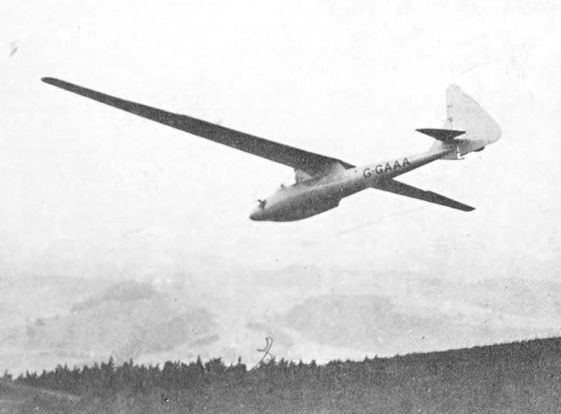
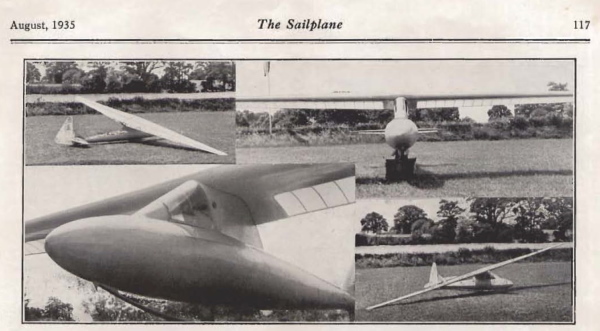
The designer, Buxton, sought optimal performance and drew an extremely slender round fuselage with a pylon on which the wing was mounted. The pilot just about fits (not 😊) and the cockpit canopy fitted nicely to the pylon. The wing was beautifully slender, with a chord of 117 cm at the root tapering to 30.5 cm at the tip, with a wingspan of 1555 cm and a aspect ratio of 21. However, it had a thick and curved profile, from Gottingen 652 at the root to RAF 32 at the tip. It was a fairly revolutionary aircraft for its time. To be able to reduce speed, Buxton had come up with the idea of making the rudder double, which could then be folded out. There were other gliders (the Elefant) that tried this, but unfortunately it did not work. As a result, it had no spoilers or anything like that, which in hindsight was a great loss. I am definitely going to install spoilers.
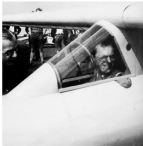
Another problem was the very small cockpit. The fuselage was 660 mm in diameter and the pilot, Phillip Wills, suffered from cramps and splitting headaches in that claustrophobic and hot cockpit. By scutting out a few chunks out of the fuselage at shoulder height, he was able to sit a little better and the ventilation was also improved

I haven't read anything about getting cold shoulders... Martin Simons' book tells the whole story beautifully.
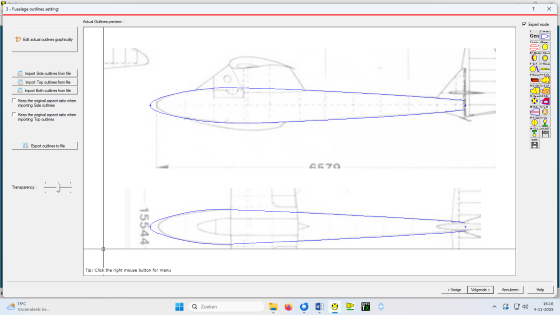
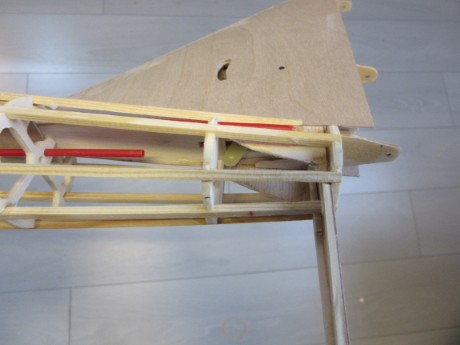
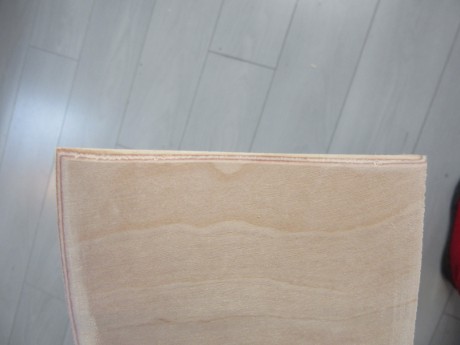
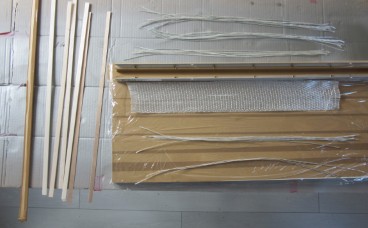
Now for the model. I am very happy with the size of my Nemere, scale 1:6, wingspan 330 cm. When I build the Hjordis on a scale of 1:5, it will have a wingspan of 311 cm and weigh between 2.5 and 3 kg. Hopefully it will be possible to launch it by hand and it will also be easy to transport. Because the wing is mounted on a neck, a modern profile is not so noticeable. The wing is covered up to the rear spar with ply, then transparent to the TE, as can be seen in this photo.
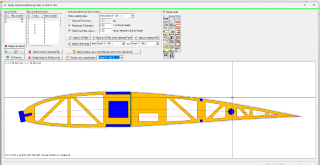
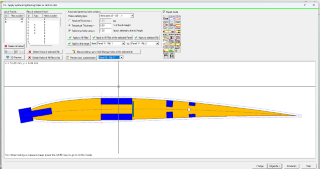
I started drawing the fuselage, with Devfus, based on the existing drawings. I couldn't get the nose to match the photos. In the photos, the nose looked more pointed than in the drawing, so I decided to make the nose a little more pointed, which also meant that the e-drive with spinner would fit. A little bit of cheeting is allowed now and then.....

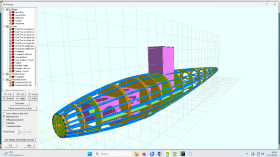
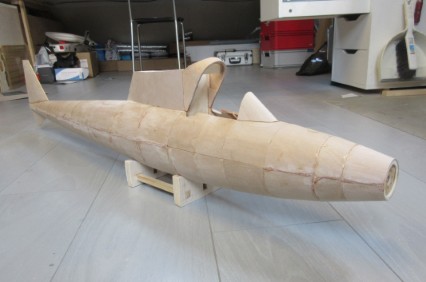
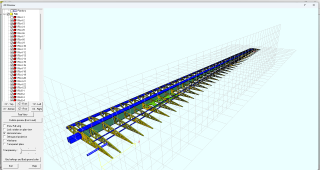
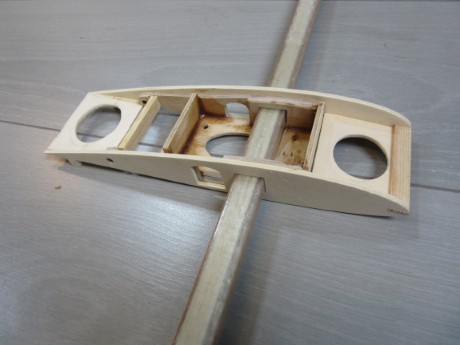
A three-dimensional image of the fuselage gives a good impression and, no, it's not a submarine! The internal reinforcements for the pylon, battery and removable cockpit can also be seen here.
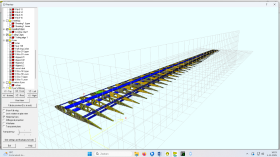
I want to make the frames from 3mm light plywood, with 3x3 pine stringers.
I plan to build the fuselage on a jig, like my other models. First sheet the bottom with 0.6mm plywood, remove the fuselage from the building jig and then sheet the top.
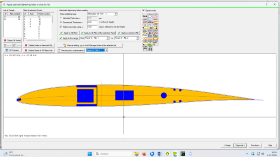
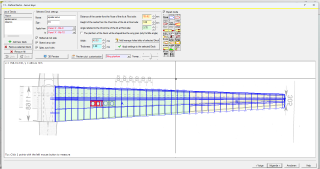
I was enjoying myself and decided to draw the wing as well, using Devwing.
For the airfoil I wanted to choose HQ 2.0-9 at the root to the aileron, then tapering to HQ1.0-1 towards the tip, in the hope of avoiding tip stall.
It would be nice if I could get a model that flies well in thermal, it is all flat over here, no slopes.
Since I was sitting at the computer anyway, I used Ecalc to calculate the main spar, 2 mm x 20 mm spruce upper and lower, which would give it a strength to withstand 14G.
I was also able to calculate the wing connector and opted for a rectangular tube that fits nicely into the spar, 12 mm high x 15 mm wide. Made of UD glass with epoxy, it should be able to handle 20G, which will not fail, I presume.
To be continued,
Vincent (DB) |
|
| Revenir en haut de page |
|
 |
VincentB
Serial Posteur


Inscrit le: 23 Jan 2006

Localisation: Hérault
Âge: 62

|
| Posté le: 05/11/2025 16:51 Sujet du message: |
|
|
|
Salut Vincent
On va prendre du plaisir à suivre ta construction ![[bave]](images/smiles/bave.gif) merci de nous la partager merci de nous la partager ![[good]](images/smiles/good.gif) ![[scie]](images/smiles/scie.gif)

Retroplane et modélisme en pause, vanlife à haute dose. |
|
| Revenir en haut de page |
|
|
sebastian92
Serial Posteur

Inscrit le: 01 Sep 2015
Localisation: Hauts de seine
Âge: 62
|
| Posté le: 05/11/2025 17:38 Sujet du message: |
|
|
|
Vincent D. l'infatigable 
You said : "I enjoy building" : I'm not going to tell you otherwise 
ça a l'air vraiment génial ces logiciels devfus & devwing !
Un jour il faudra que je regarde si c'est compatible pour un Mac
Nice to follow your new building !
Seb
Pourvu que ça vole, roule, flotte ! normalement j'ai tout bien fait pour
Un bel avion est un avion qui vole bien ! Marcel Dassault
Sebastian
Vends module émission 2.4 ghz pour Futaba, Hitec TZ-FM + 2 récepteurs corona 8 voies (contact en MP)
|
|
| Revenir en haut de page |
|
|
bocorvin
Maniaco Posteur
Inscrit le: 17 Aoû 2015
Localisation: Hillegom
Âge: 79
|
| Posté le: 05/11/2025 21:21 Sujet du message: |
|
|
|
Vincent et Sebastian,
Merci pour votre reaction aimable  (nice words) (nice words)
Vincent (DB) |
|
| Revenir en haut de page |
|
|
bocorvin
Maniaco Posteur
Inscrit le: 17 Aoû 2015
Localisation: Hillegom
Âge: 79
|
| Posté le: 03/12/2025 15:13 Sujet du message: |
|
|
|
Bonjour a tous,
As I planned, I started with the stabilizer and the vertical stabilizer at the same time.
There aren't many drawings of the Hjordis; Buxton left many details that had to be worked out in the workshop, so I can do that too!
I drew the stabilizer in Devwing, making the D-box slightly wider,

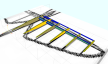
I'll adjust the angled root rib manually.
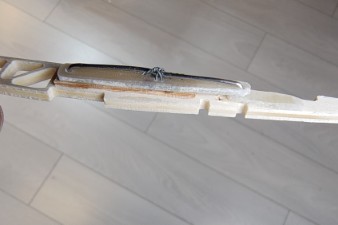
The stabilizer moves entirely on two pins. I still had some thin-walled 3 mm stainless steel tubing, which I'll use as a holder for the two "wing" joiners : the rear one as a pivot point and the front one to adjust the stabilizer.
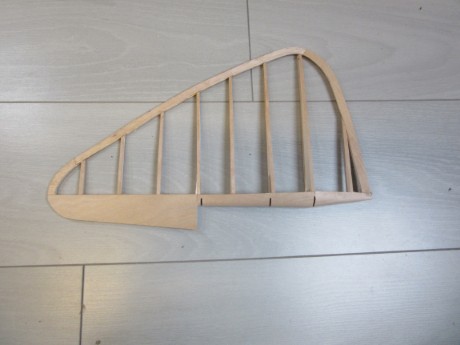
I chose the HQ-10 symmetrical profile, and Adri milled beautiful balsa ribs
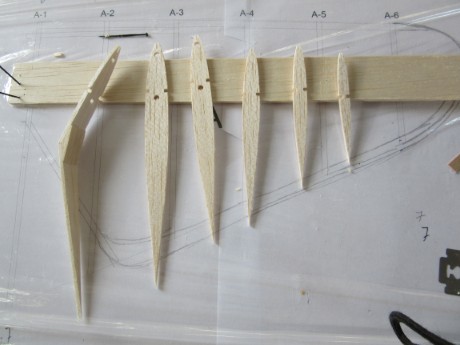
I immediately applied Maarten's tip for the LE (from the Dutch forum). The TE is constructed of 0.6 mm plywood top and bottom, with a 1 mm spruce strip between them at the front, which is quite sturdy. The ribs are quite fragile, but that's improved after gluing on cap strips. The tips have a balsa core, then covered with plywood. I can sand without any worries, because this plane is painted, not clear-coated.
The stabilizer still needs some finishing, but I'm going to make the vertical stabilizer first.
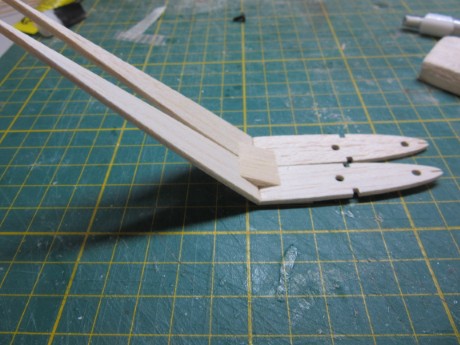
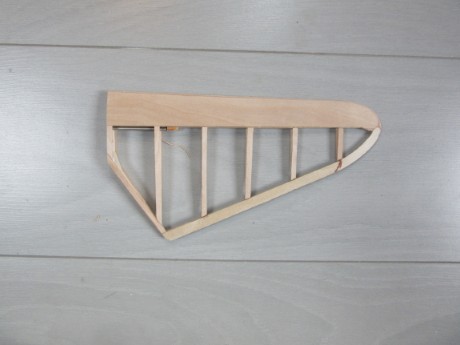
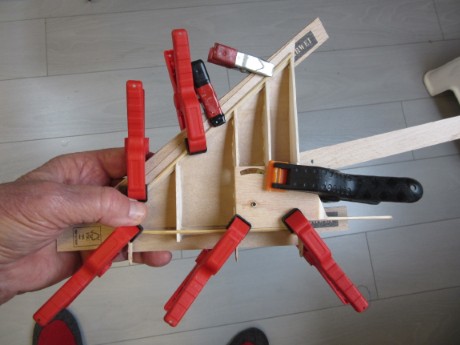
The vertical stabilizer consists of a small fin that extends under the fuselage into the tailskid. The top section houses the mounting and controls for the stabilizer.
I tried to draw it in Devwing

I adjusted the thickness of the HQ symmetrical profile so it could be properly positioned in the tailboom.
I also drew only the 1mm holes for the continuous hinge pin in the ribs, not the semicircle that should be used for a round leading edge. This resulted in too many loose parts, and I couldn't find anything in the program to solve that.
I made the base on a modified building board.
I made the tip and D-box of the rudder in the same way as I did for the stabilizer.
Then I glued 1.0mm plywood reinforcement plates to the ribs to form the hinges.
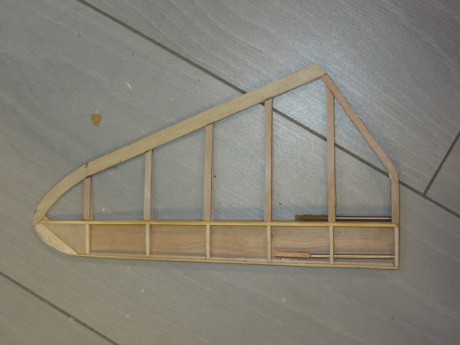
Now I could cut the rudder loose and make the round the nose. I bent plywood around a round pipe with boiling water to make the it. I first glued that to one side with cyano
and once that was hard, the other side.
I did the very tapered bottom part separately with
Then I cut slots for the hinges and fittings.
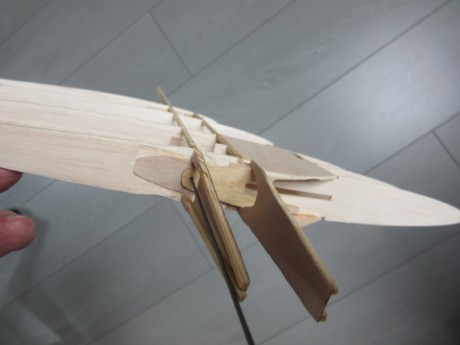
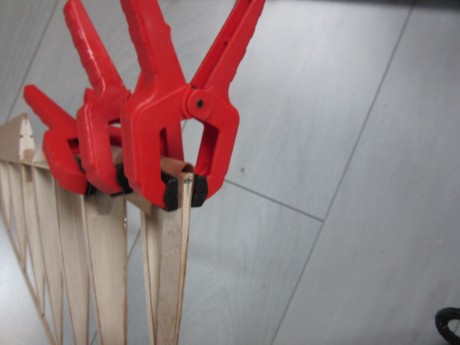
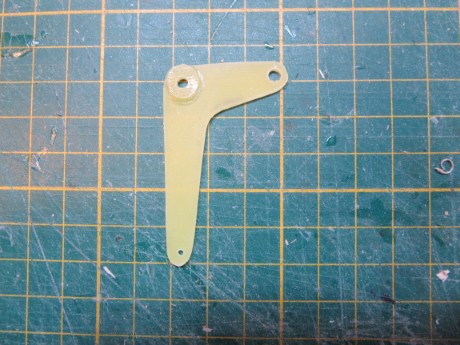
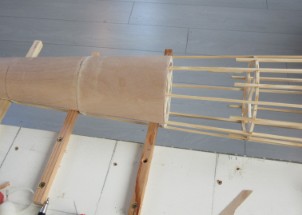
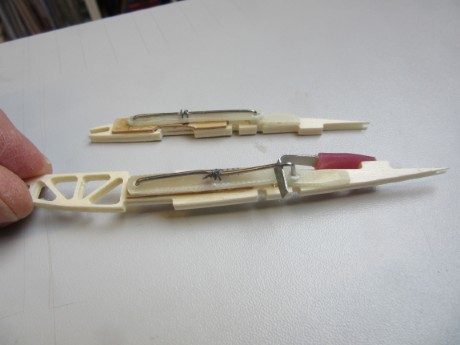
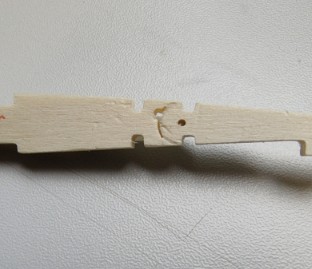
Before I sheeted the fin, I made the elevator lever. I sawed it from 1.5mm epoxy sheet, but unfortunately, I had to modify it to allow for 10 degrees of up and down travel. Here's a picture of the botched version. I used the thin walled 3mm stainless steel tube as a hinge for the lever.
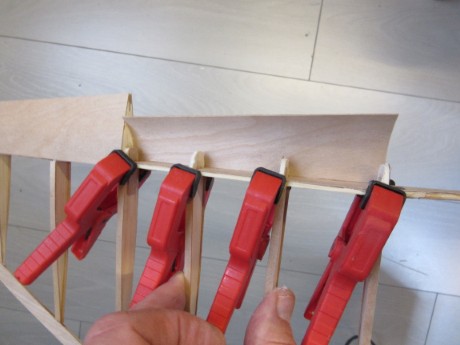
Now I could cover it, using lots of clamps.
The tail surfaces completed
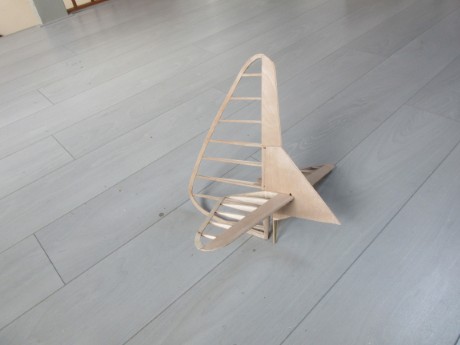
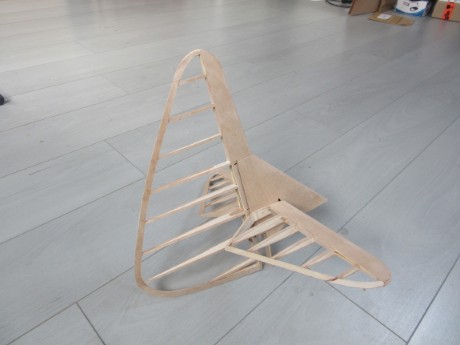
This whole thing weighs 115 grams
Vincent (DB) |
|
| Revenir en haut de page |
|
|
sebastian92
Serial Posteur
Inscrit le: 01 Sep 2015
Localisation: Hauts de seine
Âge: 62
|
| Posté le: 03/12/2025 17:33 Sujet du message: |
|
|
|
ah super Vincent !
tu as commencé ta construction, ça fait plaisir de voir de nouveaux projet à l'uvre
à suivre avec plaisir
Pourvu que ça vole, roule, flotte ! normalement j'ai tout bien fait pour
Un bel avion est un avion qui vole bien ! Marcel Dassault
Sebastian
Vends module émission 2.4 ghz pour Futaba, Hitec TZ-FM + 2 récepteurs corona 8 voies (contact en MP)
|
|
| Revenir en haut de page |
|
|
bocorvin
Maniaco Posteur
Inscrit le: 17 Aoû 2015
Localisation: Hillegom
Âge: 79
|
| Posté le: 04/12/2025 00:04 Sujet du message: |
|
|
|
Merci Sebastian pour ton comments.
Et oui, j' aime la forme des empanages aussi!
Vincent (DB) |
|
| Revenir en haut de page |
|
|
bocorvin
Maniaco Posteur
Inscrit le: 17 Aoû 2015
Localisation: Hillegom
Âge: 79
|
| Posté le: 14/12/2025 13:27 Sujet du message: |
|
|
|
Bonjour a tous,
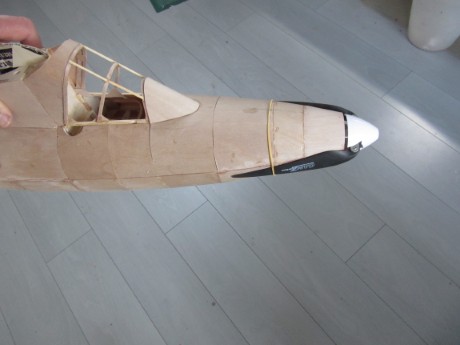
I went on with the fuselage
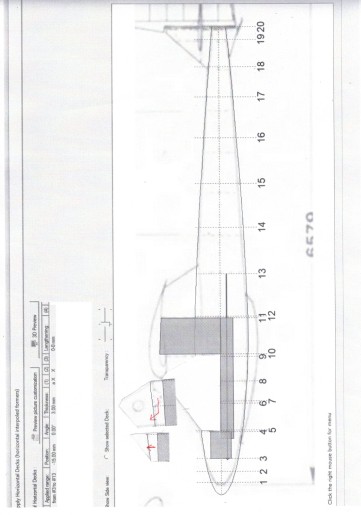
I drew the fuselage (some time ago already) using Devfus. I have already drawn a few fuselages with this programme, but this one was a bit different because of the pylon for the wing.
Back to the information about the original. In the drawings I could find, the Hjordis has a fairly blunt nose, but in the photos it looks much more pointed.

So when drawing it, I made it a little more pointed
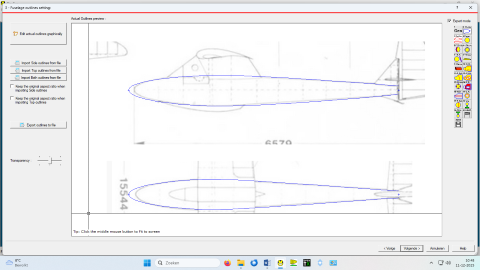
It looks nice and sleek
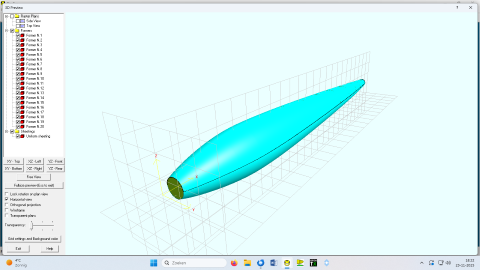
The slightly more pointed nose also made it easier to install an engine, an outrunner with an extended neck (Hacker A30-8XL-LN). With a Z spinner, I hope the propeller blades will fit nicely.
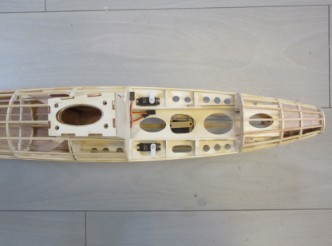
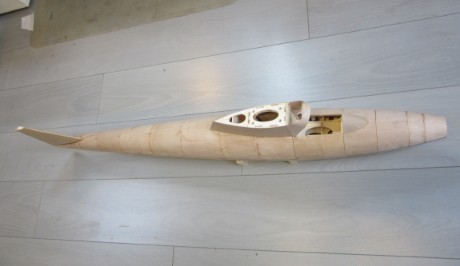
The cockpit of the Hjordis is very small, so I had to make a larger aperture. I drew the top of the battery box on the centre line and made the upper half of the fuselage removable. This had to be done in two pieces, as there was no other option due to the pylon. The front piece can then be removed straight upwards and the rear piece first forwards and then upwards. The motor can then be slid in through the battery box.
To be on the safe side, I drew two more boxes in the removable pieces to make them sturdy.
[133 420-001
Adri did some nice CNC work in poplar ply (obtained thanks to a very nice fellow modeller).

I cut the frames in half to make the top removable and temporarily glued them together with pieces of scrap wood.
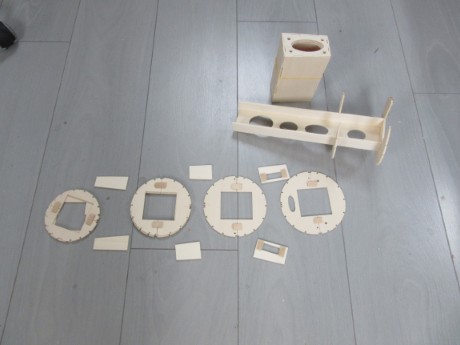
In the pylon, I thickened the plywood and inserted four insert nuts, to which the wing centre section will be attached with (nylon?) shear bolts.
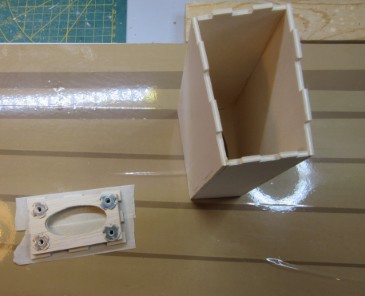
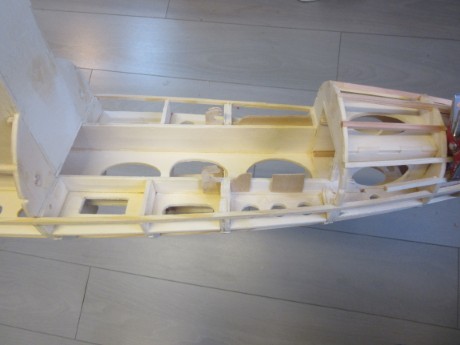
Because the battery box also rests on the centerline, I was able to assemble it separately from the building frame. That went very smoothly, as did the holes for the servos and a small board under the battery box for the decoupling servo, so it must be able to be towed.
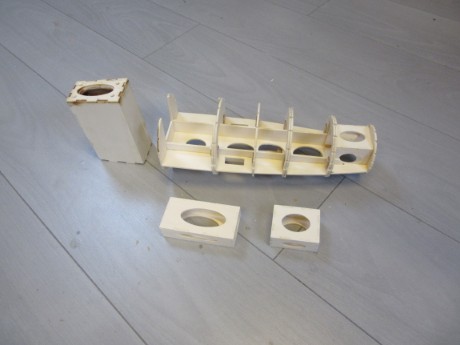
I had already made the building frame, a sturdy board with 10X10mm slats at right angles and at frame spacing.
I am leaving out the boxes for the removable fuselage halves for now, so that the whole thing fits on the slats of the building board.
I put in some stringers to see if everything fits, which fortunately was the case.
Vincent (DB) |
|
| Revenir en haut de page |
|
|
sebastian92
Serial Posteur
Inscrit le: 01 Sep 2015
Localisation: Hauts de seine
Âge: 62
|
| Posté le: 14/12/2025 14:04 Sujet du message: |
|
|
|
Hi Vincent,
wonderfull building !!
What a so facility to draw all the elements with those logiciels
It d'ont turn on MAC
my next computer will be a PC, absolutely !
I could charged it on the PC of my wife
but it is full of cracked
Wait and see for me in the future
To be continue like this your building with lot of pictures and details
Pourvu que ça vole, roule, flotte ! normalement j'ai tout bien fait pour
Un bel avion est un avion qui vole bien ! Marcel Dassault
Sebastian
Vends module émission 2.4 ghz pour Futaba, Hitec TZ-FM + 2 récepteurs corona 8 voies (contact en MP)
|
|
| Revenir en haut de page |
|
|
bocorvin
Maniaco Posteur
Inscrit le: 17 Aoû 2015
Localisation: Hillegom
Âge: 79
|
| Posté le: 14/12/2025 17:55 Sujet du message: |
|
|
|
Hi Sebastian,
Thanks and yes it is nice software, it took me some time to work with it
Cheers,
Vincent (DB) |
|
| Revenir en haut de page |
|
|
bocorvin
Maniaco Posteur
Inscrit le: 17 Aoû 2015
Localisation: Hillegom
Âge: 79
|
| Posté le: 20/12/2025 14:58 Sujet du message: |
|
|
|
Bonjour a tous,
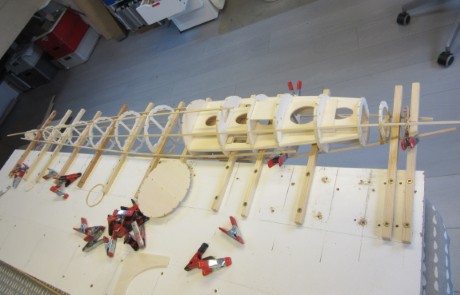
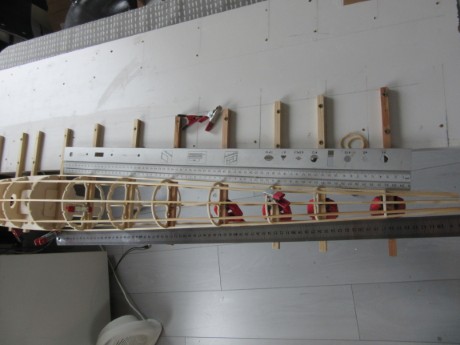
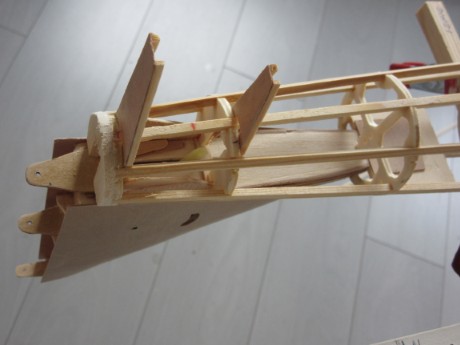
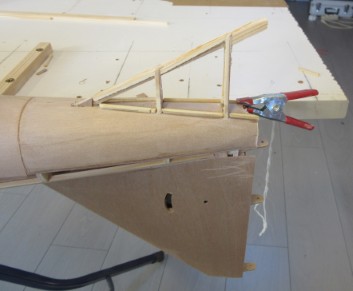
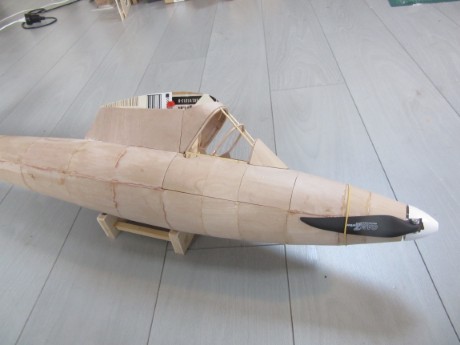
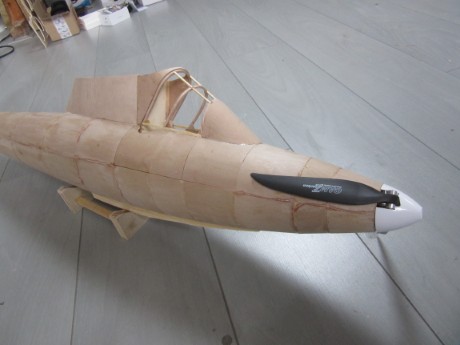
I went on with the fuselage, the two stringers on sides are on the construction level so on the 10 x 10 mm slats. With these stringers in place and the center of the formers on the centerline, I can secure the formers with clamps. I can check the outside nicely
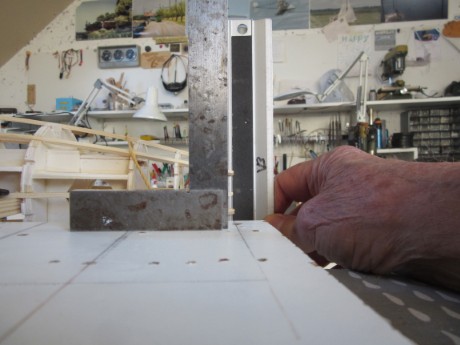
I had to leave out the two front 10 x10 due to lack of space, but with a engeneer square on the building board I could straighten them out nicely
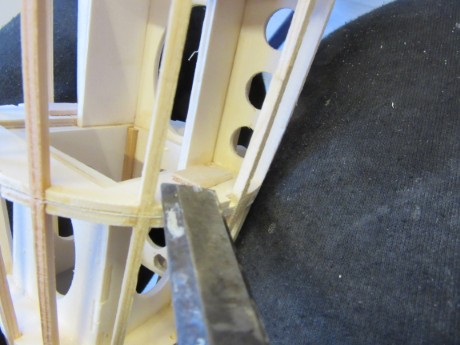
Next the cut-through formers, with a chisel I removed the temporary battens, and then I was able to detach the detachable fuselage pieces.
.
Of course they were still glued here and there. Some minor damage on a former
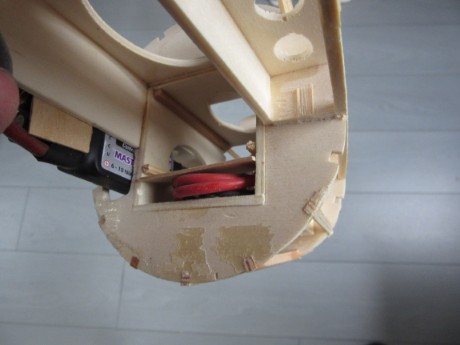
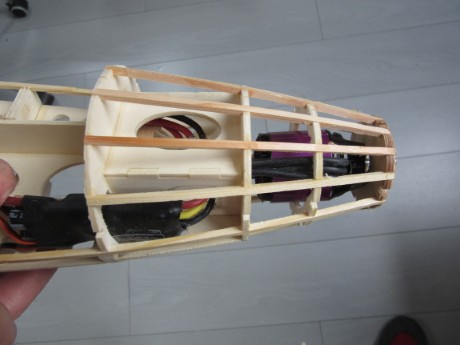
The motor fitted nicely, the leads and the controller were a puzzle. I could just put the controller on the side, I want to keep the battery box free, so that I can get the cg right with the battery. Of course everything has to remain detachable
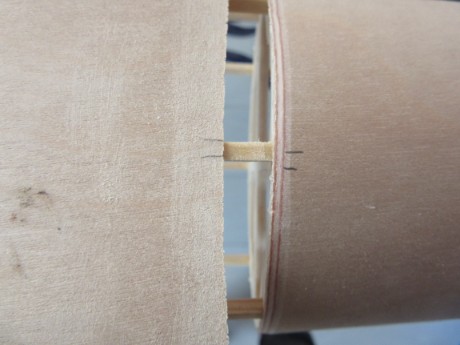
I made two dowel pins and lugs for the back part of the detacheble fuselage piece

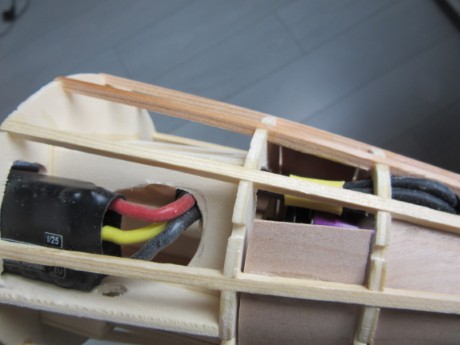
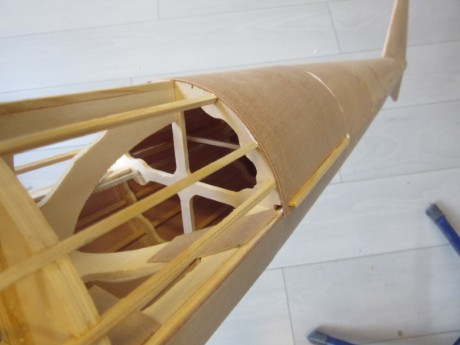
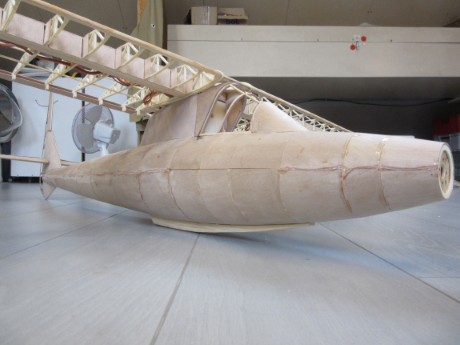
To make the nose firm, I also glued 0.6mm plywood on the inside. That will then form a nice sturdy construction with the plywood on the outside.
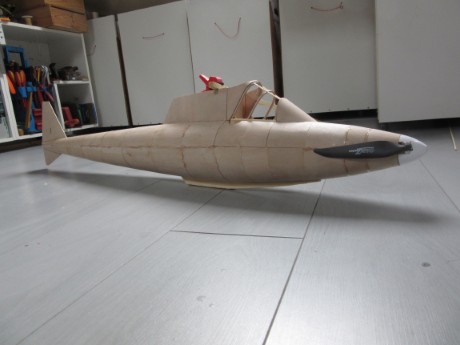
With the necessary fidgeting I was able to glue the fin and trusses for the skeg in the tail.
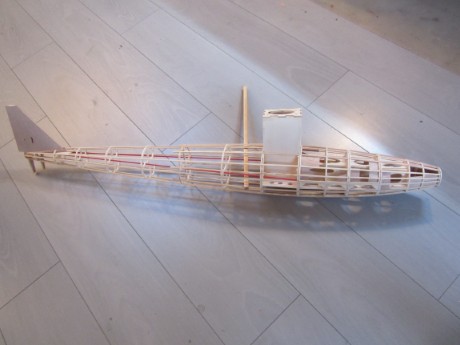
The fuselage is now making good progress and weighs about 400 gr. It still looks like a submarine...
Vincent (DB) |
|
| Revenir en haut de page |
|
|
ThomasF
Psycho Posteur


Inscrit le: 16 Jan 2010

Âge: 67

|
| Posté le: 20/12/2025 17:10 Sujet du message: |
|
|
|
Hallo Vinc,
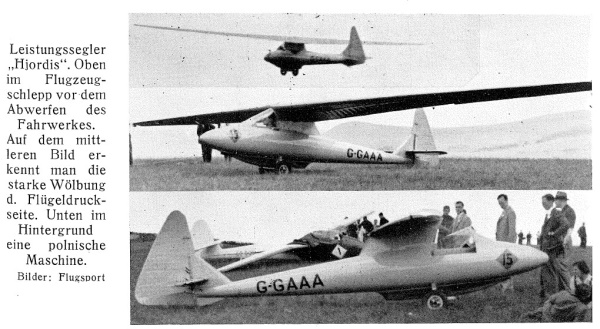
ich habe einige Bilder gefunden:
Gruß
Thomas |
|
| Revenir en haut de page |
|
|
bocorvin
Maniaco Posteur
Inscrit le: 17 Aoû 2015
Localisation: Hillegom
Âge: 79
|
| Posté le: 20/12/2025 18:04 Sujet du message: |
|
|
|
Danke Thomas,
Ich bin erstaunt . Schone bilder, da kann Ich doch die Cockpit Haube gut machen! ![[clap]](images/smiles/Clap.gif)
Vincent (DB) |
|
| Revenir en haut de page |
|
|
ThomasF
Psycho Posteur
Inscrit le: 16 Jan 2010
Âge: 67
|
| Posté le: 20/12/2025 19:28 Sujet du message: |
|
|
|
größer geht nicht

|
|
| Revenir en haut de page |
|
|
sebastian92
Serial Posteur
Inscrit le: 01 Sep 2015
Localisation: Hauts de seine
Âge: 62
|
| Posté le: 20/12/2025 20:45 Sujet du message: |
|
|
|
Quelle chance ! une verrière qui doit être développable à plat facilement sans moulage / master 
Pourvu que ça vole, roule, flotte ! normalement j'ai tout bien fait pour
Un bel avion est un avion qui vole bien ! Marcel Dassault
Sebastian
Vends module émission 2.4 ghz pour Futaba, Hitec TZ-FM + 2 récepteurs corona 8 voies (contact en MP)
|
|
| Revenir en haut de page |
|
|
bocorvin
Maniaco Posteur
Inscrit le: 17 Aoû 2015
Localisation: Hillegom
Âge: 79
|
| Posté le: 20/12/2025 20:45 Sujet du message: |
|
|
|
Danke Thomas
Grusse,
Vincent(DB) |
|
| Revenir en haut de page |
|
|
bocorvin
Maniaco Posteur
Inscrit le: 17 Aoû 2015
Localisation: Hillegom
Âge: 79
|
| Posté le: 20/12/2025 20:47 Sujet du message: |
|
|
|
Oui Sebastian, cést vraiment développable
Amicalemant,
Vincent (DB) |
|
| Revenir en haut de page |
|
|
bocorvin
Maniaco Posteur
Inscrit le: 17 Aoû 2015
Localisation: Hillegom
Âge: 79
|
| Posté le: 30/12/2025 16:49 Sujet du message: |
|
|
|
Hello everyone,
What I always find difficult with building is that one thing has to be done first, and then another, and sometimes that's a puzzle.
To make the skeg, I had to sheet the fuselage, but I also had to make the control rods. With the the control rods, I couldnt replace the fuselage on the building jig
So first the sheeting the bottom, then the skeg and the control cables later.
So first, the skeg, had to take some pieces of the frames away
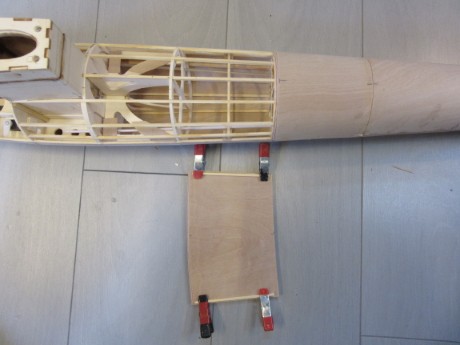
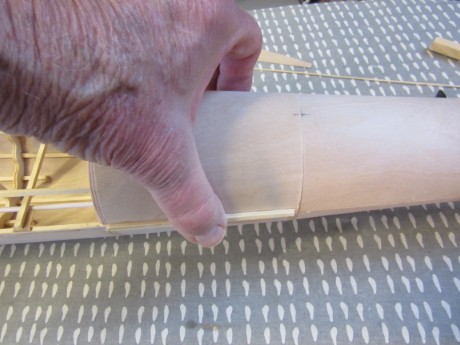
The advantage of building on a horizontal jig is that the fuselage can be put on and taken off. To sheet the tail (the nose is already dimensionally stable due to its internal structure), I slid the fuselage back onto the jig. The fuselage rests stable there, and now I can sheet the bottom. After fitting a piece of 0.6mm plywood to size, I scarfed the edges
The rear end of the tail was quite narrow, I bent the rear pieces under boiling water and let them dry rolled up, put a rubber band around it and let it dry
How far you can bend it; see https://youtu.be/KoZUbuMlBck.
I glued the plywood with PVA and because the fuselage is open at the top I could clamp it to the stringers
Skeg construction
Then the servos were installed and the Bowden control rods aligned checking if everything moved well.
Because the airfoil will be 13% instead of 9% (this will be explained during the construction of the wing), the "neck" had to be shorter; it was actually quite long. It should be 15 mm shorter. I cut the top 30mm off, bevelled both sides, and glued back in with thickened epoxy
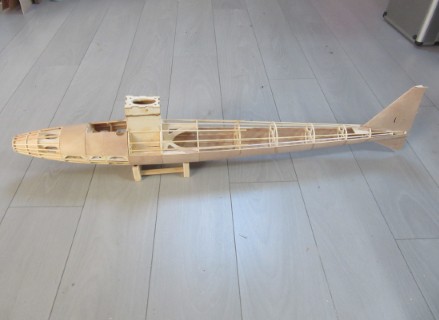
It looks more proportionate this way.
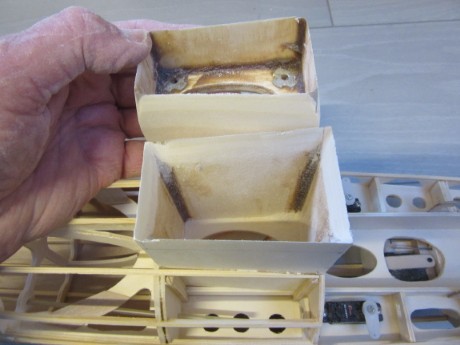
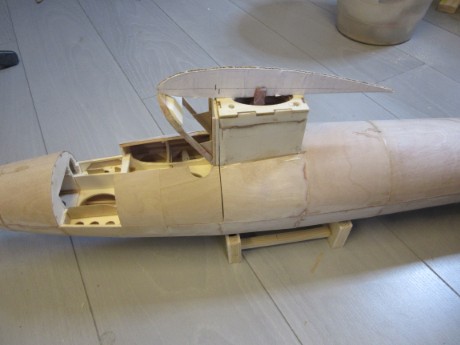
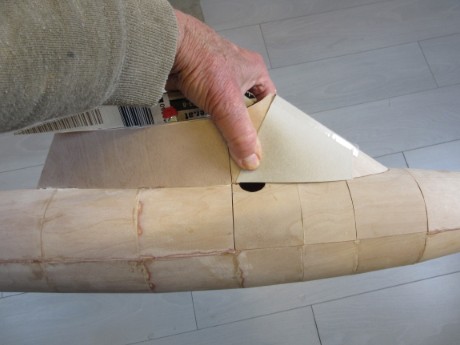
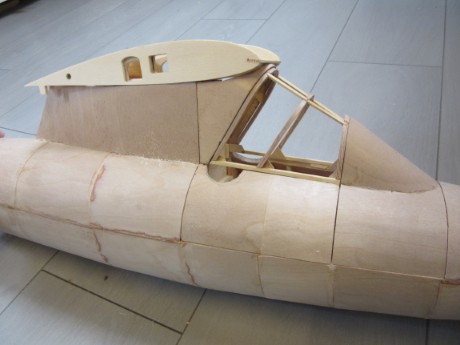
I also sheeted the removable cockpit parts and made the recesses for the pilot's shoulders!
Now I go on sheeting the fuselage with ply.
Vincent (DB) |
|
| Revenir en haut de page |
|
|
sebastian92
Serial Posteur
Inscrit le: 01 Sep 2015
Localisation: Hauts de seine
Âge: 62
|
| Posté le: 30/12/2025 17:51 Sujet du message: |
|
|
|
So good Vincent !
continue like this, the weather is perfect for building
Pourvu que ça vole, roule, flotte ! normalement j'ai tout bien fait pour
Un bel avion est un avion qui vole bien ! Marcel Dassault
Sebastian
Vends module émission 2.4 ghz pour Futaba, Hitec TZ-FM + 2 récepteurs corona 8 voies (contact en MP)
|
|
| Revenir en haut de page |
|
|
bocorvin
Maniaco Posteur
Inscrit le: 17 Aoû 2015
Localisation: Hillegom
Âge: 79
|
| Posté le: 31/12/2025 10:45 Sujet du message: |
|
|
|
Hello Sebastian,
You are right about the weather! .
I surely go on building, I guess you do the same!
Vincent (DB) |
|
| Revenir en haut de page |
|
|
bocorvin
Maniaco Posteur
Inscrit le: 17 Aoû 2015
Localisation: Hillegom
Âge: 79
|
| Posté le: 09/01/2026 12:49 Sujet du message: |
|
|
|
Bonjour a tous,
Now I had to sheet the upper half. I found that quite difficult, especially applying pressure on the glue. Finally, with a few drops of cyano, I glued 3 X 3 slats onto a prepared panel
I spread PVA on the stringers and frames, except for the horizontal stringer where the bottom panel was already glued to. There I put cyano on the edge of the panel. This way I could press it nicely in place
until the cyano was set. It then looks like this
I cut off the slats later. I did the entire fuselage in the same way.
Unfortunately, I couldn't get it super smooth, that had to be sanded, I wasn't very happy with that. Fortunately, all the wood is painted, not clear varnished, that gives me a lot more freedom, but still....
Fortunately, it does feel light.
Then back to the neck and cockpit. The Hjordis drawings are actually sketches. By the way, a lot of details were solved in the workshop of Slingsby.
The full-size wing was much thicker than the one on the model. Fortunately, the profile was chosen (see Merijn's post). After some initial thinking, I managed to sketch the cockpit and the wing neck. Finally, I based my work on the angle of the front of the cockpit, which I felt was crucial for the appearance.
Then it turned out the neck was still too long; I still needed to trim off another 15mm, grumble. Cut it off, scarfed and glued it with thickened epoxy. The angle of the wing to the centerline, is 9 degrees, which seemed like a good compromise to me.
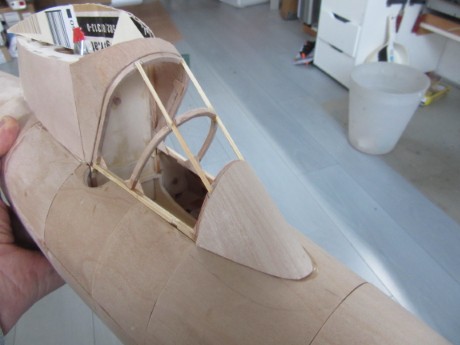
Now I could create the transition from the cockpit canopy to the fuselage and the wing with a laminated spar (which will be discussed later).
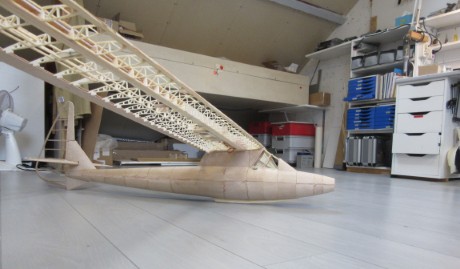
This finished, I also could make the fairing around the neck.
An extra frame some and slats for the streamling of the neck.

This is how it looks now.
A try out with a piece of cardboard instead of the "glass" to check if all is aligned.
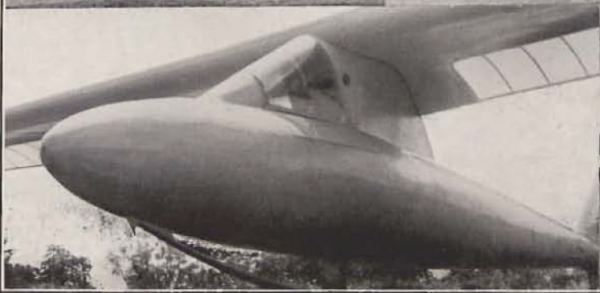
The streamlining was unusual for its time!
The fuselage now weighs 625 grams, excluding the three servos.
Vincent (DB) |
|
| Revenir en haut de page |
|
|
sebastian92
Serial Posteur
Inscrit le: 01 Sep 2015
Localisation: Hauts de seine
Âge: 62
|
| Posté le: 09/01/2026 13:33 Sujet du message: |
|
|
|
Hi Vincent,
You're making great progress !
Handling cyanoacrylate without latex gloves... care your fingers
I've never tried it... but the technique of reactivating white glue with an iron seems obvious to those who have practised it.
Looking forward to seeing your progress !
Pourvu que ça vole, roule, flotte ! normalement j'ai tout bien fait pour
Un bel avion est un avion qui vole bien ! Marcel Dassault
Sebastian
Vends module émission 2.4 ghz pour Futaba, Hitec TZ-FM + 2 récepteurs corona 8 voies (contact en MP)
|
|
| Revenir en haut de page |
|
|
bocorvin
Maniaco Posteur
Inscrit le: 17 Aoû 2015
Localisation: Hillegom
Âge: 79
|
| Posté le: 09/01/2026 15:35 Sujet du message: |
|
|
|
Hello Sebastian,
Yes I tried the "PVA ironing" method on my King Kite, it works well (with thin ply). But I guess I was in the cyano glueing mood
It surely was a remarkable glider !
Vincent (DB) |
|
| Revenir en haut de page |
|
|
bocorvin
Maniaco Posteur
Inscrit le: 17 Aoû 2015
Localisation: Hillegom
Âge: 79
|
| Posté le: 27/01/2026 15:37 Sujet du message: |
|
|
|
Bonjour a tous,
The cockpit, or rather the canopy, is the face of the model. Unfortunately, I overlooked something while taking the measurements. I had already rebuilt the canopy frame twice, but it still wasn't quite right. The problem was that the canopy is slightly tapered, and there are no actual drawings of it. It was also a bit too short, and I had also lengthened the nose a bit, and I didn't like the result. It would be better to remake it, and that's what I'm going to do.
I took another good look at the photos and discovered that the cockpit opening was rectangular and not tapered (I had blindly used the existing stringers, which turned out to be incorrect).
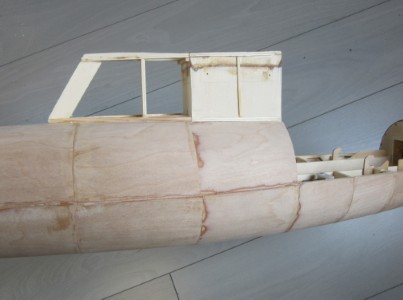
I adjusted the opening, and now the pointed streamlined body became larger and more forward, which also made the nose a bit shorter.
The "shoulder holes" also needed to be a bit larger.
A makeshift engine shaft was used to see if the spinner would fit.
Old;
New;
And the real thing;

Glad I changed it.
Now I going to start with the wings
Vincent (DB) |
|
| Revenir en haut de page |
|
|
sebastian92
Serial Posteur
Inscrit le: 01 Sep 2015
Localisation: Hauts de seine
Âge: 62
|
| Posté le: 28/01/2026 14:24 Sujet du message: |
|
|
|
Hello Vincent, always in the details and practice of building ! to continue with pleasure
Pourvu que ça vole, roule, flotte ! normalement j'ai tout bien fait pour
Un bel avion est un avion qui vole bien ! Marcel Dassault
Sebastian
Vends module émission 2.4 ghz pour Futaba, Hitec TZ-FM + 2 récepteurs corona 8 voies (contact en MP)
|
|
| Revenir en haut de page |
|
|
bocorvin
Maniaco Posteur
Inscrit le: 17 Aoû 2015
Localisation: Hillegom
Âge: 79
|
| Posté le: 28/01/2026 15:45 Sujet du message: |
|
|
|
Thanks Sebastian
You put the finger on the spot, practical enginering, I like that.
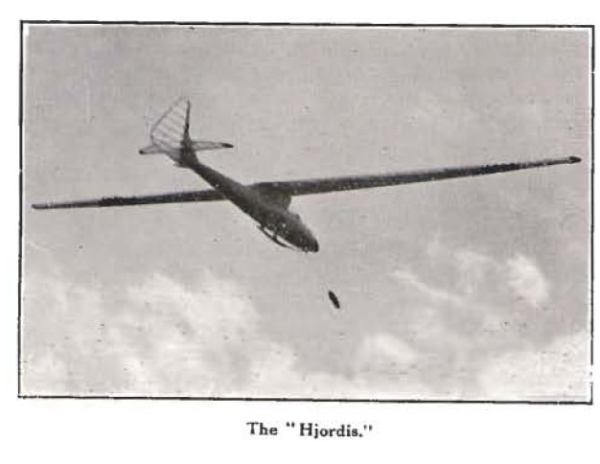
A wonderful story about the Hjordis, it was written in the Sailplane and Glider.
Thomas provided me the scans of this magazine and I found this;

In te middle of the page he writes that he preferred a steering wheel instead of a stick, to prevent a broken leg when his wing broke of (when flying in clouds) and the cable of the aileron actuation (still attached to the ripped off wing) would ram the steering stick in his his leg and prevent him bailing out.!
Opinions change!
Amicalement Vincent (DB) |
|
| Revenir en haut de page |
|
|
bocorvin
Maniaco Posteur
Inscrit le: 17 Aoû 2015
Localisation: Hillegom
Âge: 79
|
| Posté le: 01/02/2026 18:08 Sujet du message: |
|
|
|
Bonjour a tous,
Now that the fuselage is more or less finished, I want to build the wing. The choice of profile has already been posted extensively on the Dutch MBF, thanks again for all the info! Finally, I used the profiles that Merijn sent me. The tips have also been widened, from 60 to 90mm and I have also adjusted the ailerons. I put that in Devwing.
Root and end rib.
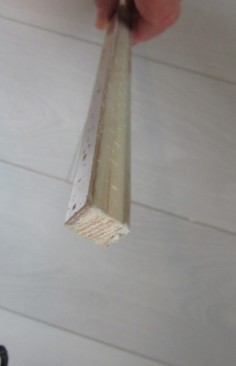
The LE is spruce 2 X 10 later supplemented with 3 x 3 top and bottom, and then planed of course.
I had already made the wing joiner.
I have good experience with a UD glass/epoxy rectangular tube with balsa filling as a wing connector. Built up with UD fabric and loose glass rovings in a template of 2 alu profiles. Size 17mm x 13mm, 500mm long and it weighs 86gr. Not so difficult to make, light and strong..
I calculated it with Calculelongeron to withstand 30G.
Adri milled a beautiful set of ribs from pappel plywood. It turned out that I had chosen the lighting holes very large, on the screen it looked a bit more "filled". Fortunately, they feel quite sturdy, sturdier than 2.5mm balsa, so I could start building.
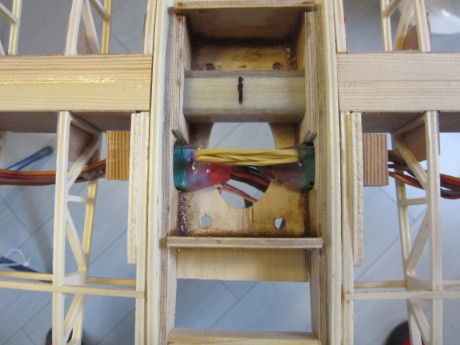
First the centre section 60mm wide, two ribs connected with some sturdy 3.5mm plywood .
The 4 holes are for M4 nylon bolts (as shear bolts) wil screw in the neck of the fuselage
The brown material in the corners is epoxy with wood dust as fillets.. This technique is used a lot in ply sailboats (real), not so beautiful, but very functional.
Preparation of the wing; Because the wing has a fixed tip, the ailerons are enclosed. I made hinges so that the ailerons remain detachable, just like I did on my KIng Kite
On the photo the front rib is unlocked, the rear is clicked in. Here in close up,
I have already partially cut off the ailerons from the ribs, except for narrow pieces at the top and bottom, much later in construction I can easily saw that loose. That "big" hole is 1.5mm to put a jigsaw through. I couldn't get this done in Devwing, unfortunately.
Vincent (DB) |
|
| Revenir en haut de page |
|
|
bocorvin
Maniaco Posteur
Inscrit le: 17 Aoû 2015
Localisation: Hillegom
Âge: 79
|
| Posté le: 17/02/2026 13:18 Sujet du message: |
|
|
|
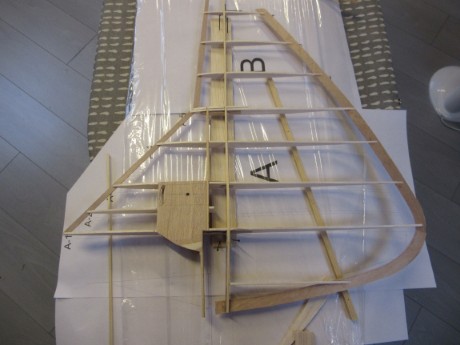
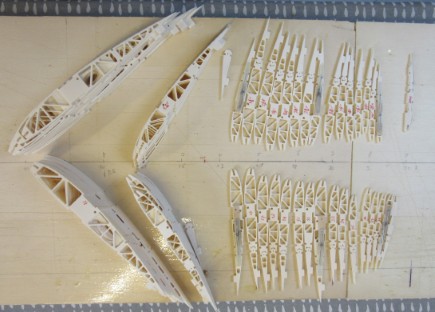
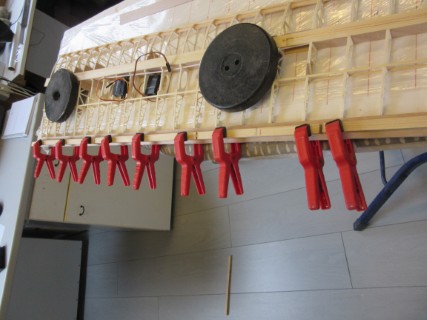
Now I could assemble the wings
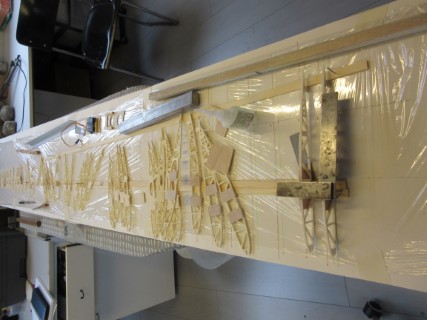
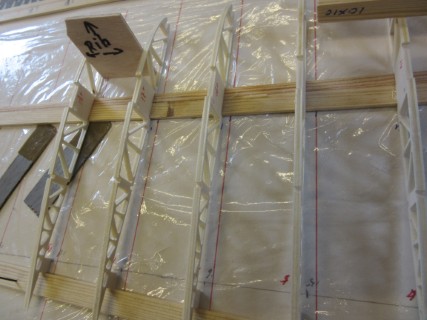

The ribs are vulnerable at this stage. , I have strengthened the ribs at the wing joiner.
The TE is made of 0.6mm plywood at the bottom, beveled with a powerfile (with vacuum cleaner), then also 0.6mm plywood at the top. Later I will fill the TE with epoxy.
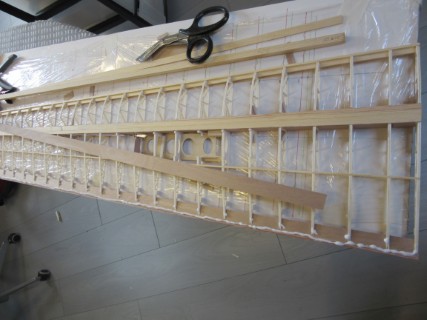
The shape of the tip is a bit unclear, they can only be seen on 1 photo

that's what I'm trying to make. The unfinished wings.
Vincent (DB) |
|
| Revenir en haut de page |
|
|
bocorvin
Maniaco Posteur
Inscrit le: 17 Aoû 2015
Localisation: Hillegom
Âge: 79
|
| Posté le: 23/02/2026 18:17 Sujet du message: |
|
|
|
Bonjour a tous,
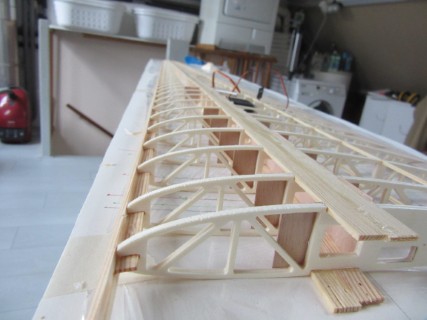
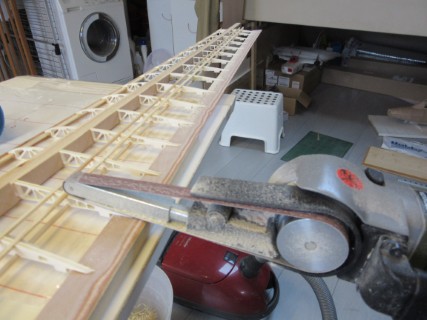
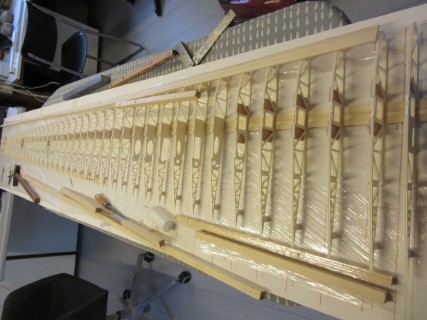
Because there was not enough space for the aileron servo at the location of the aileron, it had to be moved closer to the wing root. I decided to place it under the aperture of the spoiler together with the servo of the spoiler. With some fiddling I could change them without making extra holes in the wing.
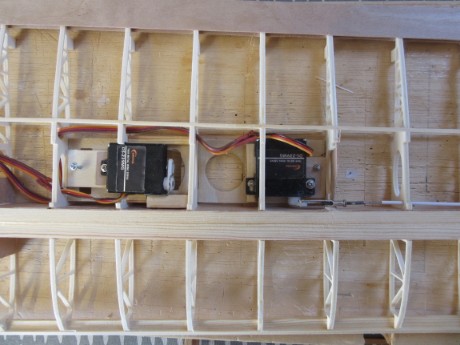
A 0.8mm steel wire goes to a rocker arm (bellcrank) at the aileron control
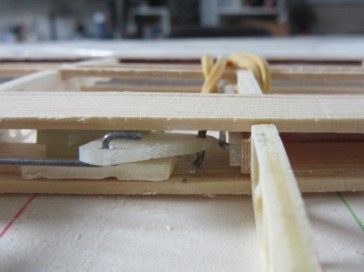
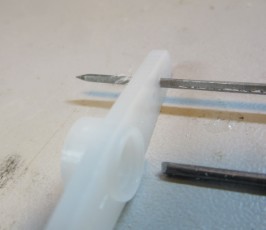
. To get that play-free I drill a 0.5 hole in the epoxy and ream it with a 5-sided reamer until the steel wire just fits., I also do that with the (not visible) 2mm axle (nail). Same tool to fit the 0.8mm fit in the servo arm
The spoiler frame glued in
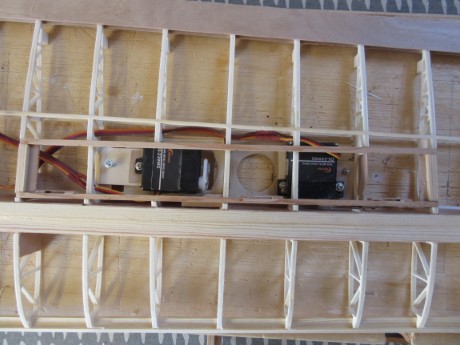
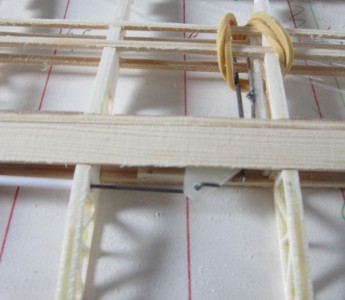
Details of the root rib; the servo connector and hook for the locking elastic band . Because the middle part is detachable, I could fit it without a fuselage
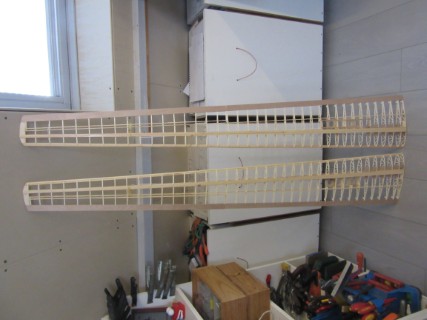
Now I was able to assemble the Hjordis for the first time, unfortunately because of the weather inside.
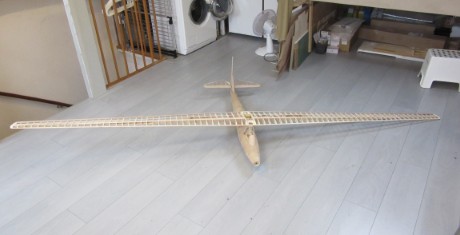
it's starting to look like a sailplane!
Vincent (DB) |
|
| Revenir en haut de page |
|
|
sebastian92
Serial Posteur
Inscrit le: 01 Sep 2015
Localisation: Hauts de seine
Âge: 62
|
| Posté le: 24/02/2026 18:20 Sujet du message: |
|
|
|
Cool ! the shapes are right there !
Next you cover the wings with plyood ? or just with Diacov ?
Continue like this, nice to see someone continuing building on the forum !
it's becoming rare these days

Pourvu que ça vole, roule, flotte ! normalement j'ai tout bien fait pour
Un bel avion est un avion qui vole bien ! Marcel Dassault
Sebastian
Vends module émission 2.4 ghz pour Futaba, Hitec TZ-FM + 2 récepteurs corona 8 voies (contact en MP)
|
|
| Revenir en haut de page |
|
|
|
|
Vous ne pouvez pas poster de nouveaux sujets dans ce forum
Vous ne pouvez pas répondre aux sujets dans ce forum
Vous ne pouvez pas éditer vos messages dans ce forum
Vous ne pouvez pas supprimer vos messages dans ce forum
Vous ne pouvez pas voter dans les sondages de ce forum
Vous ne pouvez pas joindre des fichiers
Vous pouvez télécharger des fichiers
|

Images aléatoires album Retroplane, clic pour Agrandir

|