| Voir le sujet précédent :: Voir le sujet suivant |
| Auteur |
Message |
bocorvin
Maniaco Posteur


Inscrit le: 17 Aoû 2015

Localisation: Hillegom
Âge: 79

|
 Posté le: 07/10/2015 10:49 Sujet du message: Nemere scale 1/6 Posté le: 07/10/2015 10:49 Sujet du message: Nemere scale 1/6 |
  |
|
|
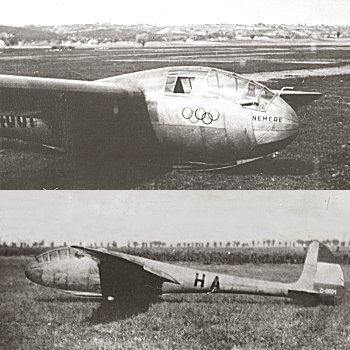
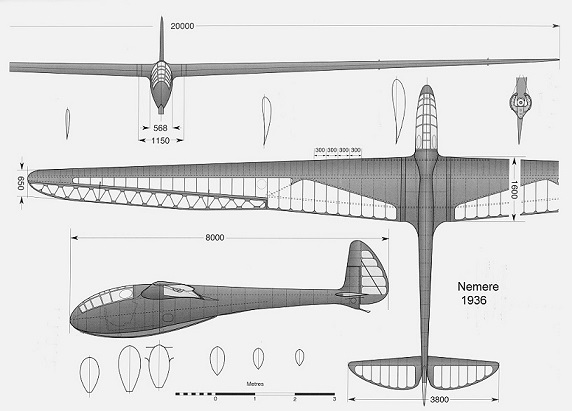
Hello everyone, I am Vincent de Bode from Holland. I can speak and understand French and German, but writing it is difficult for me. English is easier, but it is still a foreign language for me, so excuse my mistakes.
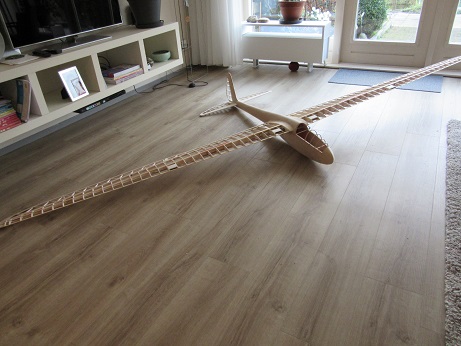
I participated Retroplane this year with a Nemere scale 1/8, wingspan 2.50, built in balsa and coloured to give it a ply look (hopefully). Having seen all those models built in ply, I decided to build a Nemere covered with ply to give a more realistic model. Also I liked to have it bigger, but not too big. I figured out that scale 1/6 gave a wingspan of about 3.30m, which suited me well. Luckily my friend Rob could digitalise the wing and another friend Adrie could cnc the wingribs, which made building much easier. I enlarged the drawing from the Nemere by 33% which gave me (almost) scale 1/6
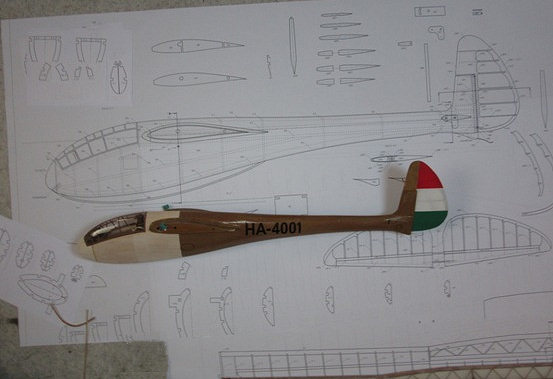
The difference between 1/8 and 1/6 is quite substanciel and the nose of the damaged Nemere still needs a paintjob!
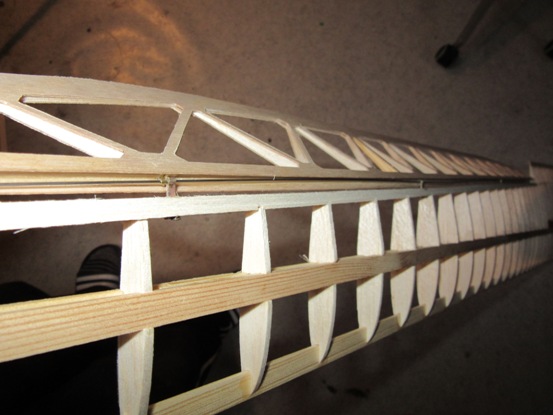
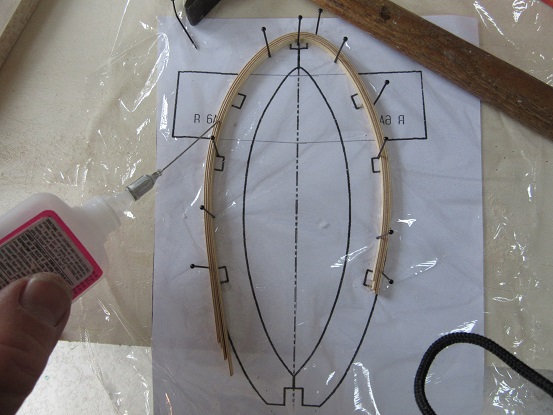
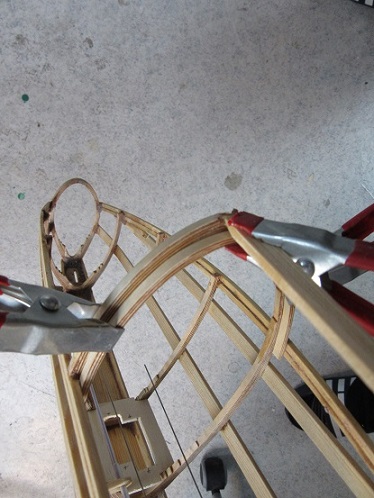
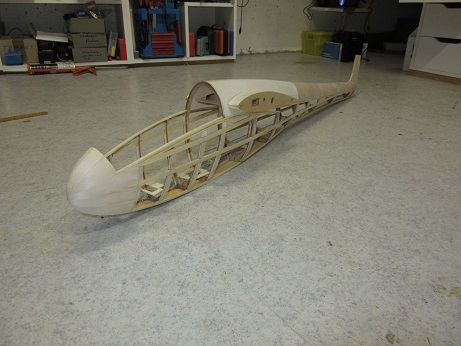
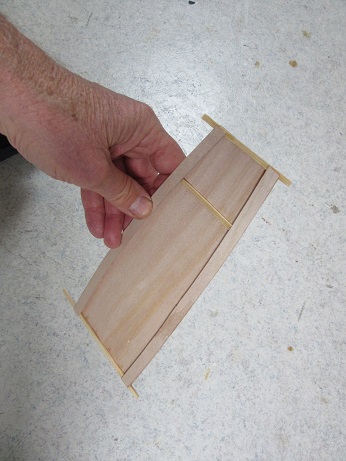
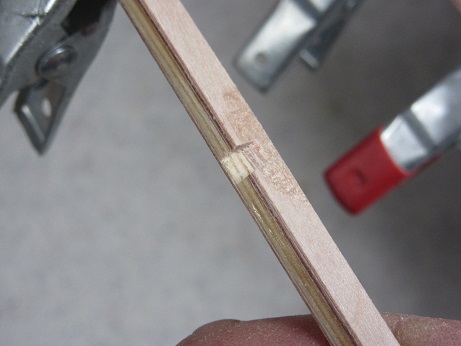
Through reading on the forum I realised that ply could be bent sharply and I decided to make the fuselage frames from laminated ply strips (which I happened to have)
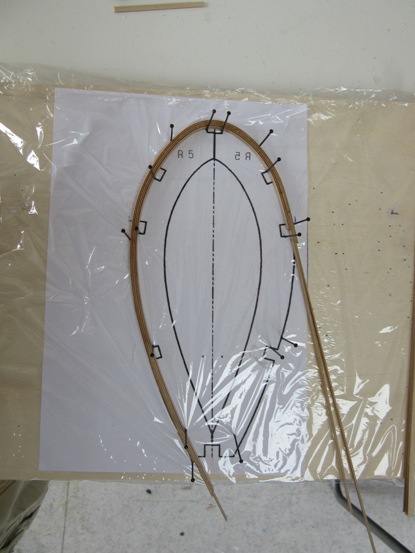
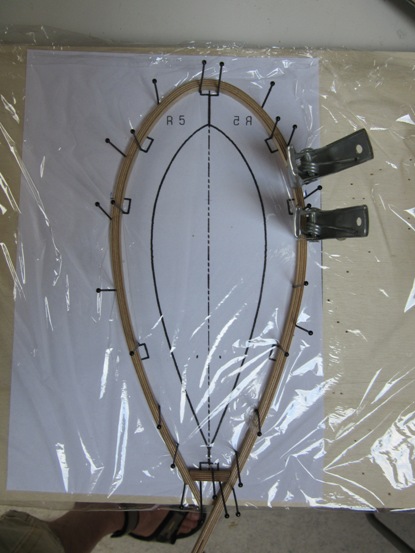
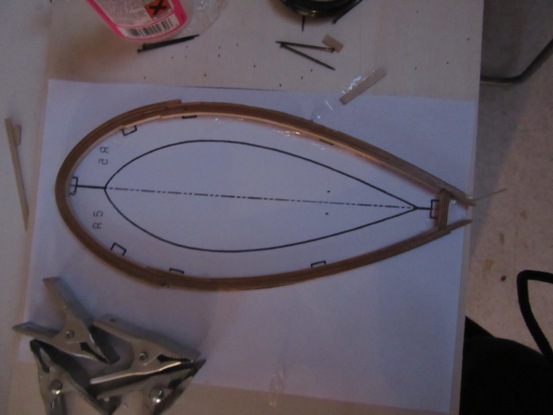
Laminating frames goes very quickly and is quite accurate, can be reinforced where needed.
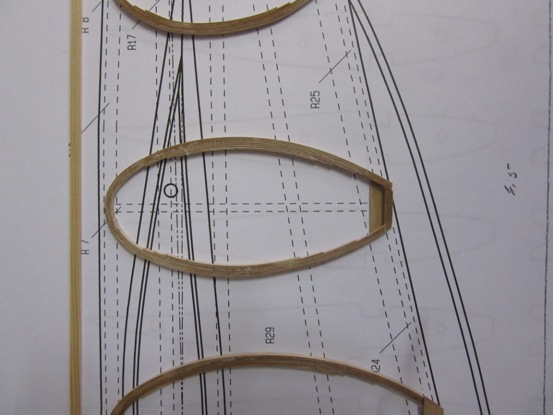
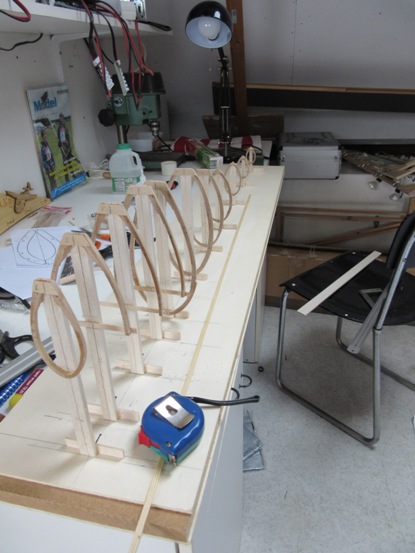
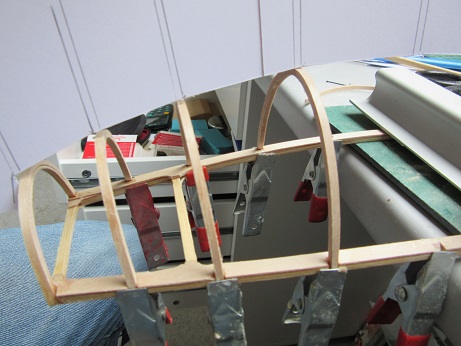
[img]
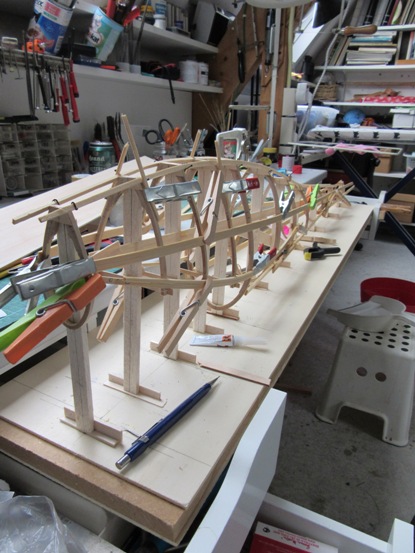
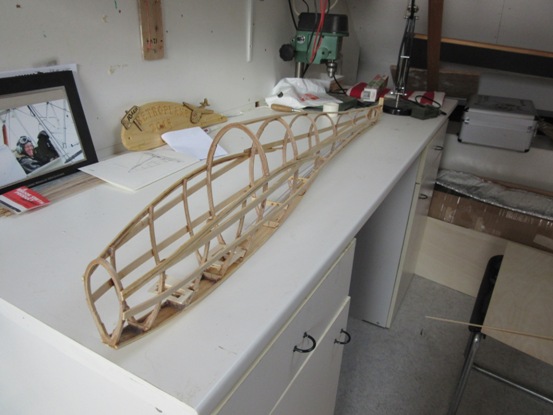
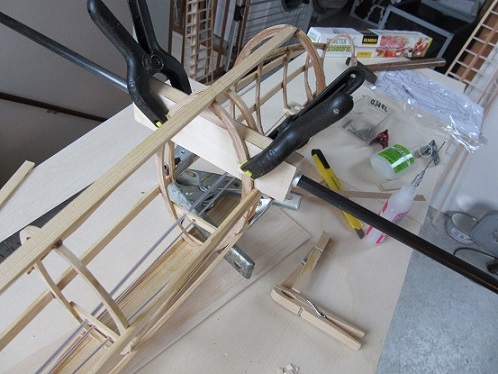
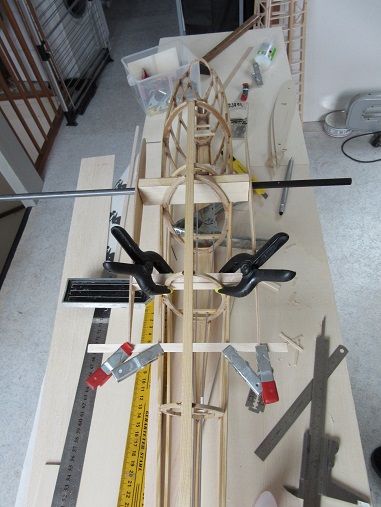
The frames were set up and stringers added and glued with epoxy plus filler. The plan is to have the frames beefed up with balsa and a gusset plate gf 0.6 ply so I can butt joined the ply covering.
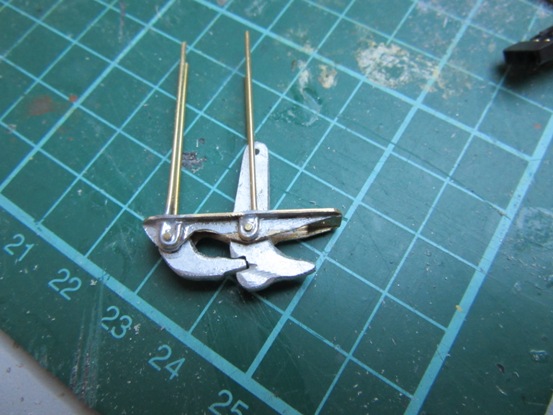
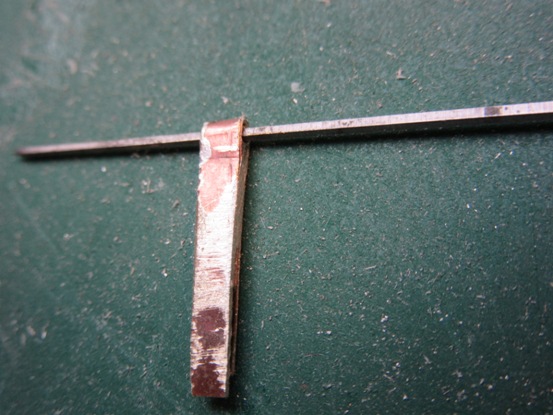
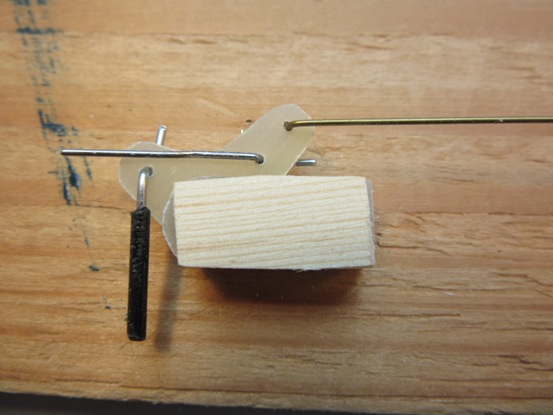
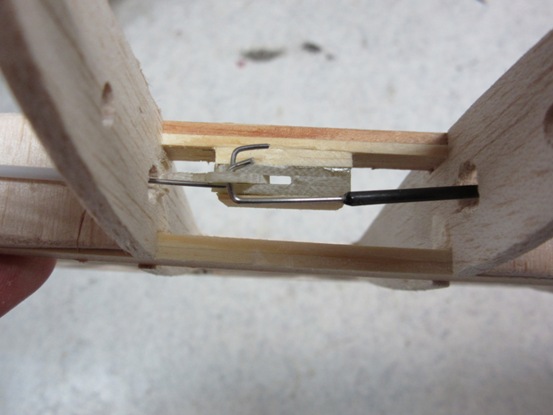
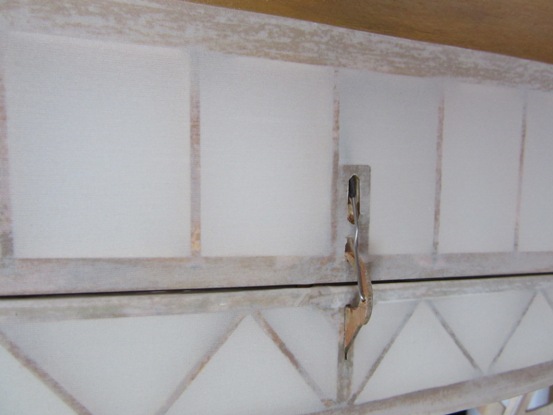
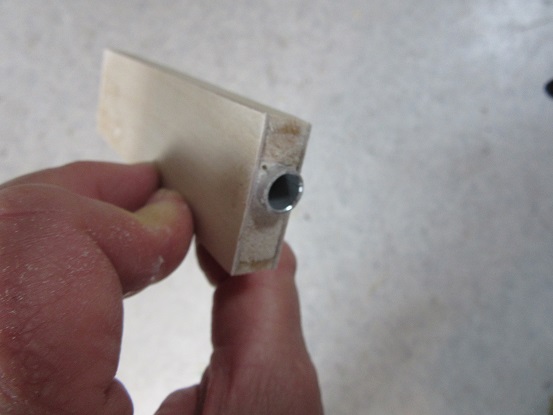
I also made a scale coupling hook from brass strip, 2mm aluminium, 4mm square brass tube and 0.9mm hard brass wire.
In the meantime Adrie cnc'ed the wingribs 
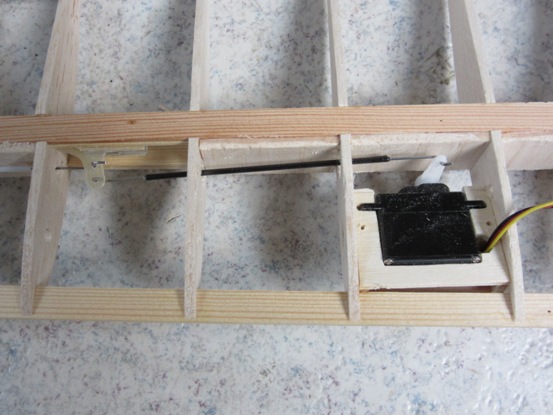
and I added the servo mounts. Next I start to build the wings, my aim is to have it finished before Retroplane 2016 ![[amen]](images/smiles/amen.gif)
|
|
| Revenir en haut de page |
|
 |
VincentB
Serial Posteur


Inscrit le: 23 Jan 2006

Localisation: Hérault
Âge: 62

|
| Posté le: 07/10/2015 11:35 Sujet du message: |
|
|
|
Bonjour Vincent,
On va suivre ta construction avec intérêt ![[good]](images/smiles/good.gif) joli travail de lamellé collé sur les couples, ton crochet est super aussi joli travail de lamellé collé sur les couples, ton crochet est super aussi ![[clap]](images/smiles/Clap.gif)

Retroplane et modélisme en pause, vanlife à haute dose. |
|
| Revenir en haut de page |
|
|
bocorvin
Maniaco Posteur
Inscrit le: 17 Aoû 2015
Localisation: Hillegom
Âge: 79
|
| Posté le: 07/10/2015 12:04 Sujet du message: |
|
|
|
| Merci Vincent! Un ami a construit un bateau de onze mètres avec des couples lamellés, ça marche bien! |
|
| Revenir en haut de page |
|
|
Johannes
Serial Posteur

Inscrit le: 23 Juil 2007

Localisation: Leichlingen
Âge: 66

|
| Posté le: 07/10/2015 13:04 Sujet du message: |
|
|
|
Hallo Vincent,
sehr schön die Bauart mit den schichtverleimten
Spanten,
dadurch sieht der Rumpf sehr schön zierlich aus
Johannes |
|
| Revenir en haut de page |
|
|
Clifton
Psycho Posteur


Inscrit le: 07 Mai 2014
Localisation: Anjou
Âge: 63

|
| Posté le: 07/10/2015 23:28 Sujet du message: |
|
|
|
![[good2]](images/smiles/good2.gif) Very nice job for a beautiful sailplane. I'll followed your job with a lot of interest. Very nice job for a beautiful sailplane. I'll followed your job with a lot of interest.
Slingsby Petrel, à mon gout le plus beau de tous, quoi que le Fafnir ... Ah ces ailes en mouette, un jour ....
Rien de ce qui est fini n'est jamais achevé tant que tout ce qui est commencé n'est pas totalement terminé (Pierre Dac) |
|
| Revenir en haut de page |
|
|
bocorvin
Maniaco Posteur
Inscrit le: 17 Aoû 2015
Localisation: Hillegom
Âge: 79
|
| Posté le: 16/10/2015 19:08 Sujet du message: |
|
|
|
Merci pour tous les encouragements!, je continue en Anglais!
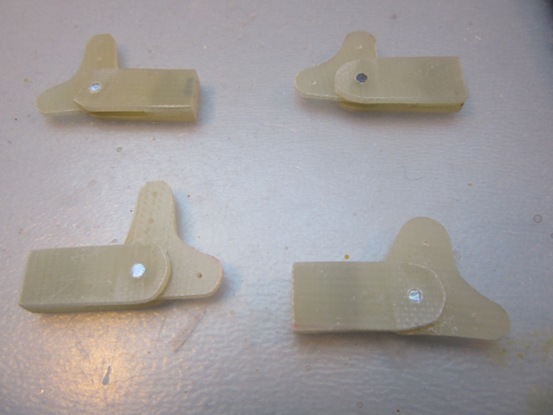
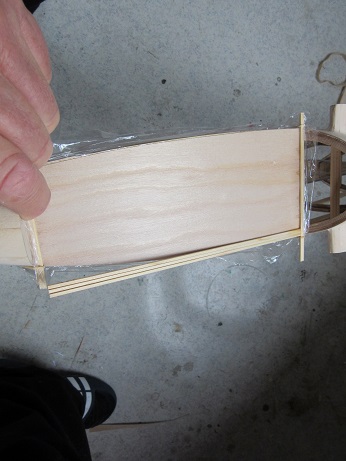
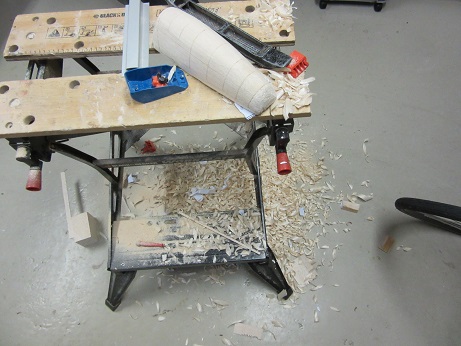
Before starting the wing I needed to make the spoilers, because they where not on the plans. I made the spoilers out of 0.6 ply, on top a spruce batten of 8X3 mm. On the ply I glued pieces of 2 mm aluminium in which I drilled and tapped holes for M 2.5. The ply was thicked up with 2 mm balsa to give it an even surface.
The actuators? are made of PCB with brass tube soldered in. Now the actuation itself; in my Nemere 1/8 I had two destroyed servo's. Because the actuation needs to be very stiff to retract the spoilers completely, it needs to be 100% accurate trimmed electronically. This is critical, I made a small trimming eror, the servo's buzzed, and where gone javascript:emoticon(' ')So I tried to find a different solution; when I should add springs to the spoiler to close it and make a lot of play in the actuation, the trimming should't be critical any more. So I made springs out of 0.3 steel wire and some tiny loops in the spoiler casing of 0.2 mm steel in which the springs rested. You can see on the foto a circulair servo arm? wheel? with a slot hole, that should give ample play! Of course the spoilers will go in the casing turning on 3mm axles, you can see that in one of the pictures of the wing. ')So I tried to find a different solution; when I should add springs to the spoiler to close it and make a lot of play in the actuation, the trimming should't be critical any more. So I made springs out of 0.3 steel wire and some tiny loops in the spoiler casing of 0.2 mm steel in which the springs rested. You can see on the foto a circulair servo arm? wheel? with a slot hole, that should give ample play! Of course the spoilers will go in the casing turning on 3mm axles, you can see that in one of the pictures of the wing.
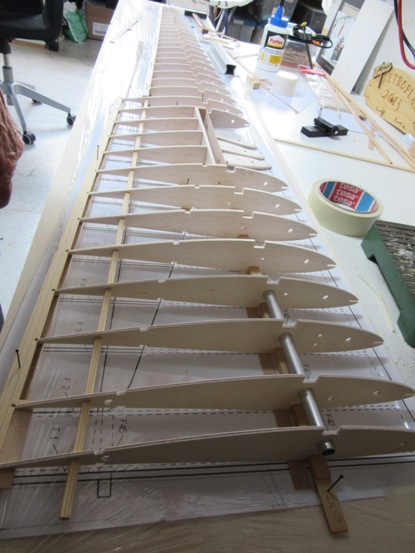
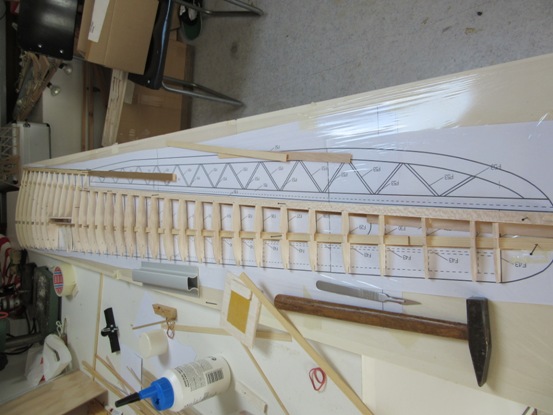
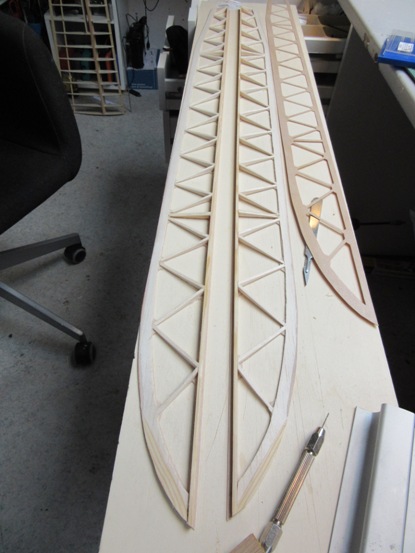
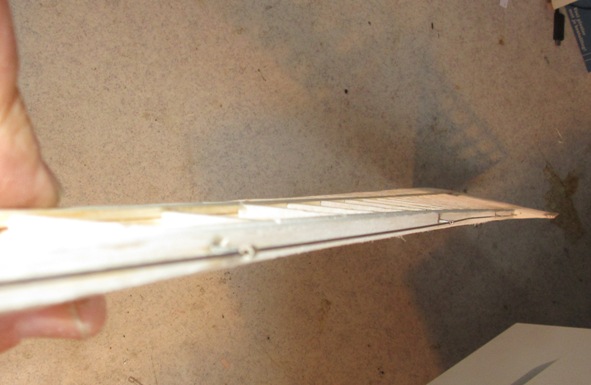
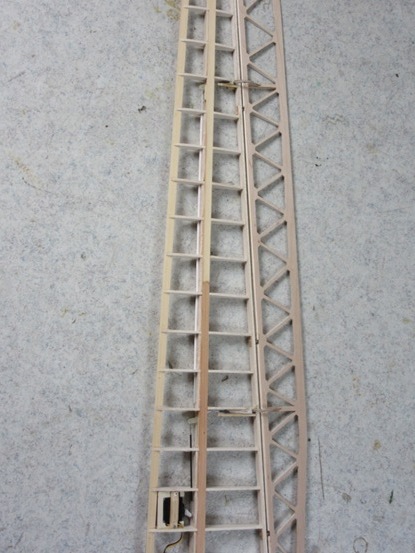
Now back to the wings, with the wingribs already CNC'ed, I had to scarf the spruce for the spar.
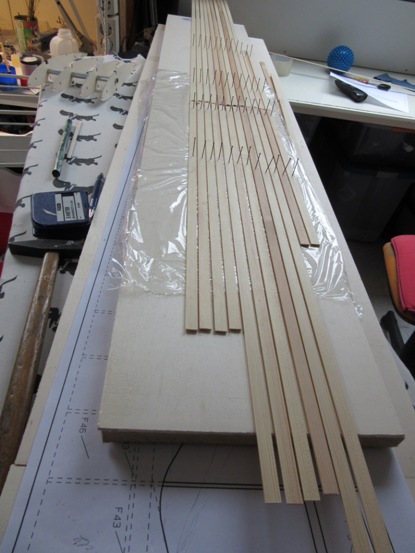
The spar itself is made of 3 layers 2X10, changing in 2 layers 2X10 to a single 2X10 batten at the tip. In a couple of days the basic stucture of the wings was completed.
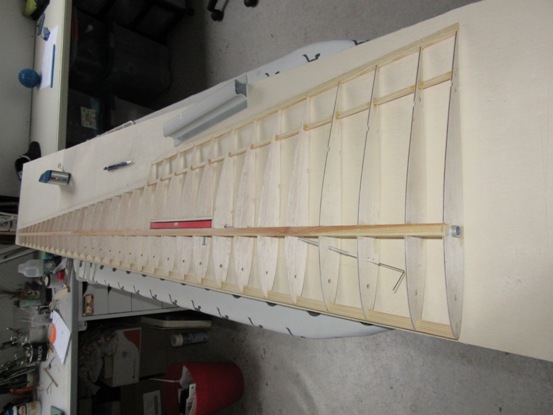
Next will be the ailerons! |
|
| Revenir en haut de page |
|
|
bocorvin
Maniaco Posteur
Inscrit le: 17 Aoû 2015
Localisation: Hillegom
Âge: 79
|
| Posté le: 23/10/2015 13:52 Sujet du message: |
|
|
|
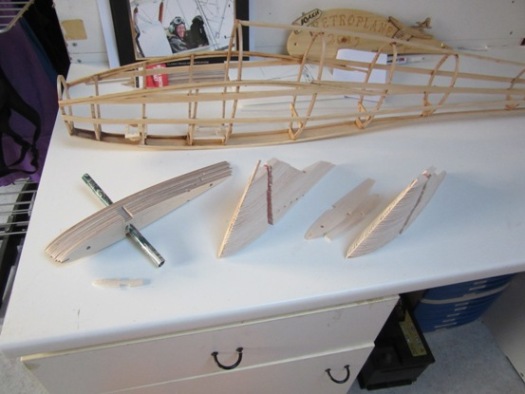
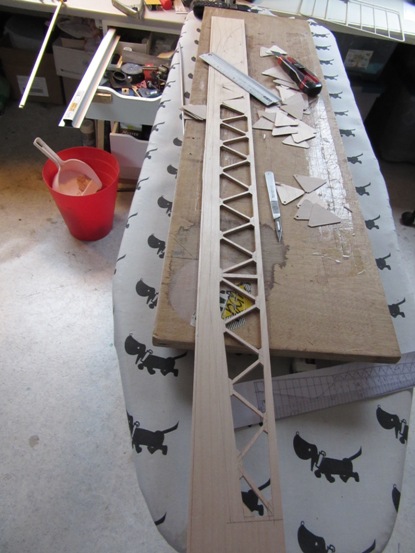
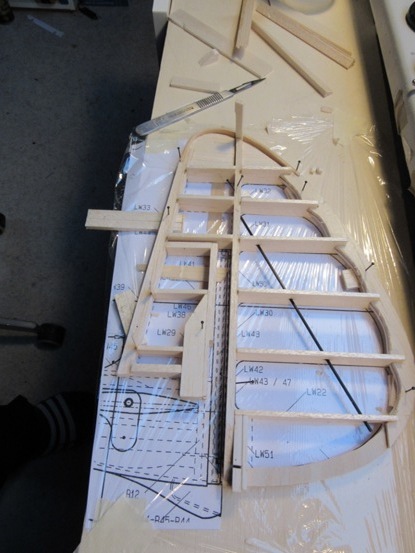
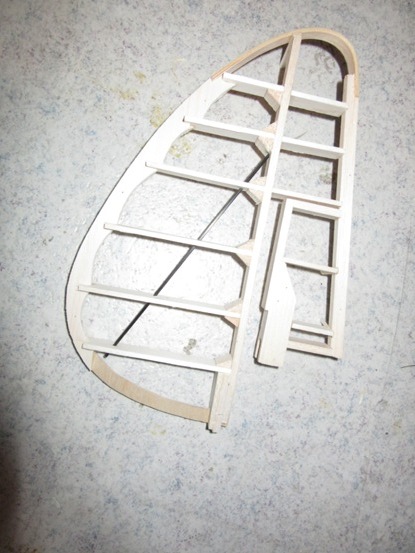
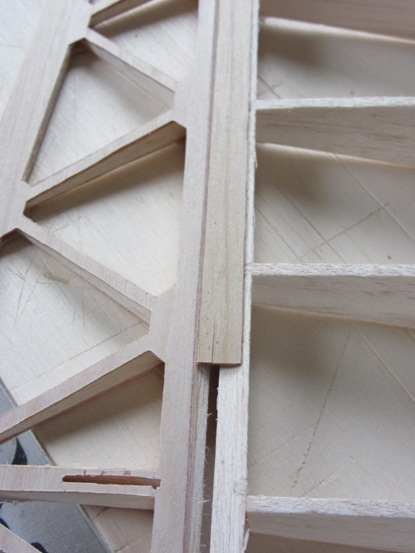
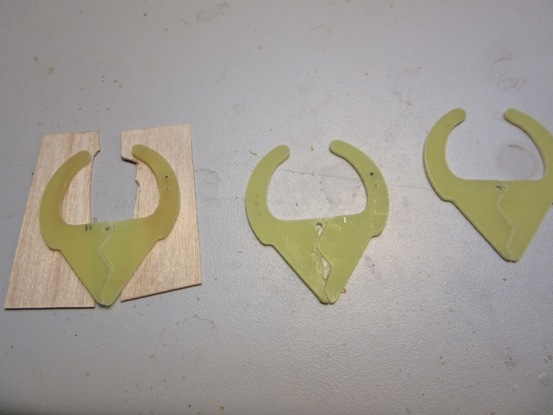
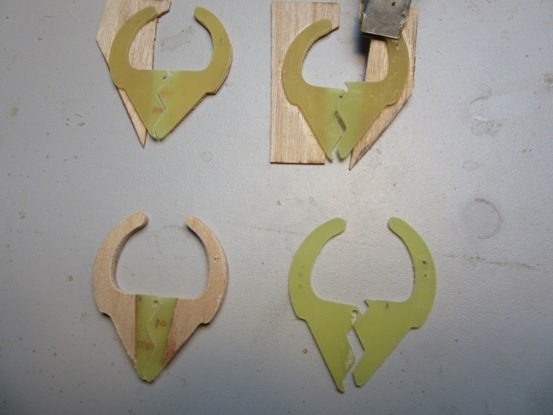
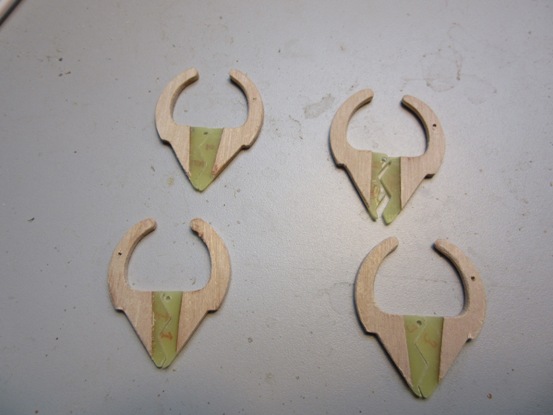
Last week I had a lot of time, so I started with the ailerons
A big challenge were all the gusset plates. Sixty per aileron!, (top and bottom). I can't make that neatly javascript:emoticon(' ')! ')!
Luckily I read the article from Eric Spore; "NEMERE 1936" on this forum. In his kit of the Nemere the upper and lower surfaces were CNC'ed ply.
That brought me on an idea. All I had to do was jigsaw them.
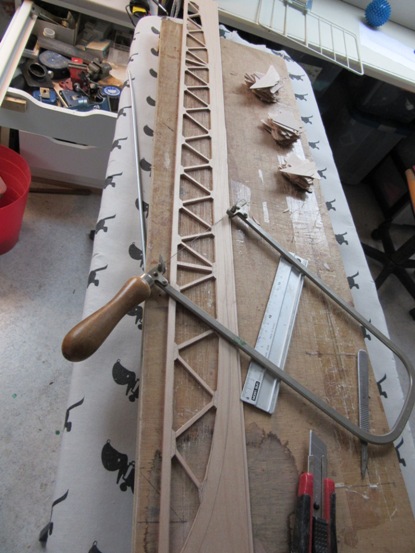
I took 4 pieces od 0.6 ply, glued it in three spots together outside the perimeter of the aileron, (its on my last picture of the ailerons). On top I drew th aileron and started sawing with a very fine sawblade.
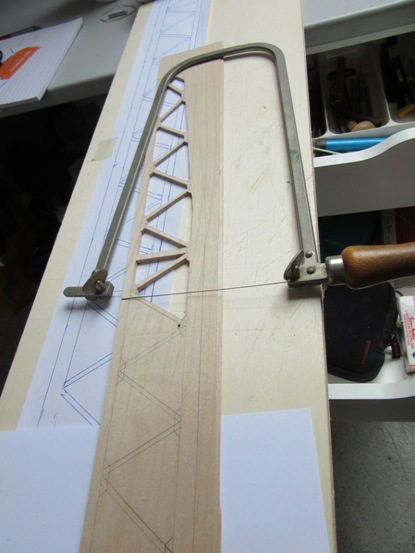
. In the middle my jigsaw was to short, so I had to cut some.
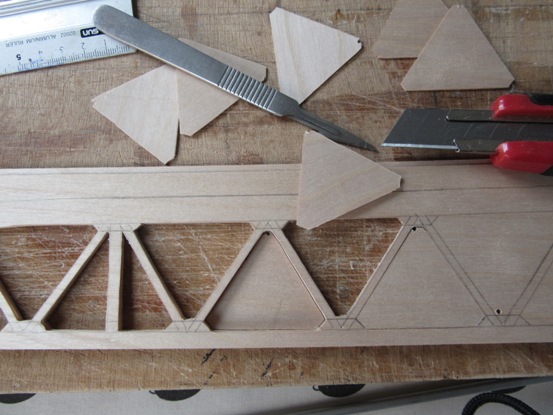
. It took me a lot of time, but I was cutting all 4 in the same time, great confort!
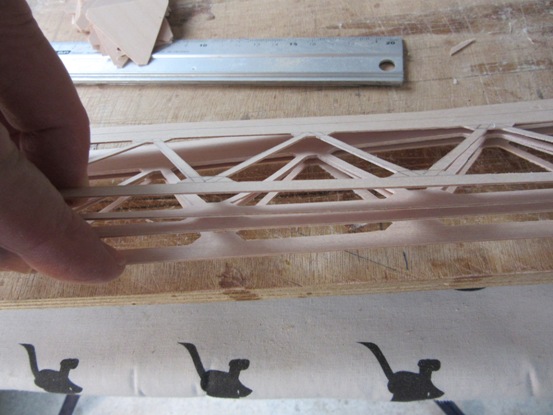
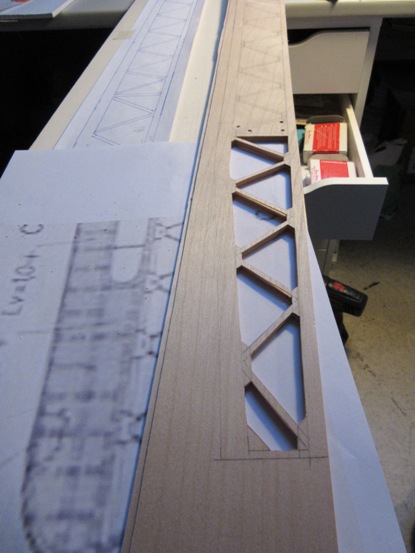
. I glued on the spruce batten on front, balsa ribs and a balsa trailing adge. I sanded it all into a triangular shape.
. Next I glued the top on it and I had the basic aileron.
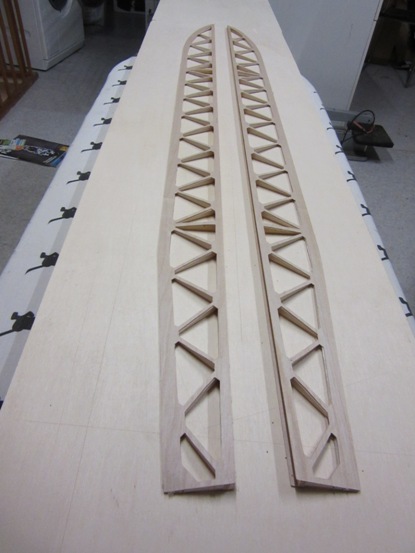
On this picture the glued spots are marked, just to make it clear what I meant.
. Next will be the tailsurfaces, a bientot. |
|
| Revenir en haut de page |
|
|
bocorvin
Maniaco Posteur
Inscrit le: 17 Aoû 2015
Localisation: Hillegom
Âge: 79
|
| Posté le: 04/11/2015 23:41 Sujet du message: |
|
|
|
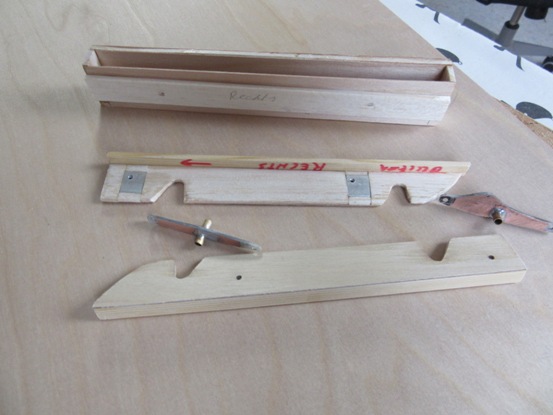
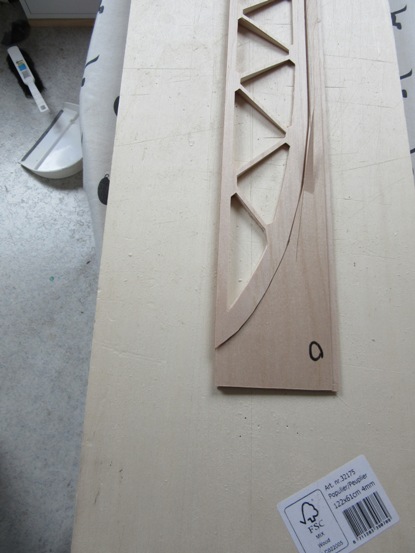
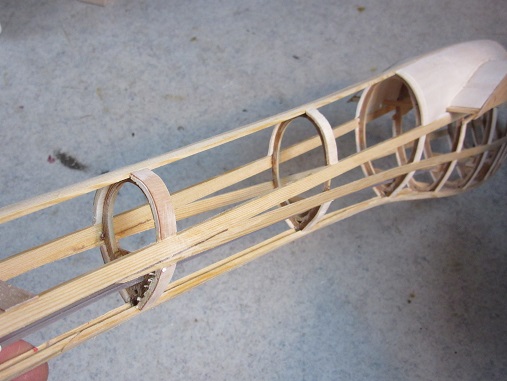
I started with the horizontal tailplane. Because it is elliptical it was to complicated for me to CNC the ribs. I took a shortcut, made the trailing edge of ply, jigsaw again, glued 3mm balsa on both sides. Made the ribs square of 3mm balsa with only a cutout for the spars.

I pinned the leading and trailing edge at half the profile thickness on my building board.
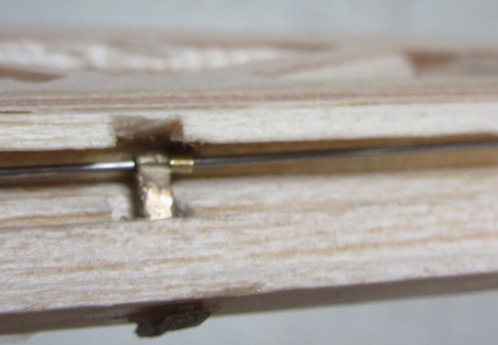
In the three central ribs I made reinforced holes for the connectors. Checked it with the actuator in place.
I made all the ribs fit to the trailing and leading edge, glued in the top spar.
added the tips and upper spar. took it of the board, sanded into a symmitrical profile and covered the nose with 2mm balsa.
Now the verical tailplane, it went about the same. The only difference is the tip, which was laminated from veneer. Later it will be visible.
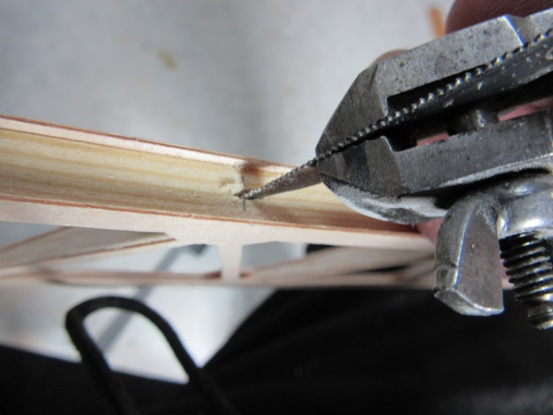
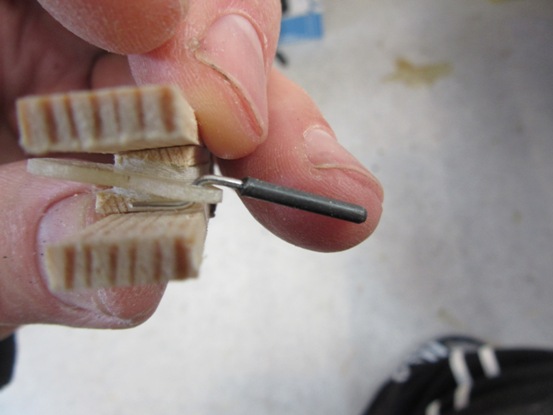
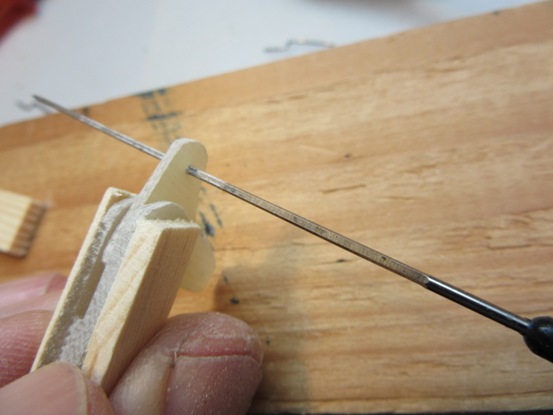
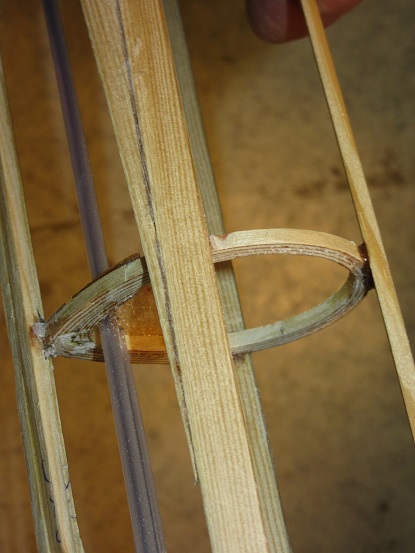
Next I needed hinges and I made them just as on my 1/8 Nemre, just a bit stronger. I started with an nickle silver (brass is just as well, I happend to have this stuff) strip of 3mm wide and 0.4 thick. Folded it around my pivoting wire (0.9 steel)
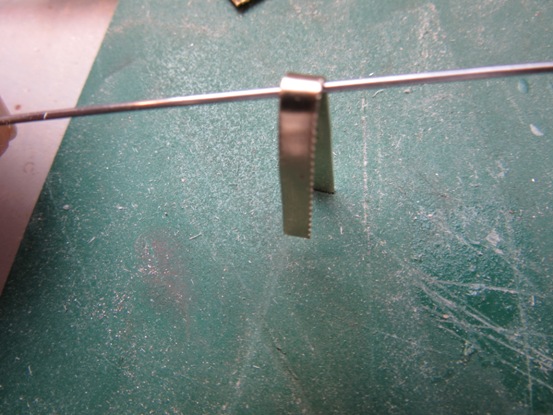
and pressed it with a big forceps around this wire.
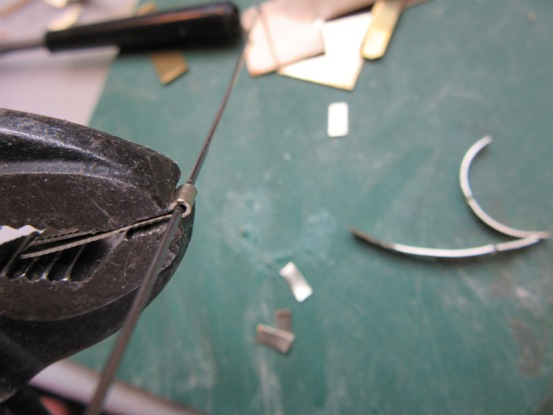
. Put some grease on the wire and soldered the strip. Later I wrenched out the wire and reamed the hole a tiny bit to give a nice fit.
I glued them in the rudder and the fixed part, these much longer so it will be possible to close the gap (as the original)
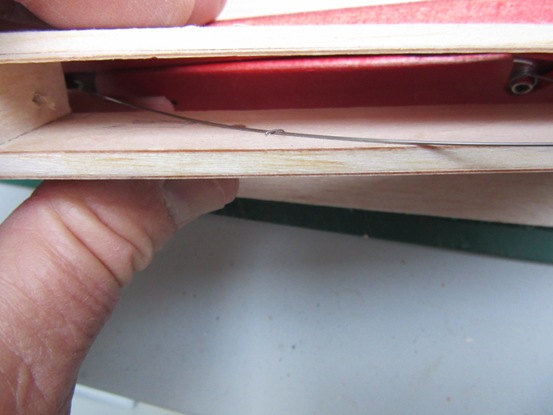
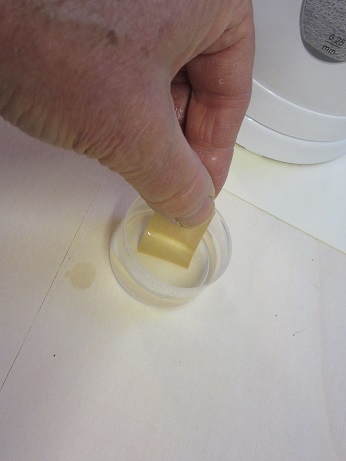
Next step was covering with ply, never done that! Luckily I could find a lot on this forum about the bending of ply and indeed, at the moment I poured boiling water over the ply, it bended so easily! Thank you forum! The gluing was quite nerve wracking, but after a couple of mistakes it went on.

. Friday I hope to start with the aileron actuation, a bientot! |
|
| Revenir en haut de page |
|
|
DOMINIQUE DIOT
Incurable Posteur


Inscrit le: 03 Nov 2013
Localisation: Somme
Âge: 72
|
| Posté le: 05/11/2015 08:43 Sujet du message: |
|
|
|
nickel
Lorsque on est encore en l'air, c'est qu'il est encore entier.
Dominique |
|
| Revenir en haut de page |
|
|
Walter L.
Maniaco Posteur
Inscrit le: 06 Fév 2008
Localisation: Neuenrade
|
| Posté le: 05/11/2015 19:25 Sujet du message: |
|
|
|
Good luck for the following steps.
It will become a very nice model.
Best regards
Walter |
|
| Revenir en haut de page |
|
|
bocorvin
Maniaco Posteur
Inscrit le: 17 Aoû 2015
Localisation: Hillegom
Âge: 79
|
| Posté le: 11/11/2015 15:53 Sujet du message: |
|
|
|
Merci Dominique pour les encouragements and thank you Walter for your nice comment!
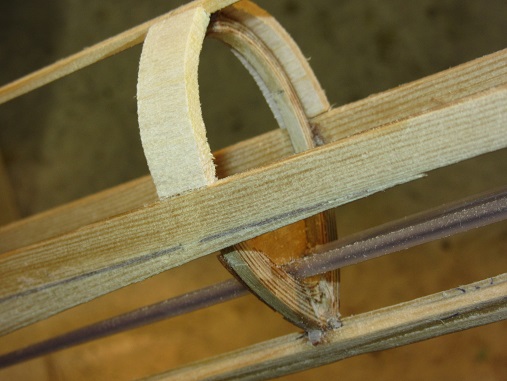
First some pics of the hinges of the rudder, I use a wire which spans all the hinges and it sometimes tricky to get it in, I made some guidance from 0.6 ply,
cut it al lot smaller and glued it on the rudder.
.
I also glued 6mm balsa cut of to 45 degrees on front of the rudder and sanded it round.
For the picture I laid a strip of ply on the fixed part of the rudder just to get an impression what it should look like.
Now I had to do about the same with the ailerons. First I made a rebate in the trailing edge in which the strip ply, which should close the slot, would fit. Out of some scrap material I made a sand contraption and sanded the rebate.
With a shortened saw blade clamped into a handvice I made the slots in the spruce front of the aileron and glued the hinges in. The hinges in the trailing edge were done about in the same manner. In one wing I folded the doubling of the hinge out, in the other wing I reinforced it with some small pieces of ply.The wire , 0.7 mm steel, was more difficult to get trough all the holes.
I glued bals on the front of the aileron, sanded it round, made some gaps for the hinges.
for the picture and to see if all fits I laid a strip of ply over the gap.
.
I already made some parts for the aileron actuation, I hope to start with that! A bientot! |
|
| Revenir en haut de page |
|
|
caralp_laurent
Psycho Posteur
Inscrit le: 30 Jan 2006
Localisation: La Houssaye en Brie 77
Âge: 54

|
| Posté le: 11/11/2015 23:52 Sujet du message: |
|
|
|
Hello Vincent,
Beautiful building ! The 1/6 scale gives a good span for all slopes 
Lolo
Lolométéo, rétro addict ;o)
"On commence à vieillir quand on remplace ses rêves par des regrets"
Sénèque |
|
| Revenir en haut de page |
|
|
bocorvin
Maniaco Posteur
Inscrit le: 17 Aoû 2015
Localisation: Hillegom
Âge: 79
|
| Posté le: 17/11/2015 21:09 Sujet du message: |
|
|
|
Merci Lolo, malheureusement il n'ya pas baucoup des pentes en Hollande javascript:emoticon(' ! !
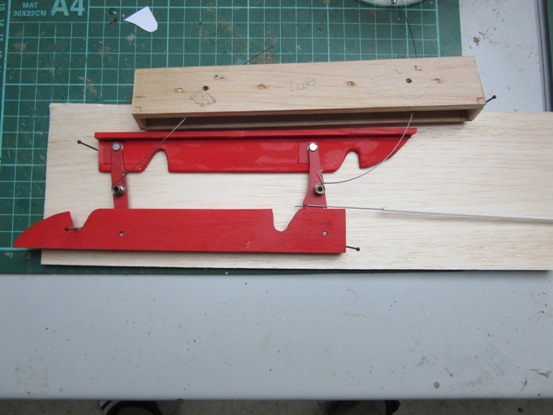
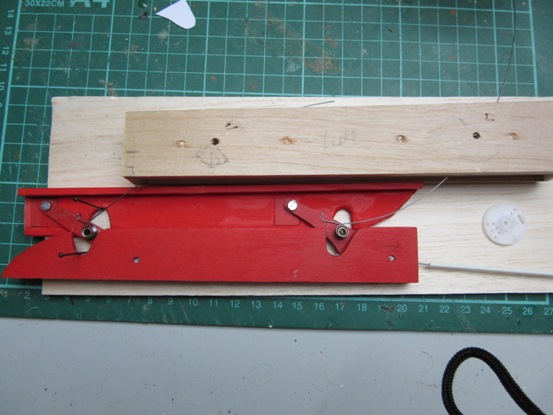
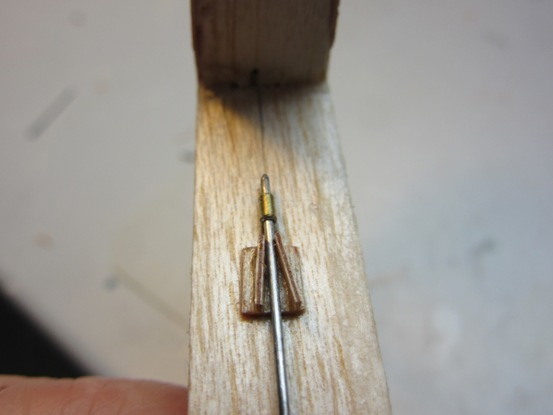
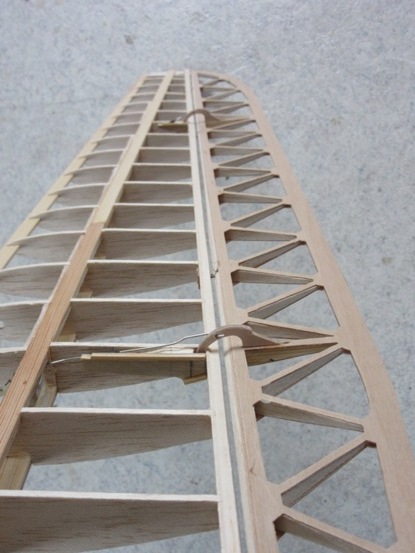
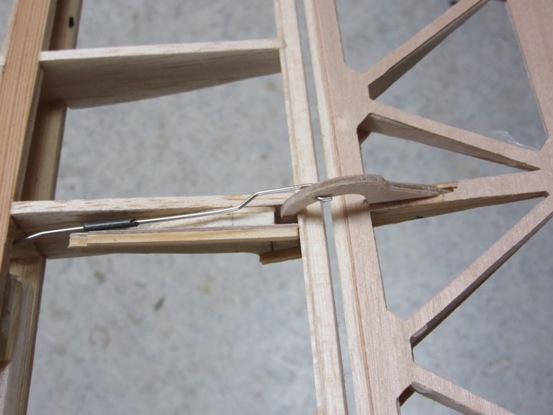
About the ailerons, the original Nemere was actuated with two segments and cables. I think it was the only way to control the twist (and flutter)in the big ailerons. The problem in the model is the thickness of the wing on the spot where the actuation is.
on that spot it is 15 mm thick, I can't get a servo in it. I thought to get more resistance against torsion in the aileron, but I didn't found a easy solution. I realised when I should couple both actuators (like the real thing) the aileron would become very stiff. I made a jig out of ply and jigsawed the bellcranks, pre drilled with 0.7 mm holes, later drilled or reamed to the required diameters.
This are the CNCed segments and a epoxy bellcrank
All the bellcranks must have the same throw.
I tried to put the bellcranks in line with the push/pull rods to the aileron to minimize slob.
The rod to the aileron segments (rudderhorn) is 1 mm, in two pieces connected with a carbon tube which will be glued after the oratex is put on.
This picture is just to make it clear.
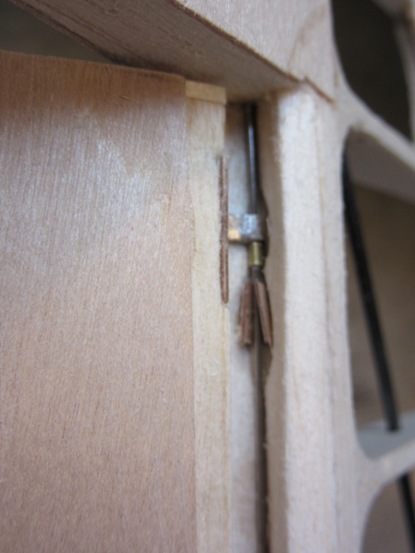
I use a reamer to get a nice fit. Now you can see the servo, both coupled bellcranks who actuate the aileron
The big gap with the girder will be filled later!
This is how it looks on my 1/8 Nemere.
Finishing the segments and planning it so that I can oratex it before putting the aileron, part of the push/pullrod and segments in place,.
I also made some servo mounts.

I put the servo in place connected with a 0.7 steel wire stiffened with a carbon tube.
Now another thing; the spoilers. I made springs to close the spoiler ( see much above) just to prevent servo's destroying itself (yes it happened). (''). On this foto you see an easier solution. In the (blocked) closed position I positioned the servo arm horizontally.
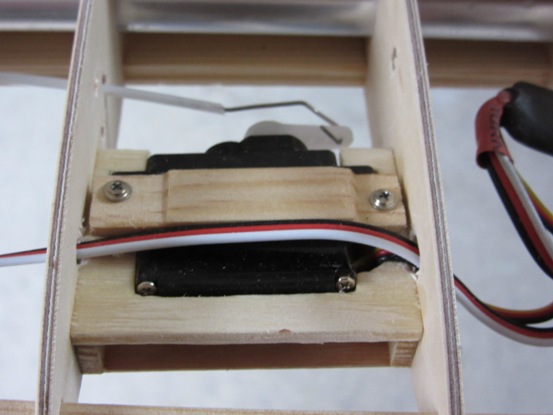
now the spoiler is under tension, the servo is at rest an it can be blocked. ('')
|
|
| Revenir en haut de page |
|
|
DOMINIQUE DIOT
Incurable Posteur
Inscrit le: 03 Nov 2013
Localisation: Somme
Âge: 72
|
| Posté le: 17/11/2015 23:43 Sujet du message: |
|
|
|
Lorsque on est encore en l'air, c'est qu'il est encore entier.
Dominique |
|
| Revenir en haut de page |
|
|
bocorvin
Maniaco Posteur
Inscrit le: 17 Aoû 2015
Localisation: Hillegom
Âge: 79
|
| Posté le: 22/11/2015 21:57 Sujet du message: |
|
|
|
Merci Dominique pour les smiley's!!, je continue le progres de mon Nemere, en Anglais..
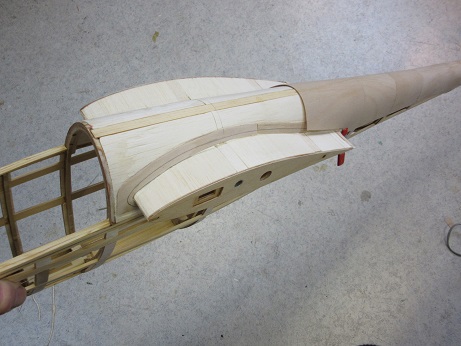
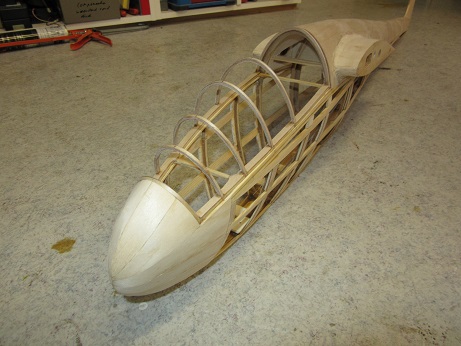
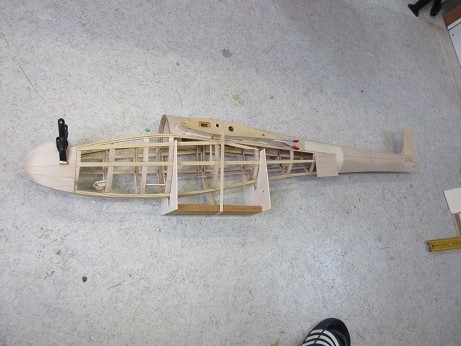
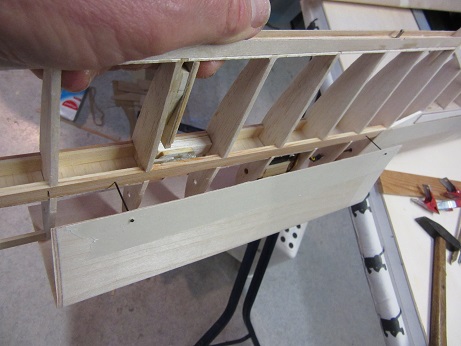
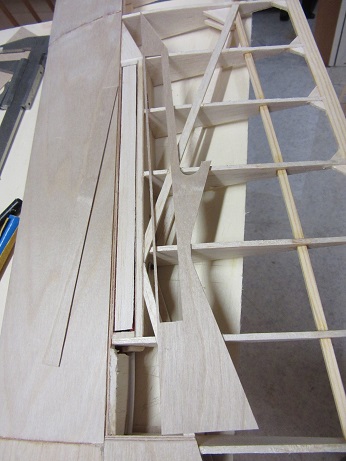
Having completed the basic structure of the wings, I could go further at the fuselage. I use an enlarged plan of my Nemere 1/8, which was covered with balsa. I changed some things (later it appeared not all!) so it could be covered with 0.6mm ply.
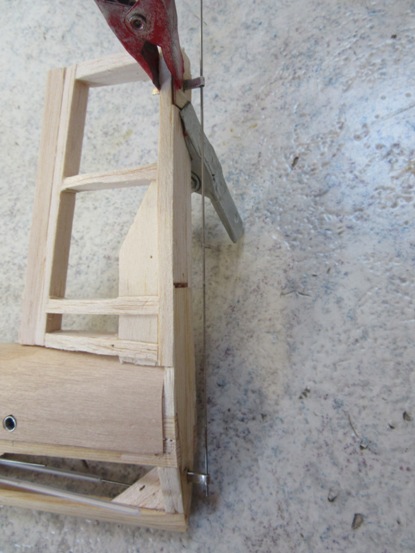
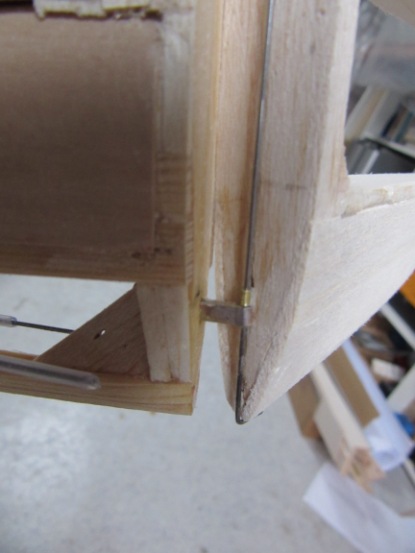
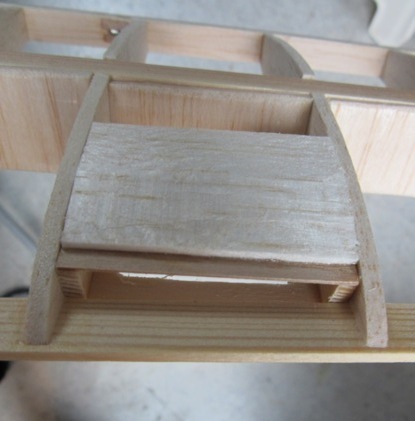
I started with the wing joiner.
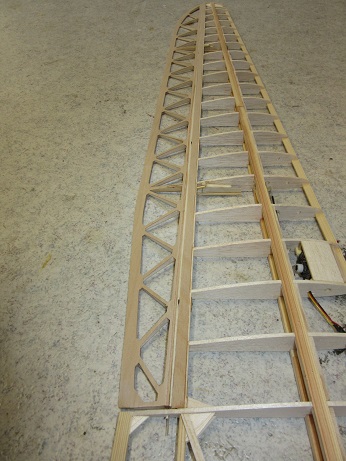
10 mm dia alu tube for the 8 mm carbon wing joiner, front and back ply, top and bottom 10 X 3 spruce, filled up with balsa and epoxy with microballoons. I wanted to glue this contraption between two frames. Sadly there was only one frame, so I laminated a second (partial) frame.
. It is checked if it is horizontal and square.
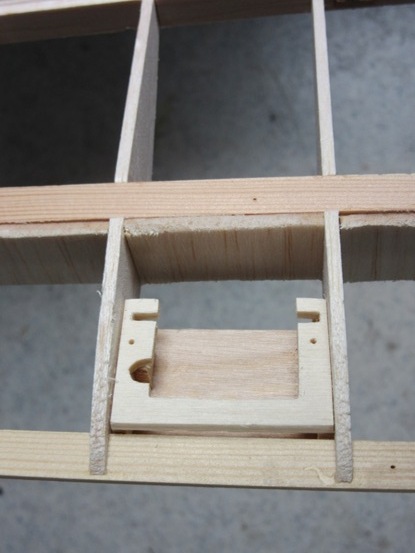
. Now with the aid of the ribs I put the rear beam in.
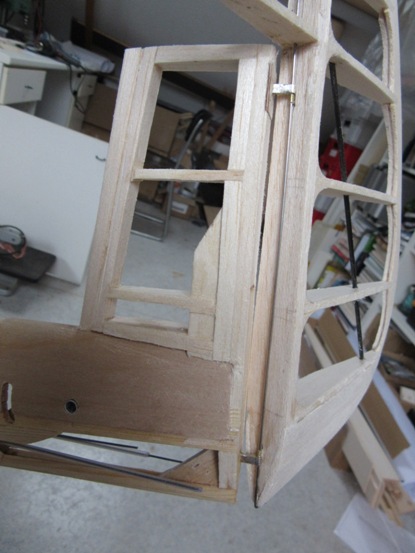
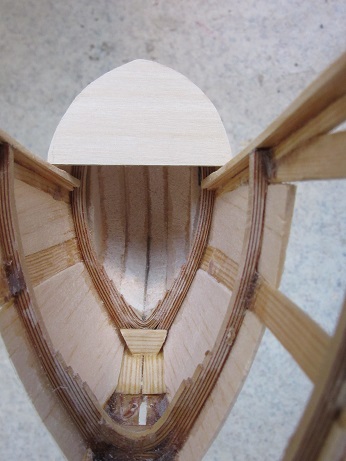
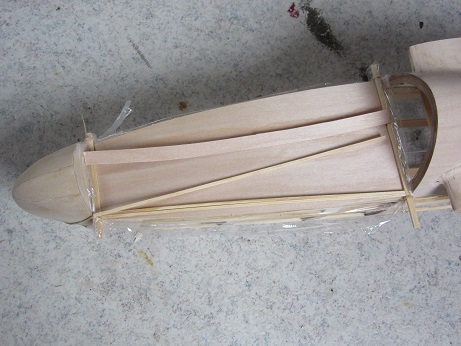
I wanted 3 mm balsa as base, so I made a rebate on the frame just behind the pilot, as support for the ply and specially the fairing with the wing.
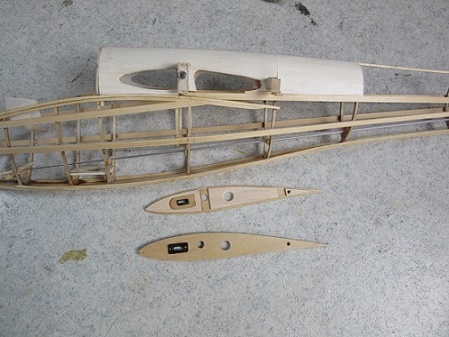
. Now the wing "stubs"could be aligned.
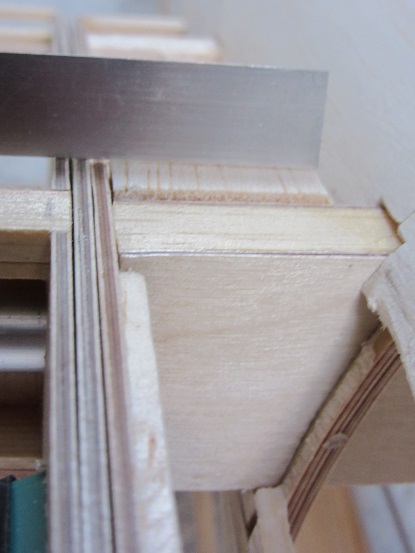
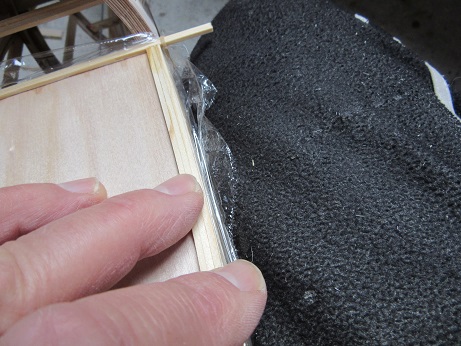
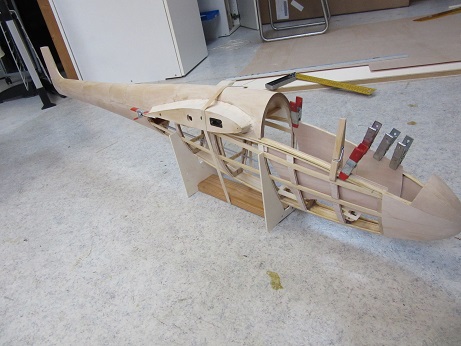
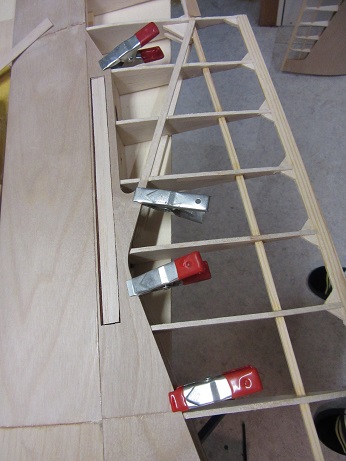
I never covered a model with ply, so I hesitated starting with that. First I filled up the frames between the girders with balsa , sanded it down and glued ply (as a gusset plate) on it. Thanks to the articles of Eric Spore I managed (after a few failures) to get the panels on.
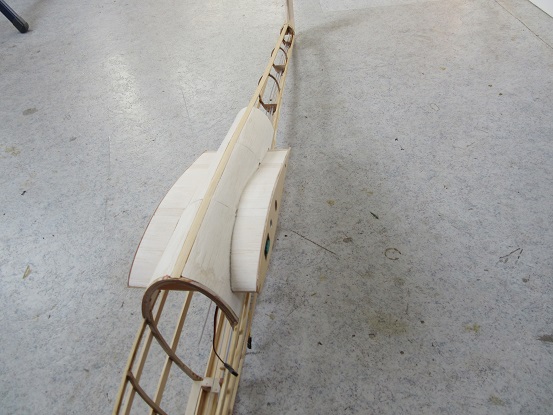
. It appeared that the fisrt part behind the wing was longer than the original, so I tore it out, laminated an extra frame and covered it again.
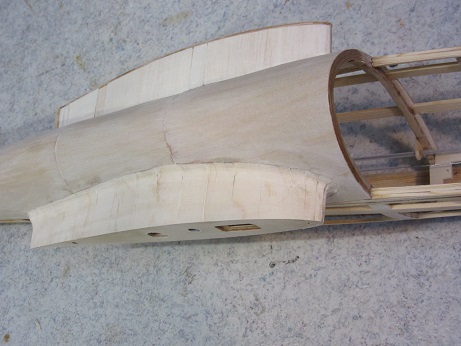
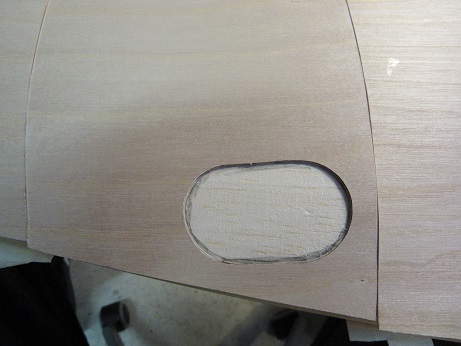
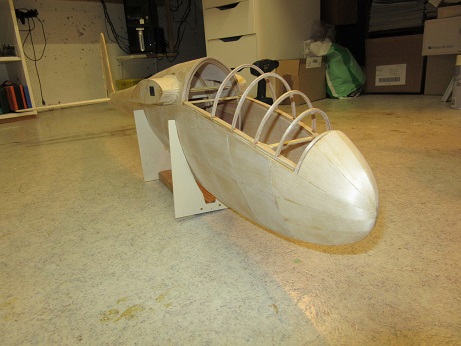
. Another part which I feared was the nose, I thought using 0.6 mm veneer instead of ply, you can sand it without changing the colour. First I filled in the space between the two front frames and made a balsa nose, which was already hollow for the ballast later.
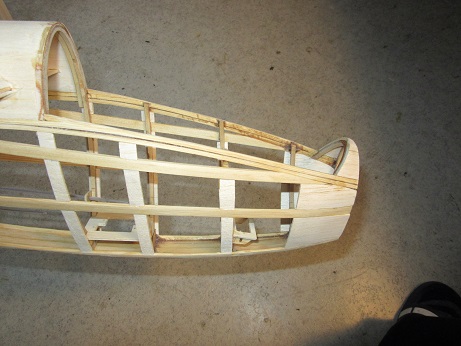
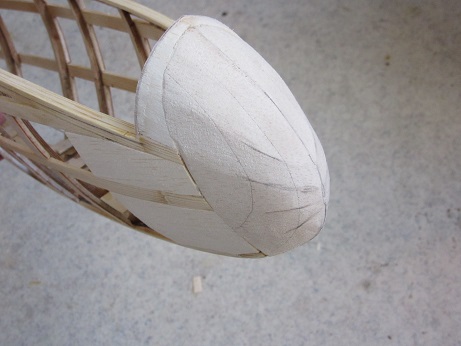
Sanded it in shape (took some time!)
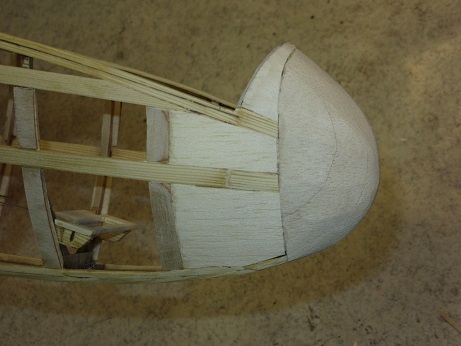
Put on the veneer with thick cyano.
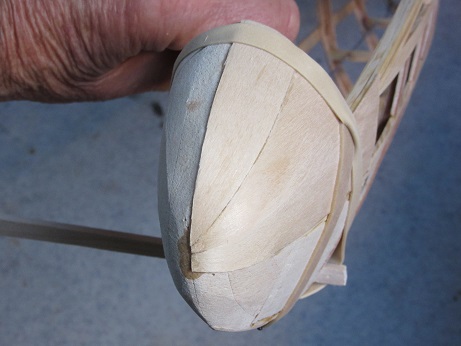
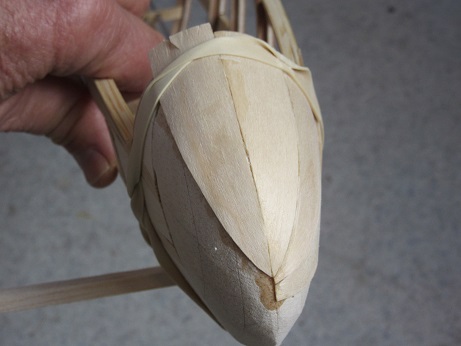
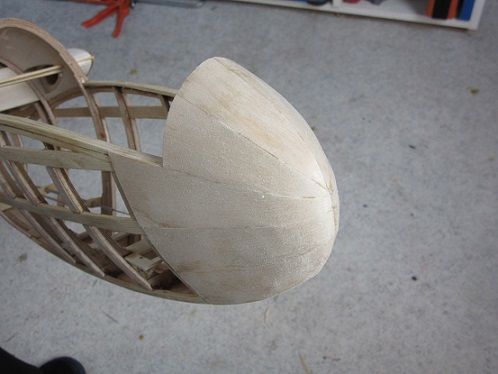
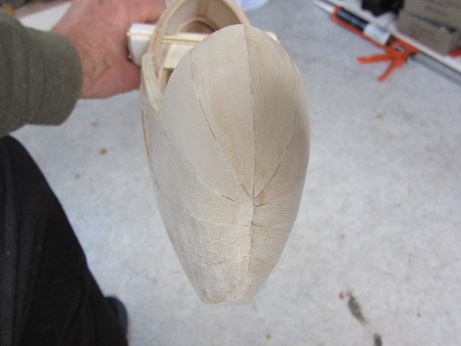
There aren't much pictures of the real thing..
I was quite happy I got it on!
a suivre.
|
|
| Revenir en haut de page |
|
|
Clifton
Psycho Posteur
Inscrit le: 07 Mai 2014
Localisation: Anjou
Âge: 63
|
| Posté le: 23/11/2015 00:01 Sujet du message: |
|
|
|
Very nice work, I like very much your model.
Slingsby Petrel, à mon gout le plus beau de tous, quoi que le Fafnir ... Ah ces ailes en mouette, un jour ....
Rien de ce qui est fini n'est jamais achevé tant que tout ce qui est commencé n'est pas totalement terminé (Pierre Dac) |
|
| Revenir en haut de page |
|
|
stéphane monot
Accro Posteur

Inscrit le: 08 Mai 2010
Localisation: Domloup (35)
Âge: 57

|
| Posté le: 24/11/2015 08:18 Sujet du message: |
|
|
|
Bonjour,
joli
Stéphane |
|
| Revenir en haut de page |
|
|
LEROY
Maniaco Posteur

Inscrit le: 21 Juil 2011
Localisation: Maurepas 78
Âge: 73

|
| Posté le: 24/11/2015 21:57 Sujet du message: |
|
|
|
Bravo for these mounting tips, I continue to follow your building with great interest
Michel.L
Ceux qui s'avancent trop précipitamment reculeront encore plus vite |
|
| Revenir en haut de page |
|
|
bocorvin
Maniaco Posteur
Inscrit le: 17 Aoû 2015
Localisation: Hillegom
Âge: 79
|
| Posté le: 28/11/2015 12:46 Sujet du message: |
|
|
|
Merci pour tous les encouragements!
The last week I tried to make the fairings between the wing and fuselage.
I wanted to make these out of veneer, because you can sand it and it keeps the same colour. I already had done the nose with that, but I ran into problems. I soaked the veneer in hot water

and dried it with a hairdryer. I glued these pieces on the balsa supporting structure. Well, that just didn't work javascript:emoticon('') (no picture!) So I ripped it out and started over again. First I sanded a rebate in the balsa and then made a ply "underlay". Then I covered that part of the fuselage with ply, in which I left space for the veneer fairing.
I also discovered that the veneer expanded with about 10% when wetted,
so I dried the veneer in the oven.
Now I glued all the pieces in place.....
I didn't get it perfect, but its the best I could do.
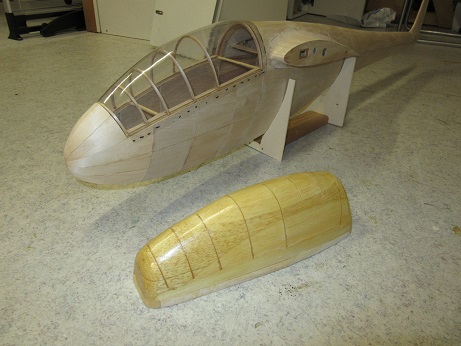
Next is the frame and mold for the canopy.
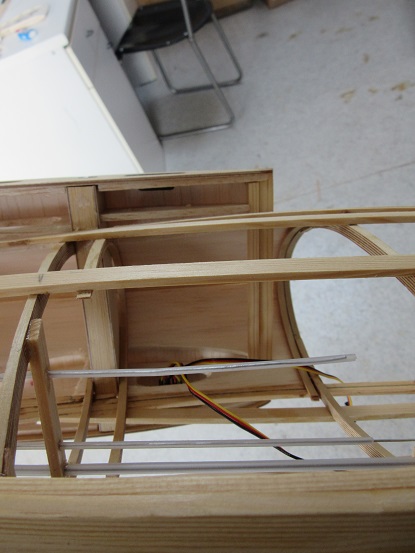
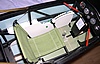
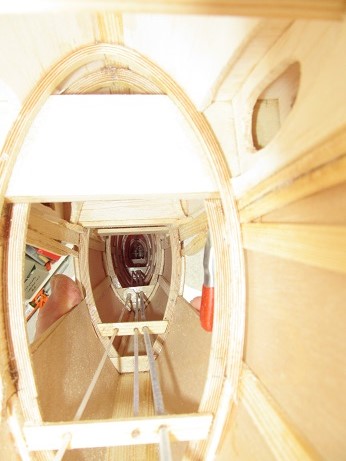
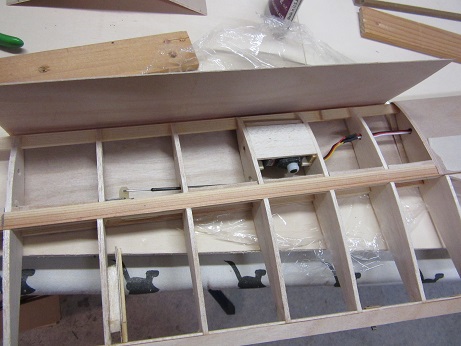
This is an impression of the planned interior, the receiver battery fits between the front (coupling) and rear (elevator and rudder) servo mounts.
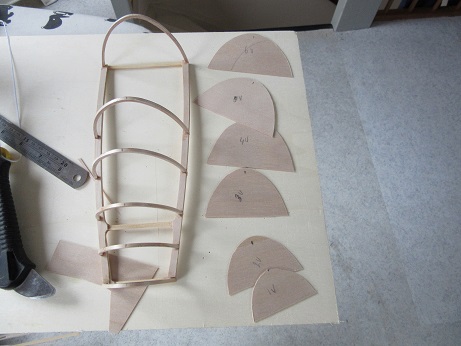
I had only a side view of the canopy'swo I had to make things just fit on the fuselage.
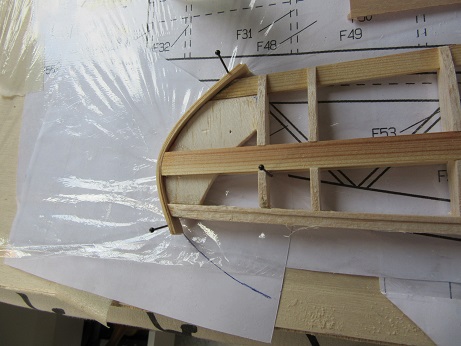
I had now the bottom of the canopy, took front and rear dimensions from the fuselage and with the dimensions of the side view I made a plan for the other franes of the canopy. Laminated the frames out of 0.6 ply, 3 mm wide strips.
, made rebates in the bottom frame
and glued it together.
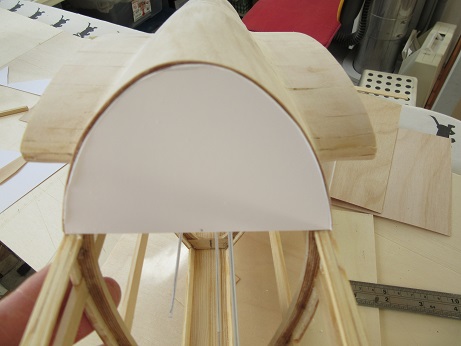
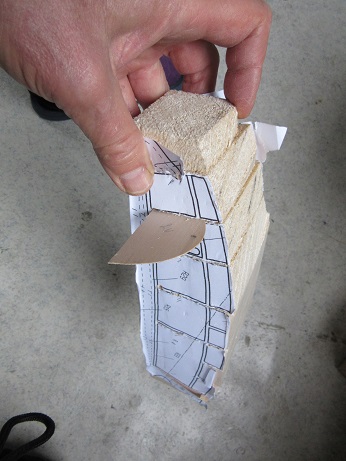
To make the mold or plug I made a block balsa
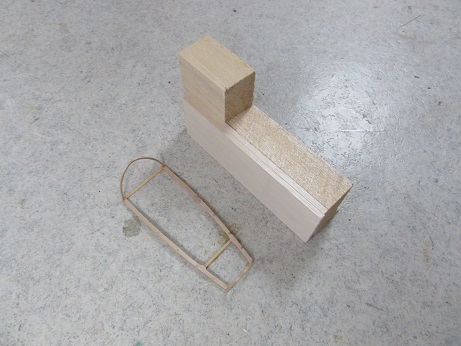
drawed and sawed the bottom, glued copy's of the side views on it and made saw cuts on the frame markings.
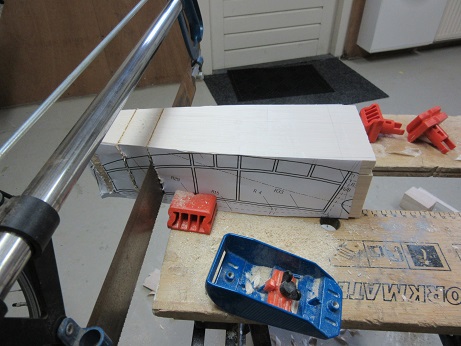
From the canopy frame I copied in ply the frames and put them in the sawcuts (not as easy as I write!)
After some planing..
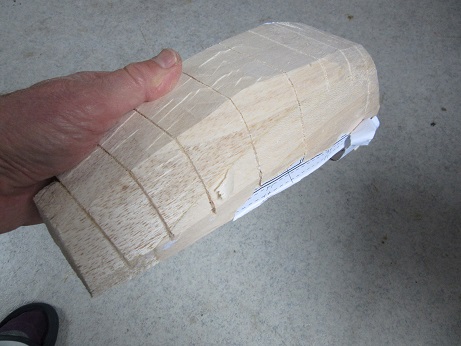
Still needs some more planing and sanding! To be continued! |
|
| Revenir en haut de page |
|
|
bocorvin
Maniaco Posteur
Inscrit le: 17 Aoû 2015
Localisation: Hillegom
Âge: 79
|
| Posté le: 03/12/2015 23:14 Sujet du message: |
|
|
|
Last week I did the rest of the covering of the fuselage with 0.6 ply. It found it sometimes quite difficult and a couple of times had had to redo a piece. ('![[argh]](images/smiles/argh.gif) ') ')
. I also covered the visible part of the inside of the cockpit.

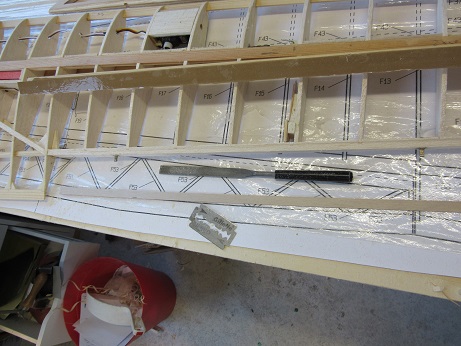
Slowly the fuselage took shape. Just behind the main frame there are inspection hatches in the real thing (it has a mechanism for aileron differential and raising and lowering both ailerons simultaniously). I wanted to make those hatches, but it is precisely at the spot you grab when you hand launch it , so I made a sandwich there.
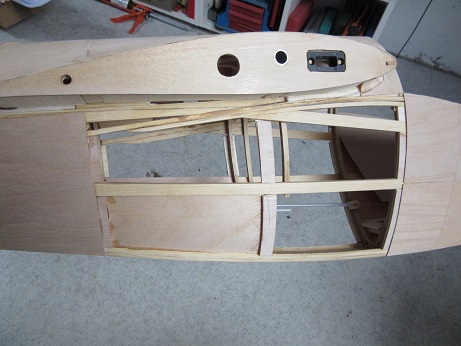
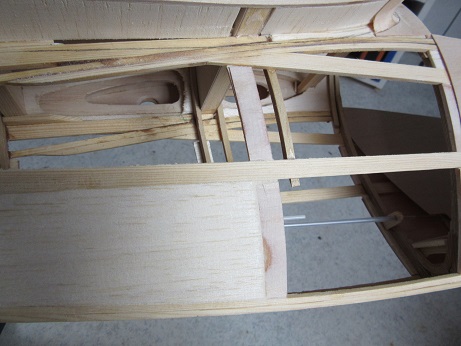
You can see the hatches on the plans.
I am still not satisfied with the wing-fuselage fairing and I doubt if I wil redo that. (' ') ')
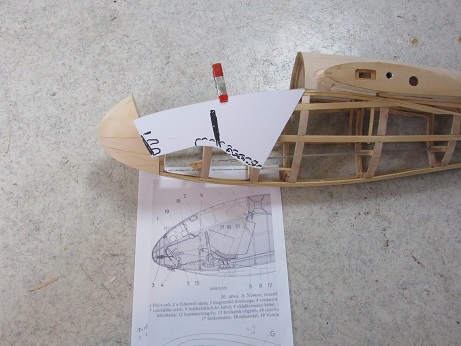
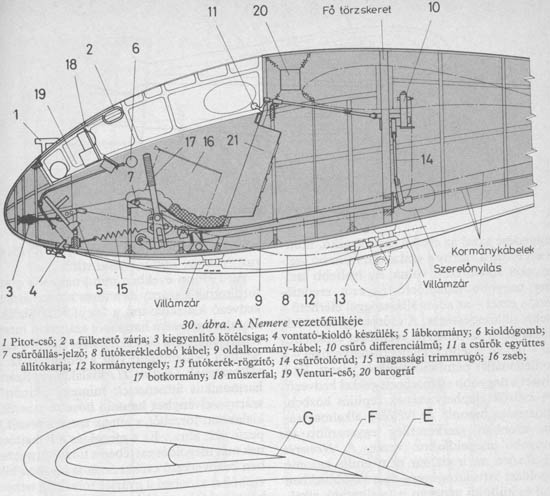
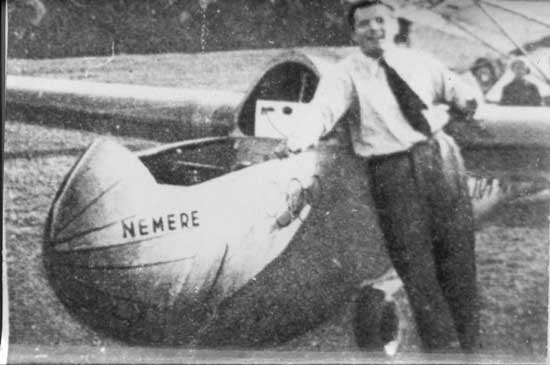
I have a question; on the next picture there is a white box behind the pilot (when he is in the plane) . It looks to me like a radio, but it is only a guess. Has anyone an idea what it is?
To be continued. |
|
| Revenir en haut de page |
|
|
VincentB
Serial Posteur
Inscrit le: 23 Jan 2006
Localisation: Hérault
Âge: 62
|
|
| Revenir en haut de page |
|
|
bocorvin
Maniaco Posteur
Inscrit le: 17 Aoû 2015
Localisation: Hillegom
Âge: 79
|
| Posté le: 04/12/2015 09:49 Sujet du message: |
|
|
|
| Peut etre vous avez raison, quand je regarde le photo encore une fois, c'est bien possible que ce truc blanc est plus en arriere et dans une coffre. |
|
| Revenir en haut de page |
|
|
filotto78
Apprenti Posteur


Inscrit le: 09 Déc 2012

Localisation: Novara
Âge: 48

|
| Posté le: 04/12/2015 12:42 Sujet du message: |
|
|
|
« bocorvin » a écrit: Peut etre vous avez raison, quand je regarde le photo encore une fois, c'est bien possible que ce truc blanc est plus en arriere et dans une coffre.
My compliments Vincent for this really nice job. I'm following your progress with interest.
Are that plans still available? I was always fascinated by the gorgeous silhouette of this glider but so far I only found a plan on eBay for a 4 meters model that is actually too big for me (and for the "health" my wedding too)...
Great job!
Let's us updated as usual.
Alessandro |
|
| Revenir en haut de page |
|
|
bocorvin
Maniaco Posteur
Inscrit le: 17 Aoû 2015
Localisation: Hillegom
Âge: 79
|
| Posté le: 04/12/2015 18:09 Sujet du message: |
|
|
|
Dear Alessandro,
Thanks for your interest, that encourages me!
The drawing I used for the Nemere scale 1 : 6 is an enlarged drawing scale 1 : 8.
I bought this ( 1: 8 ) drawing (together with a set of ribs and frames, but you can buy that seperately) from AR Flugmodele, costs 29.50 (ex postage) . The drawings were enlarged (by 33%) in a local copy shop. Beware!, these plans are made to cover the plane with 2mm balsa, so had to change a lot of things. (it is in the beginning of this article). On the pictures of making the frames, I use the original outline, but instead of 2mm balsa, (scaled op about 3mm), I put on girders and ply ( 3mm and 0.6), so the outside is about right.
If you want to know more of that, I'am happy to inform you.
Regards, Vincent |
|
| Revenir en haut de page |
|
|
filotto78
Apprenti Posteur
Inscrit le: 09 Déc 2012
Localisation: Novara
Âge: 48
|
| Posté le: 05/12/2015 00:15 Sujet du message: |
|
|
|
« bocorvin » a écrit: Dear Alessandro,
Thanks for your interest, that encourages me!
The drawing I used for the Nemere scale 1 : 6 is an enlarged drawing scale 1 : 8.
I bought this ( 1: 8 ) drawing (together with a set of ribs and frames, but you can buy that seperately) from AR Flugmodele, costs 29.50 (ex postage) . The drawings were enlarged (by 33%) in a local copy shop. Beware!, these plans are made to cover the plane with 2mm balsa, so had to change a lot of things. (it is in the beginning of this article). On the pictures of making the frames, I use the original outline, but instead of 2mm balsa, (scaled op about 3mm), I put on girders and ply ( 3mm and 0.6), so the outside is about right.
If you want to know more of that, I'am happy to inform you.
Regards, Vincent
Hello Vincent,
Many thanks for your indications. Unfortunately I absolutely don't speak German and I'll ask to some of my multi-language colleagues ;-)
I'm interested of 1:8 scale that is more suitable for the slope where I usually fly. Is the original plan designed to have a detachable elevator ?
No problem to make some modification. As far as I remember I never built a model without doing some modification :-)
In any case now I'm busy with the model for Retroplane 2017, so I don't think that I'll begin this model in a short time.
I'm continuing to follow your adventure.
Bye
Alex |
|
| Revenir en haut de page |
|
|
bocorvin
Maniaco Posteur
Inscrit le: 17 Aoû 2015
Localisation: Hillegom
Âge: 79
|
| Posté le: 05/12/2015 00:44 Sujet du message: |
|
|
|
Hello Alex,
Yes the model has an detachebel elevator.
On the website of AR flugmodelle are some pictures, so you can get an idea of what you get.
If you plan to build it I can send you some pictures of building mine and if you look at "atelier reparation" you will find the repair of my 1 : 8 Nemere .
Bye,
Vincent. |
|
| Revenir en haut de page |
|
|
bocorvin
Maniaco Posteur
Inscrit le: 17 Aoû 2015
Localisation: Hillegom
Âge: 79
|
| Posté le: 13/12/2015 20:49 Sujet du message: |
|
|
|
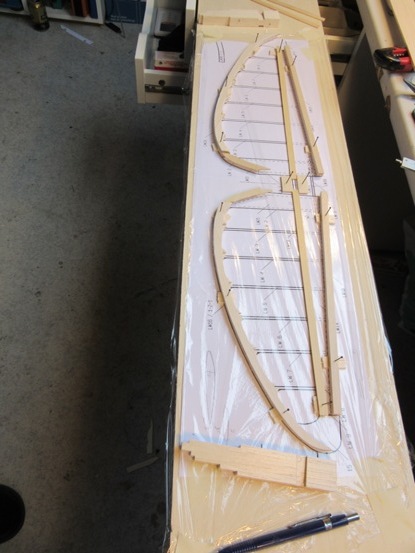
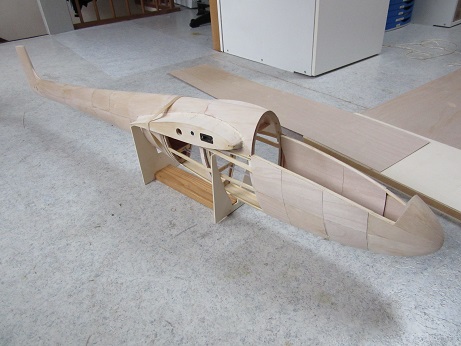
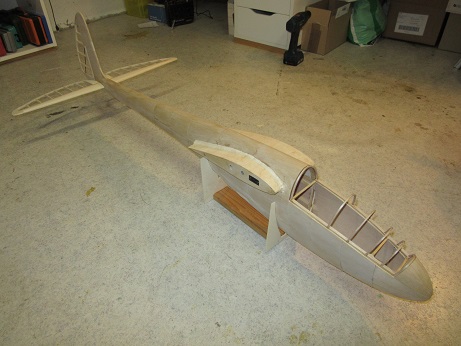
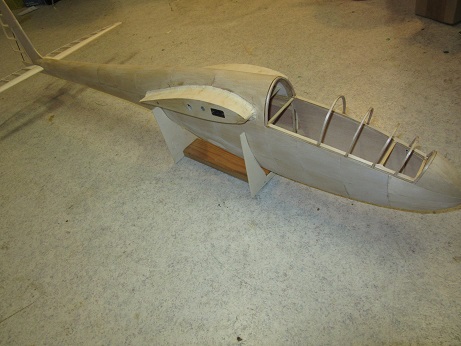
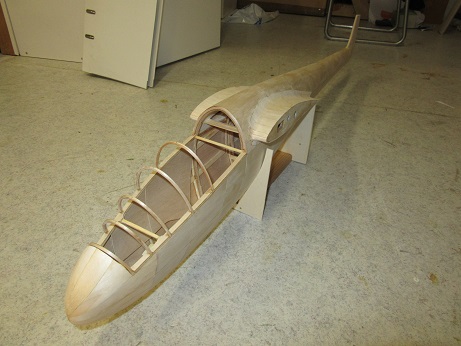
To begin with, a photo of the assembled model
This was (of course also for fun) and to adjust the ribs at the root of the wing to check with the fuselage if there wasn't a gap. I had to correct a bit on one side.
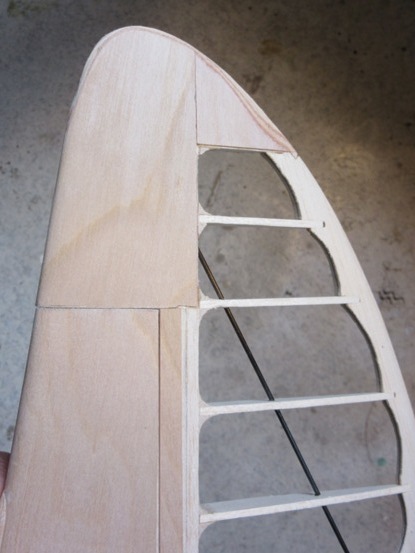
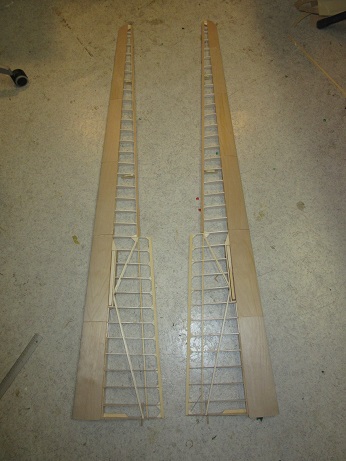
I went on with the wings, made the tips and the aileron things, to close the gap between wing and aileron, it took some time...

and the result.
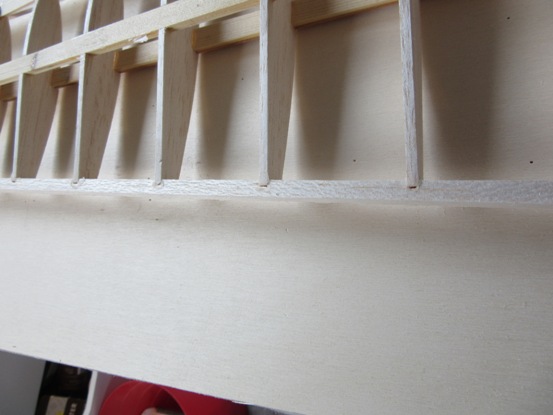
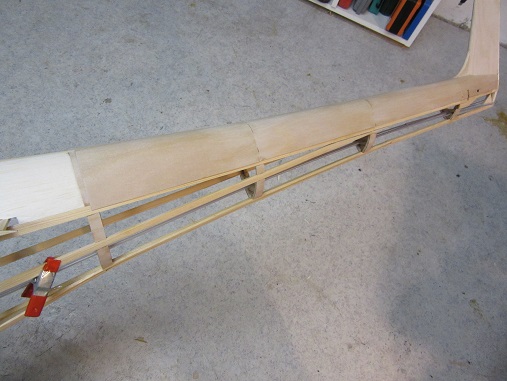
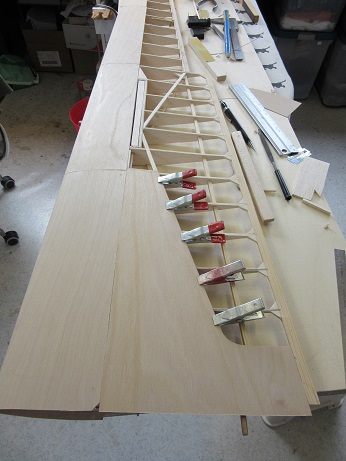
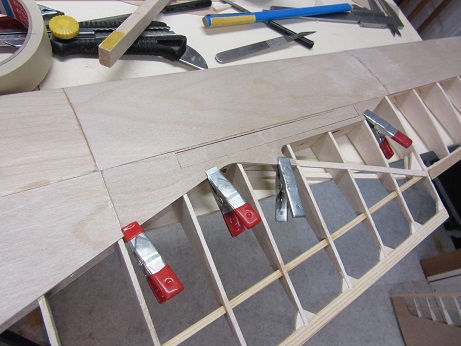
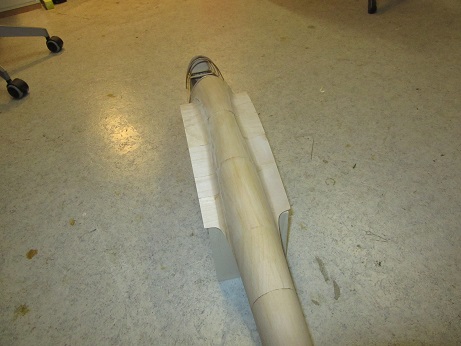
I slowly started with the ply covering of the wing, which I had never done First I did a lot of little things and then I made a beginning, the scarfs
Then the bending of the 0.6 mm ply, in the end I did it as you can seen on the pictures, using boiling water, when the water is that hot you feel the ply weakening instantly
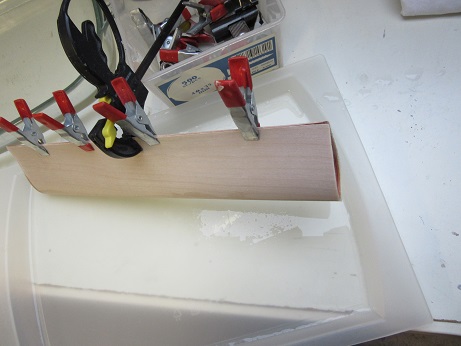
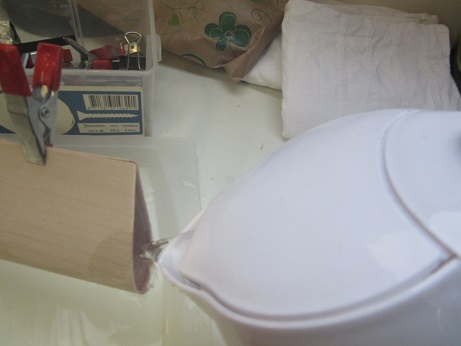
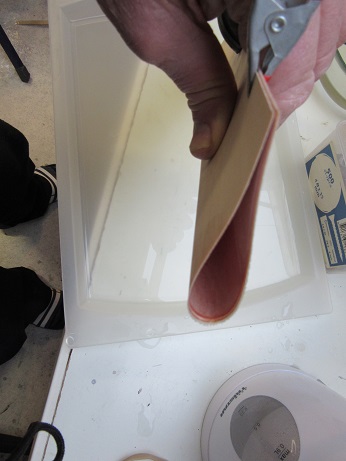
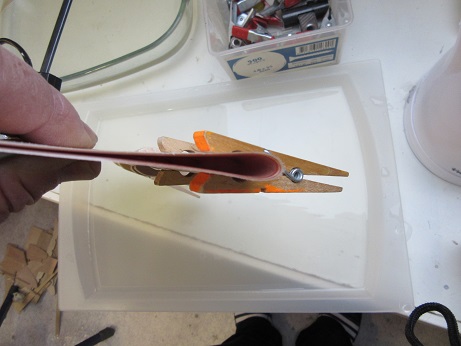
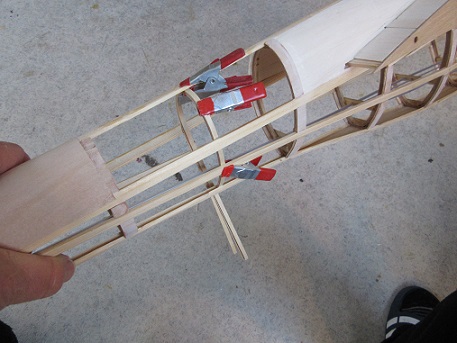
I read a lot on the forum about covering the wings with ply, it is quite stressfull! I messed up some panels and came to the following method (it's almost the same as Eric Spore uses on his 1/4 Nemere) for exact location of the first side of gluing I used pins (yes it gives holes....)
Using thick cyano, glide the panel along the pins to its exact spot, after 10 seconds I remove the pins, turn the wing over (plastic under it..)
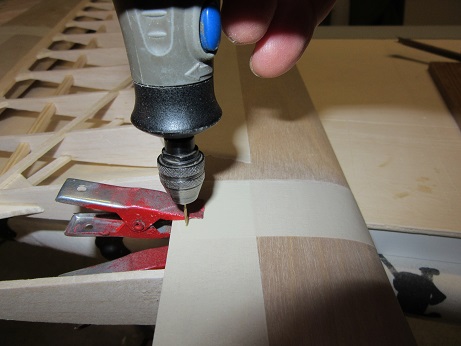
I bent it open, put glue under the ribs, leading edge and scarf joint and the upper girder, wrap the panel around the ribs and close it, I'am glad its done...
Next is putting the rest the ply on the wings and preparing the canopy mold. |
|
| Revenir en haut de page |
|
|
bocorvin
Maniaco Posteur
Inscrit le: 17 Aoû 2015
Localisation: Hillegom
Âge: 79
|
| Posté le: 27/12/2015 22:05 Sujet du message: |
|
|
|
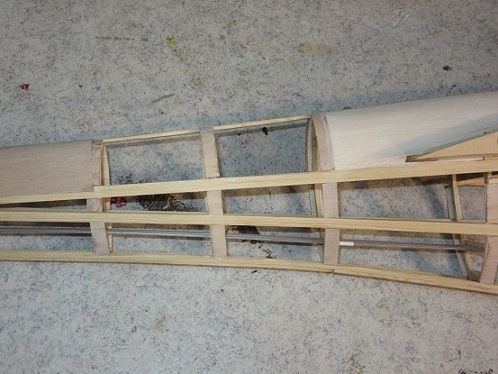
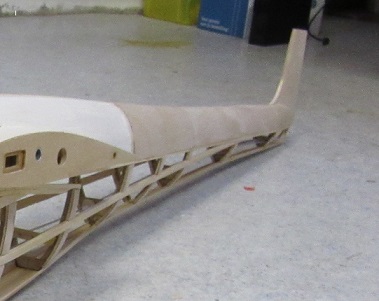
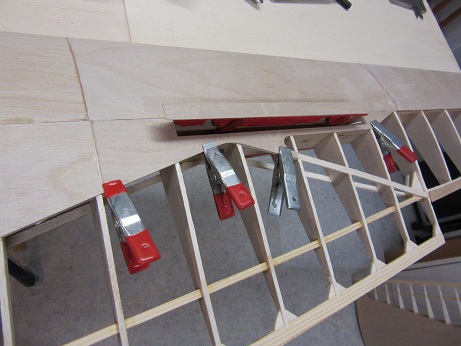
I went on with the covering of the wing with ply. First the inner parts. The reinforcements on the rib at the root of the wing is to attach a hook which hold the wing in its place.
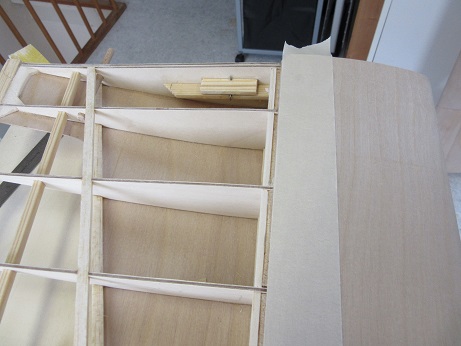
I had to incorporate the spoilers.
and check if they still worked (they did!)
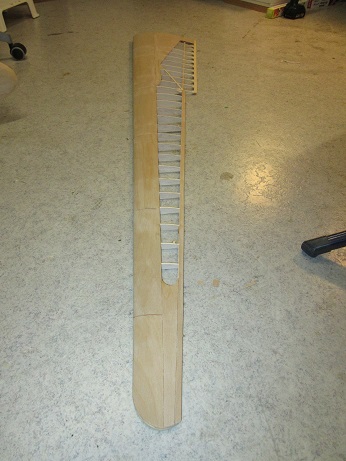
Next I bent spruce around the tips and then covered them with ply.

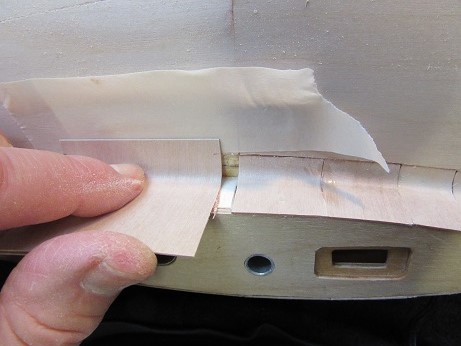
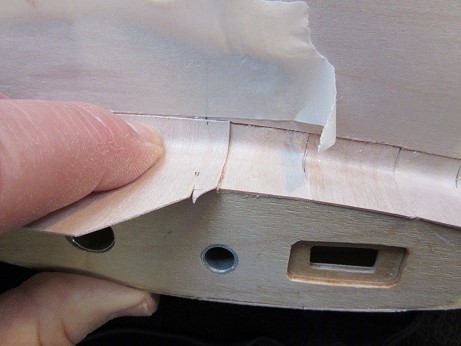
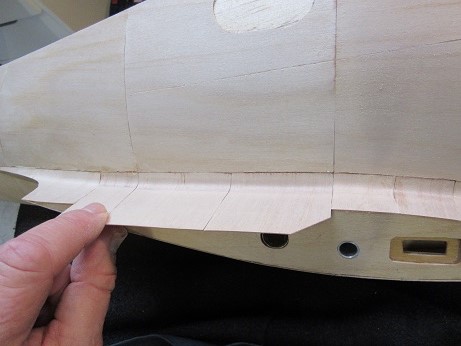
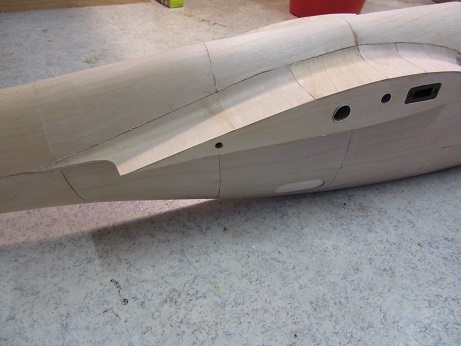
. Now back to the fuselage, especially the wing fairing. I made it first with 0.6 mm veneer, but I didn't like the result, so I took the veneer out and started with ply.
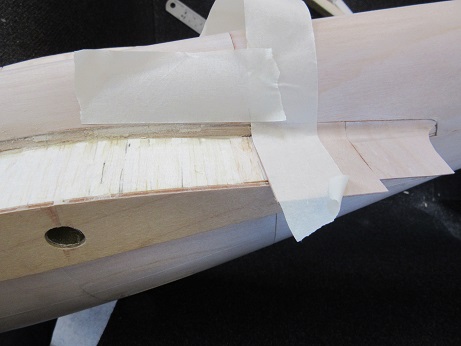
Then there was someting wrong with the fairing on the trailing side of the wing. After a lot of thinking I hope I got it right now.
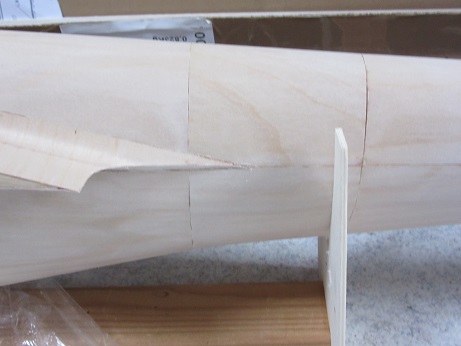
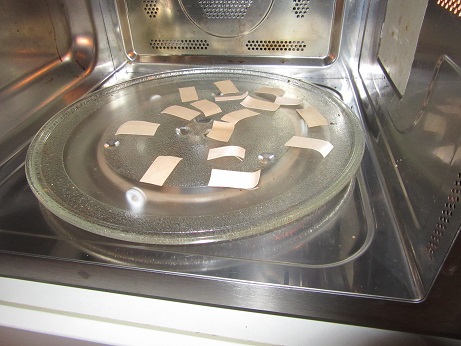
I had also used a too small radius for the fairing, so I took a bigger one and so I had to take out a strip of ply out of the fuselage Not a pleasant job hacking out ply! I prebent the wet ply
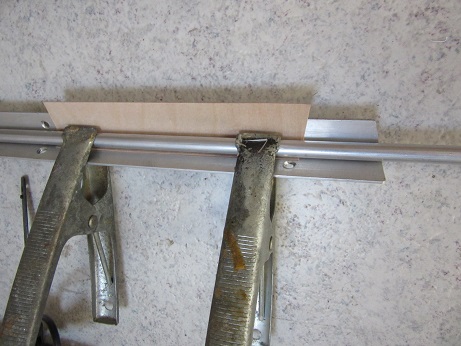
also with a bigger pipe (15mm dia) and let it dry overnight.
.
In the meantime and finished of the master for the canopy and had the canopy vacuumformed from 0.5 mm .
to be continued. |
|
| Revenir en haut de page |
|
|
Clifton
Psycho Posteur
Inscrit le: 07 Mai 2014
Localisation: Anjou
Âge: 63
|
| Posté le: 28/12/2015 00:00 Sujet du message: |
|
|
|
Very nice job. Congratulations for the farings, they look very beautiful.
Slingsby Petrel, à mon gout le plus beau de tous, quoi que le Fafnir ... Ah ces ailes en mouette, un jour ....
Rien de ce qui est fini n'est jamais achevé tant que tout ce qui est commencé n'est pas totalement terminé (Pierre Dac) |
|
| Revenir en haut de page |
|
|
bocorvin
Maniaco Posteur
Inscrit le: 17 Aoû 2015
Localisation: Hillegom
Âge: 79
|
| Posté le: 28/12/2015 01:03 Sujet du message: |
|
|
|
| Thank you! It was the third attempt..... : |
|
| Revenir en haut de page |
|
|
|