| Voir le sujet précédent :: Voir le sujet suivant |
| Auteur |
Message |
bocorvin
Maniaco Posteur


Inscrit le: 17 Aoû 2015

Localisation: Hillegom
Âge: 79

|
 Posté le: 12/11/2020 14:48 Sujet du message: Slingsby King Kite 1/4 Posté le: 12/11/2020 14:48 Sujet du message: Slingsby King Kite 1/4 |
  |
|
|
Bonjour a tous,
Malheuresement mon Francais est pas tres bonne, I'll do the building story in English, sorry,
Its almost winter again and it started to itch, what should I build? Whilst building the Slingsby Gull, I had the opportunaty to read the book Slingsby Sailplanes by Martin Simons, writing about the development of all the Slingsby gliders. There was a wonderful story about the Slingsby King Kite T- 9. This was a innovative design from 1936/37 with the aim of participating in a major international competition at the Wasserkuppe in July 1937. It was said that gliding would become Olympic. This glider was equipped with flaps and built to be able to fly fast. Because there was little time 3 prototypes were built simultaneously. During the test flights , the aircraft unfortunately turned out to be extremely sensitive to spins . As an emergency measure, all kinds of enlarged vertical stabilizers were built and with such an enlarged vertical stabilizer he finally flew and did reasonably well. Afterwards it turned out that there was a mistake in the building of the wings. Which mistake has never become completely clear, but what I understand is that the wing twisting was not well built (in all 3!) And that the center of gravity was quite far back. It is a wonderful story , it can also be found on the SSUK website : articles / rise and fall ., wonderful to read!
https://scalesoaring.co.uk/slingsby-the-rise-and-fall/
Because this glider was covered with plywood (I like that), was quite innovative and had good flying pqualities, I decided to build it in 1: 4 scale. The wingspan will be 3875mm and I hope to keep the weight below 4.4 KG
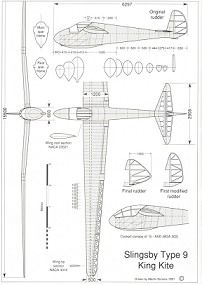
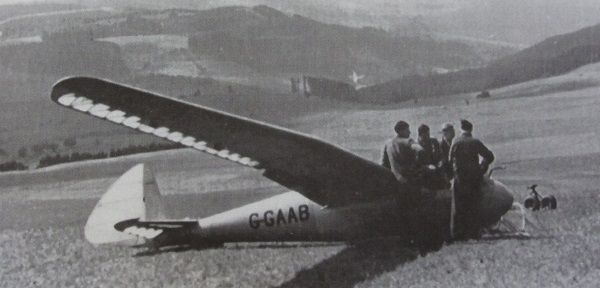
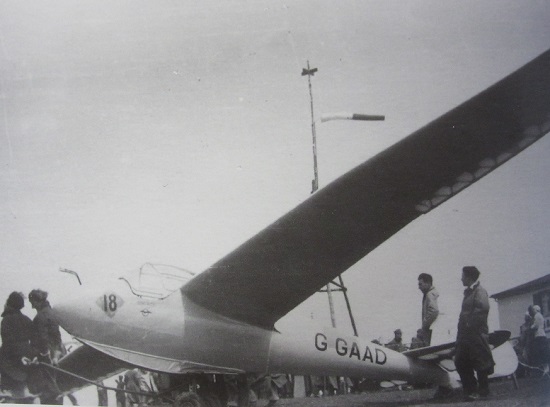
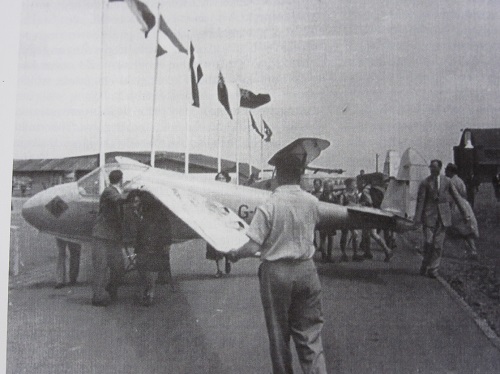
There are very few pictures of the real thing
Now the making, a different story. I grew up with pencil and drawing board and now I wanted to draw this glider digitally. I bought the drawing programs Devwing and Devfus4, just affordable . It took me quite some time to learn to work with it, but gradually I managed to do useful things sometimes with frustration, but in the end gave me a lot of satisfaction.
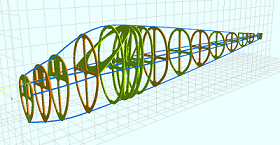
I also had a problem what to use as wingjoiner. After breaking the carbon 8mm round wingjoiner (it was designed for a steel rod, which is has it now) of my Nemere 1/6, 330cm wingspan and with some warnings on the Retroplane forum, I had my reservations about carbon wing joiners . A steel wing pin is quite heavy and I really wanted to keep the weight down. Due to the gull wing there is quite a bit of dihedral in the middle part of the wing , which did not make it any easier.
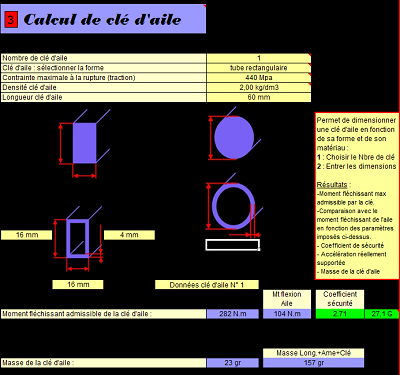
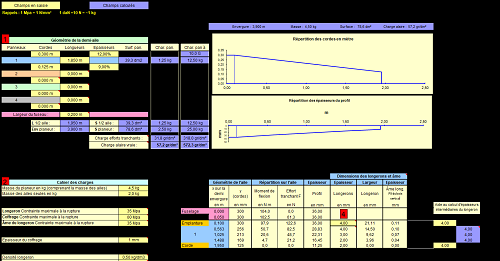
On the Dutch modelbouw forum and on Retroplane, I stumbled in an excel sheet with wing spar and wing joiner calculations. That was nice, I'm educated in Kilogrammes , later Newtons and finally Mpa's , and I was afraid to make a mistake by a factor of 10 or something. With this program I could calculate the wing spar and also a wingjoiner.
http://voiletech.free.fr/Modelismeplaneur/calcul_longeron.htm
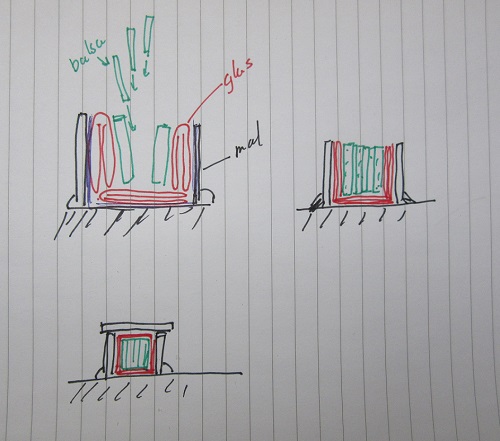
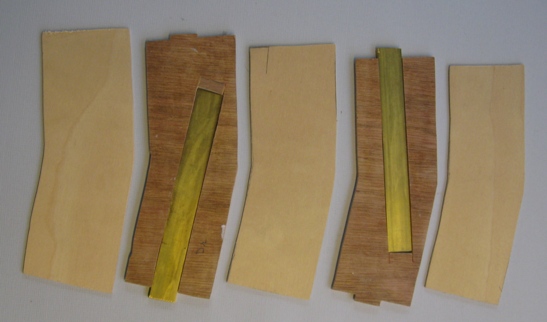
I realized that if I made a wing joiner of UD glass/epoxy myself I could make it with dihedral built in . This means , moreover, that the wing joiner could only be held in place by the (reinforced) skin of the fuselage, a tube is not possible because of the built-in V . I bought 20 X 20mm square aluminum tube which will fit nicely between the 20 X 4 mm upper and lower girder of the main spar of the wing. Now I had to make a 17 X 17mm square glass rod which would fit into this square tube . I thought let's try to make that. From spruce battens and a board (covered with packing tape to get a non sticking surface) glued together with hotglue, I made a simple mold.
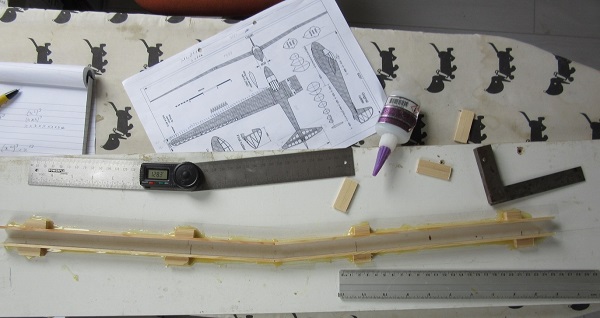
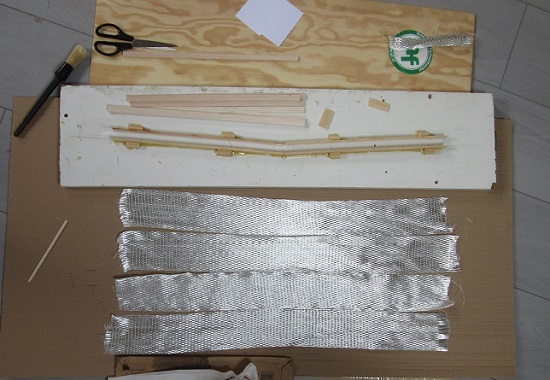
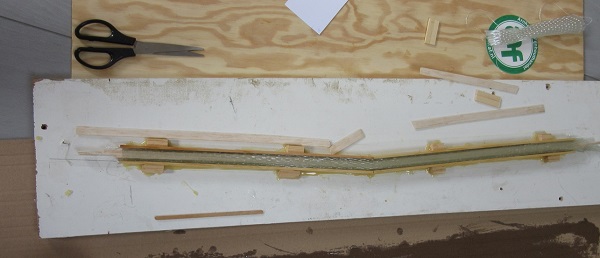
I took four pieces of UD glass tape, 7.5cm wide (600gr / m). Impregnated that with epoxy resin and the folded lengthwise twice double (4 thick) , placed on the bottom of the mold, and after that the two upright sides in a similar way. In between those upright impregnated tapes,I first put 2mm balsa strips of 11mm, each against one side and then I put 1mm balsa strips between the other balsa strips to get the impregnated glass in place without touching it. Thereafter the last double folded layer of glass on top of it, and closed it with a batten with the tape to get a flat surface. Now I got a square glass / epoxy tube with a balsa core

The wall thickness turned out to be more than 4mm, making the joiner much stronger than the wing spar , it should stand 27G according to the above calculation program. The weight of this joiner is 168 g, 60 cm long. I was glad with this experiment, now I could start the building of glider itself.
To be continued.
Vincent (DB) |
|
| Revenir en haut de page |
|
 |
Clifton
Psycho Posteur


Inscrit le: 07 Mai 2014

Localisation: Anjou
Âge: 63

|
| Posté le: 12/11/2020 20:03 Sujet du message: |
|
|
|
Hello Vincent
Very good choice this glider. I have the Martin Simons book too and there are lot of beautiful gliders to build.
Nice job, as usual !
Philippe

Slingsby Petrel, à mon gout le plus beau de tous, quoi que le Fafnir ... Ah ces ailes en mouette, un jour ....
Rien de ce qui est fini n'est jamais achevé tant que tout ce qui est commencé n'est pas totalement terminé (Pierre Dac) |
|
| Revenir en haut de page |
|
|
bocorvin
Maniaco Posteur
Inscrit le: 17 Aoû 2015
Localisation: Hillegom
Âge: 79
|
| Posté le: 12/11/2020 23:17 Sujet du message: |
|
|
|
Merci Philippe  , ,
It will be a slow project, bur I'll enjoy it!
Vincent (DB) |
|
| Revenir en haut de page |
|
|
de Schaetzen Harold
Maniaco Posteur
Inscrit le: 06 Avr 2006

Localisation: Schilde
Âge: 80

|
| Posté le: 16/11/2020 11:41 Sujet du message: |
|
|
|
Dear Vincent,
I am also following your new construction with great attention.
I am suprised with your construction of a special wing steel joiner. I am afraid with the stifness of your system. Or you are going to build a very strong enclosure around?
As an alternatif I suggest a system as I used for my Reiher.
If you look at thes included picture, you shall understand. Can been build for a flat steel wing or a round one.
Met zeer vriendelijke groeten.
Harold |
|
| Revenir en haut de page |
|
|
bocorvin
Maniaco Posteur
Inscrit le: 17 Aoû 2015
Localisation: Hillegom
Âge: 79
|
| Posté le: 16/11/2020 15:43 Sujet du message: |
|
|
|
Dear Harold,
Thanks for your interest in this project! Wingjoiners are more difficult than I thought....
It looks like you misinterpretated how my wingjoiner was made, its made from (UD)glass/epoxy composite, not from steel.
The wingjoiner you use in the Reiher is a sound construction, but I dont like to use it for this glider because its so flexible horizontally. Let me explain my thoughts how I came to this solution.
I prefer to place the wingjoiner between the upper and lower wingspar. That combined with the dehydral, limits the height of the wingjoiner. In this glider the pilots sits between the leading edges of the wing, so the wingjoiner has to also be strong horizontally. The square glass/epoxy is strong in both directions. Besides, because its only held in place by the (local reinforced) skin and not in a tube, it can flex a bit. That reduces the peak loads with hard landings. When a profile is put in a stiff tube it can flex much less and the peak loads can be higher.
The wingjoiner slides in a square aluminium tube which will be bonded solidly with the wingspar, so I think I have a sound solution.
Met ook zeer vriendelijke groet,
Vincent (DB) |
|
| Revenir en haut de page |
|
|
caralp_laurent
Psycho Posteur
Inscrit le: 30 Jan 2006
Localisation: La Houssaye en Brie 77
Âge: 54

|
| Posté le: 25/11/2020 16:05 Sujet du message: |
|
|
|
Super projet Vincent ! ![[clap]](images/smiles/Clap.gif)
Bonne construction !
Amicalement,
Lolo
Lolométéo, rétro addict ;o)
"On commence à vieillir quand on remplace ses rêves par des regrets"
Sénèque |
|
| Revenir en haut de page |
|
|
bocorvin
Maniaco Posteur
Inscrit le: 17 Aoû 2015
Localisation: Hillegom
Âge: 79
|
| Posté le: 28/11/2020 18:00 Sujet du message: |
|
|
|
Hello everyone,
I thought it would be most convenient to start with the tail surfaces, I wanted to make the plans digitally, for me that is something completely completely new. I had already played around with the drawing program Devwing last summer and I started to understand a bit how that worked.
In addition, I had to try to understand how the real glider was constructed. Unfortunately, things went wrong in those two learning processes, it turned out that the horizontal stabilizer of the King Kite was more complex than I had realized. I also managed to make entire drawings disappear. Finally I managed to send the files as DXF. A good friend, Adri CNCed the ribs and I started to build the horizontal stabilizer. Because I had misinterpreted a few construction details the result were unsatisfactory. Adri suggested it was better to CNC a new set of stabilo ribs. In the meantime, I started building the vertical stabilizer.

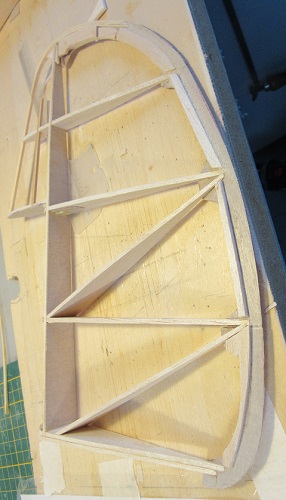
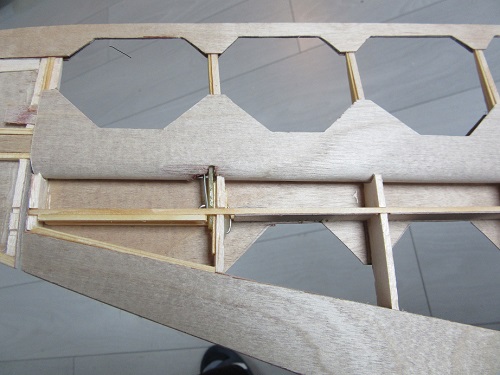
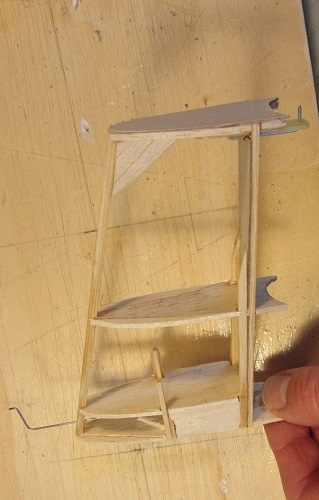
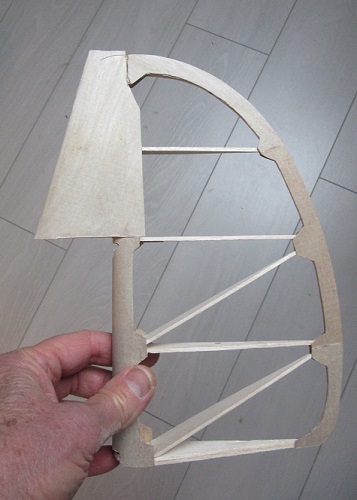
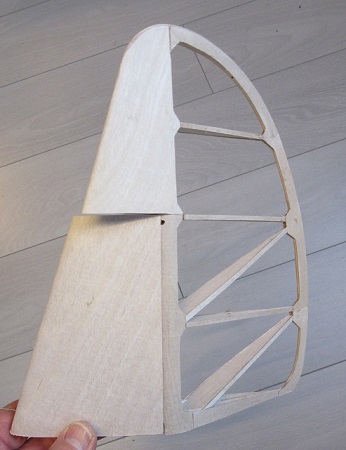
The fin under construction, the laminated top arch is already in place, as are the hinges
I wanted the rudder itself to be easily detachable, which is convenient for storage and transport.
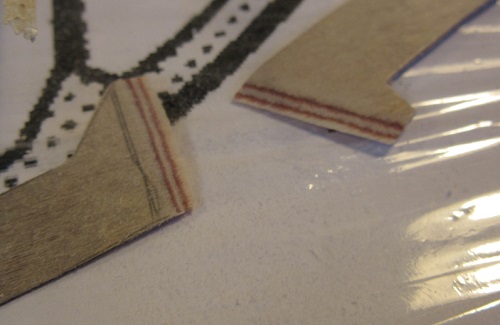
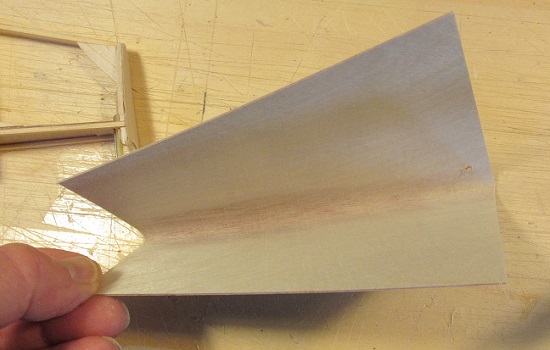
The top and TE of the rudder are completely curved, so I laminated the top of 3x1 spruce, bent after being poured over with boiling water and glued with thin CA.
The rear of the TE is made up 3 pieces of 0.4mm plywood, scarfed joined on both sides, filled with balsa, forming a sandwich.
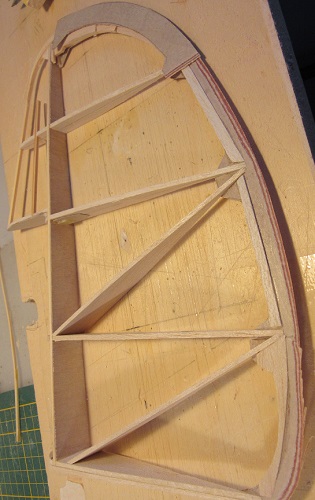
right half of the py TE glued on and holes already drilled in the ribs where rudder must be detached .
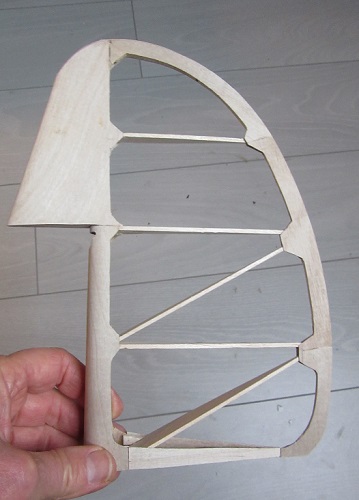
The two hinge pins are made 1mm steel in 1mm epoxy/glass, so I can slide the rudder from above over these pins. It is secured with a sliding steel wire at the lowest rib
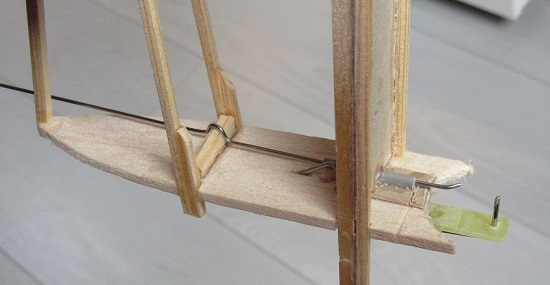
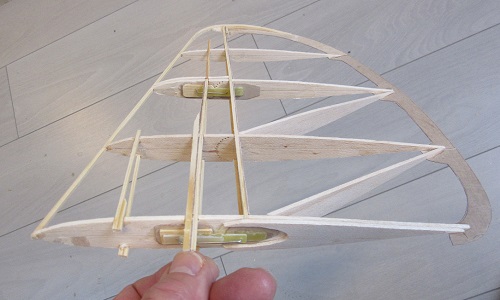
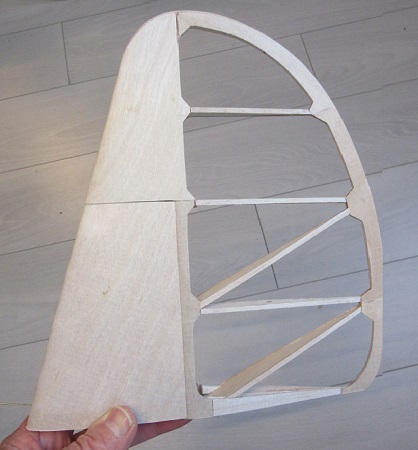
I covered the front of the rudder with curved 0.4mm plywood, together with the main spar of the rudder this becomes a light and stiff plywood tube.
the weight is about 30gr in this building stage.
With the rest of the plywood covering I wait until a later stage of the construction, first I will built the horizontal stabilizer.
To be continued,
Vincent (DB) |
|
| Revenir en haut de page |
|
|
sebastian92
Serial Posteur


Inscrit le: 01 Sep 2015
Localisation: Hauts de seine
Âge: 62

|
| Posté le: 28/11/2020 18:14 Sujet du message: |
|
|
|
Hello Vincent,
we are all looking to gain a few grams 
good job !
let's continue like this !
Pourvu que ça vole, roule, flotte ! normalement j'ai tout bien fait pour
Un bel avion est un avion qui vole bien ! Marcel Dassault
Sebastian
Vends module émission 2.4 ghz pour Futaba, Hitec TZ-FM + 2 récepteurs corona 8 voies (contact en MP)
|
|
| Revenir en haut de page |
|
|
bocorvin
Maniaco Posteur
Inscrit le: 17 Aoû 2015
Localisation: Hillegom
Âge: 79
|
| Posté le: 28/11/2020 20:03 Sujet du message: |
|
|
|
Hello Sebastian,
That is a good idea, .
Vincent (DB) |
|
| Revenir en haut de page |
|
|
ThomasF
Psycho Posteur

Inscrit le: 16 Jan 2010

Âge: 67

|
| Posté le: 29/11/2020 12:34 Sujet du message: |
|
|
|
Hello Vincent,
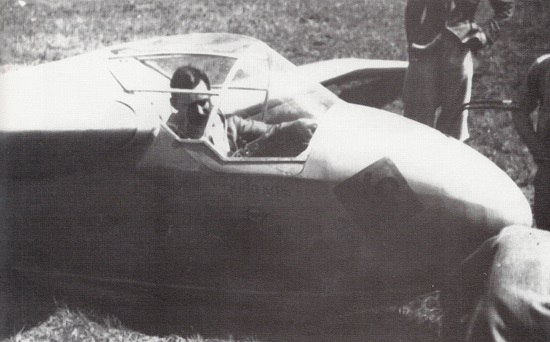
I found the list of participants, aircraft of the international competition of 1937 and the result in the book by Peter Riedel "Über sonnige Weiten" - Experienced Rhön history 1933-1939.

Attendees

Result
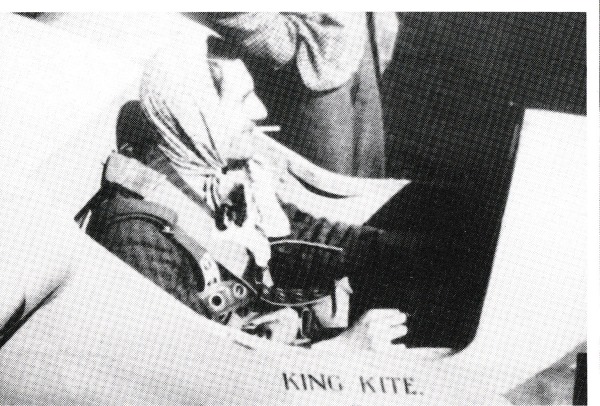
P.M. Watt best English pilot 12th place.
Gruß
Thomas |
|
| Revenir en haut de page |
|
|
bocorvin
Maniaco Posteur
Inscrit le: 17 Aoû 2015
Localisation: Hillegom
Âge: 79
|
| Posté le: 29/11/2020 15:18 Sujet du message: |
|
|
|
Hello Thomas,
Danke fur die info, dass ist schon und die Photo ist ganz gut, weil Ich keiner von das interior? habe Die Tuche um seiner Kopf musst doch modelliert worden, ebenso die Zigarette
Vincent (DB) |
|
| Revenir en haut de page |
|
|
ThomasF
Psycho Posteur
Inscrit le: 16 Jan 2010
Âge: 67
|
|
| Revenir en haut de page |
|
|
de Schaetzen Harold
Maniaco Posteur
Inscrit le: 06 Avr 2006
Localisation: Schilde
Âge: 80
|
| Posté le: 29/11/2020 18:48 Sujet du message: |
|
|
|
Proficiat Vincent,
Zoals verwacht, alles goed nagedacht en gepland.
Ik verheug mij om jouw constructie van dichtbij te volgen.
Mvg.
Harold
Félicitations Vincent. Une belle et intéressante construction à suivre de très près. |
|
| Revenir en haut de page |
|
|
bocorvin
Maniaco Posteur
Inscrit le: 17 Aoû 2015
Localisation: Hillegom
Âge: 79
|
| Posté le: 29/11/2020 19:39 Sujet du message: |
|
|
|
Danke Thomas,
die sachen van C Evans hatte Ich bereits, aber die andere von benitz/Watt sind wieder ganz gut ![[amen]](images/smiles/amen.gif) , es gibt so wenig dokumentation, klasse das Sie dass gefunden habe , es gibt so wenig dokumentation, klasse das Sie dass gefunden habe
Beste Harold,
Dank je voor je plezierige commentaar, leuk dat je het wilt volgen!
Mvrg, LG
Vincent (DB) |
|
| Revenir en haut de page |
|
|
ThomasF
Psycho Posteur
Inscrit le: 16 Jan 2010
Âge: 67
|
|
| Revenir en haut de page |
|
|
bocorvin
Maniaco Posteur
Inscrit le: 17 Aoû 2015
Localisation: Hillegom
Âge: 79
|
| Posté le: 01/12/2020 11:06 Sujet du message: |
|
|
|
Hallo Thomas,
Nochmahl vielen Dank fur alle info
Vincent (DB) |
|
| Revenir en haut de page |
|
|
Mad Doc
Accro Posteur


Inscrit le: 08 Juil 2014

Localisation: Wuppertal, Deutschland
Âge: 49
|
| Posté le: 02/12/2020 17:47 Sujet du message: |
|
|
|
Hello Vincent!!!
It is always a great inspiration to see you building something, nice solutions you
created!
Hope you are well, greetings from Wuppertal!
Christian |
|
| Revenir en haut de page |
|
|
bocorvin
Maniaco Posteur
Inscrit le: 17 Aoû 2015
Localisation: Hillegom
Âge: 79
|
| Posté le: 03/12/2020 11:26 Sujet du message: |
|
|
|
Hello Christian,
Thanks for your nice comments . All is well over here in Hillegom, strange times.
The King Kite is an interesting glider, not much info about it, so it take time to solve all those riddles 
LG
Vincent (DB) |
|
| Revenir en haut de page |
|
|
bocorvin
Maniaco Posteur
Inscrit le: 17 Aoû 2015
Localisation: Hillegom
Âge: 79
|
| Posté le: 09/12/2020 11:50 Sujet du message: |
|
|
|
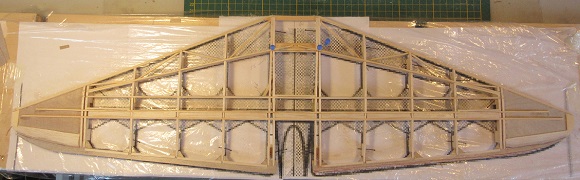
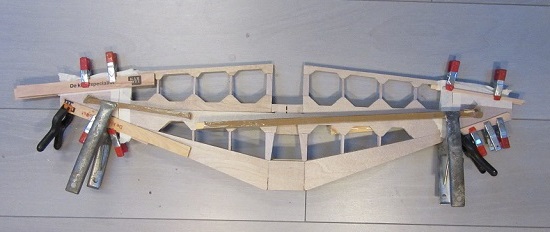
In the previous construction report I had already written something about the horizontal stabilizer. I had completely overlooked something in the plans
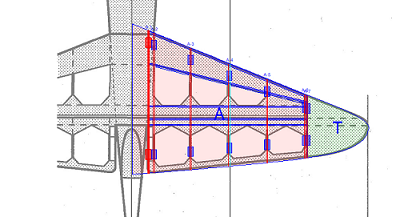
The front of the moving part is not only a semicircular plywood tube (which I was used to) but also a square box girder behind it. I think this is there to take up the bending and torsion of the balancing tips. In addition, the designers opted for a thin profile, which can be clearly seen in this photo (many thanks to Thomas)
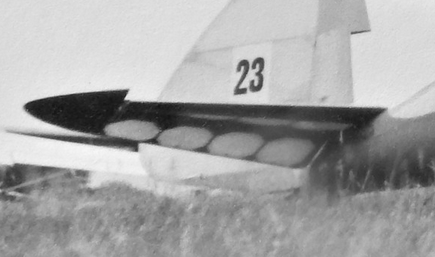
. Because the horizontal stabilizer is also very tapered, the profile at the tips becomes very thin. I also wanted to keep the horizontal stabilizer very light, I presume that the 0.5mm plywood covering and web plates, glued with 2 X 2 mm spruce, should be strong enough.
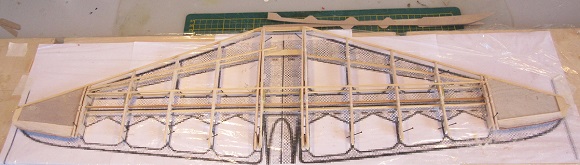
I had to make sure that there was enough sheeting to keep the construction stable when removing it from my buildingboard, so I filled the space between the 2x2 beams of the rudder with balsa and glued all the web plates in. I glued diagonals in the nose, which together with the top sheeting should already form a kind of D box. The bottom sheeting can only be added when the stabilizer is off the building board.
Top sheeting, scarf joints
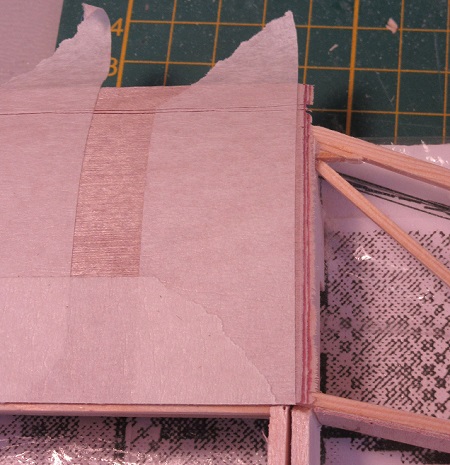
The TE, just like the vertical tail, is constructed from 2 layers of 0.5 plywood with balsa in between. Yet another problem caused by the balancing tips is the detachability of the rudder, it cannot be slided aside. I bent a hinge pins from 1mm steel wire, which I can later detach with the help of a screwdriver or a similar tool from the bottom
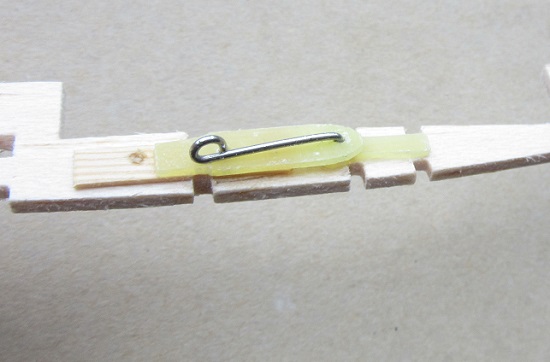
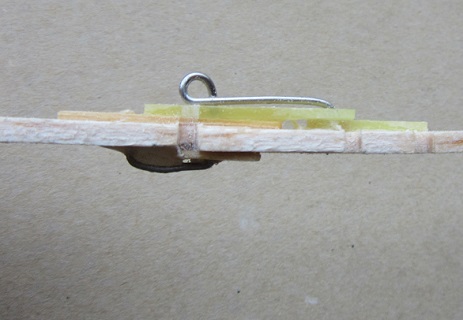
The nose D box sheeted on top also
In the background are the prebent strips for the sheeting of the elevator.
To be continued,
Vincent (DB) |
|
| Revenir en haut de page |
|
|
sebastian92
Serial Posteur
Inscrit le: 01 Sep 2015
Localisation: Hauts de seine
Âge: 62
|
| Posté le: 09/12/2020 12:26 Sujet du message: |
|
|
|
Hello Vincent,
what a speed too
j'aime bien tes petites astuces techniques pour trouver les bonnes solutions ; continue like this !
Pourvu que ça vole, roule, flotte ! normalement j'ai tout bien fait pour
Un bel avion est un avion qui vole bien ! Marcel Dassault
Sebastian
Vends module émission 2.4 ghz pour Futaba, Hitec TZ-FM + 2 récepteurs corona 8 voies (contact en MP)
|
|
| Revenir en haut de page |
|
|
Clifton
Psycho Posteur
Inscrit le: 07 Mai 2014
Localisation: Anjou
Âge: 63
|
| Posté le: 09/12/2020 12:37 Sujet du message: |
|
|
|
As Sebastian said, very good job, I like your mechanical's ideas too !
Slingsby Petrel, à mon gout le plus beau de tous, quoi que le Fafnir ... Ah ces ailes en mouette, un jour ....
Rien de ce qui est fini n'est jamais achevé tant que tout ce qui est commencé n'est pas totalement terminé (Pierre Dac) |
|
| Revenir en haut de page |
|
|
caralp_laurent
Psycho Posteur
Inscrit le: 30 Jan 2006
Localisation: La Houssaye en Brie 77
Âge: 54
|
| Posté le: 09/12/2020 16:07 Sujet du message: |
|
|
|
Hi Vincent,
Good job !
The shape of this tail is unusual and beautiful !
All this glider is beautiful, especially the shape of the cockpit canopy on a picture above.
Friendly,
Lolo
Lolométéo, rétro addict ;o)
"On commence à vieillir quand on remplace ses rêves par des regrets"
Sénèque |
|
| Revenir en haut de page |
|
|
bocorvin
Maniaco Posteur
Inscrit le: 17 Aoû 2015
Localisation: Hillegom
Âge: 79
|
| Posté le: 09/12/2020 16:39 Sujet du message: |
|
|
|
Thanks for your nice comments!
Yes its a remarkable glider with a wonderfull canopy. Three prototypes were built simultaneously, all with the same error in, probably, the washout. They were very prone to spinning. 
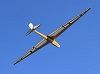
In 1984 a new King Kite was build with a different profile and flew very good.
Vincent (DB) |
|
| Revenir en haut de page |
|
|
bocorvin
Maniaco Posteur
Inscrit le: 17 Aoû 2015
Localisation: Hillegom
Âge: 79
|
| Posté le: 17/12/2020 16:05 Sujet du message: |
|
|
|
I went on with the elevator. First I cut the rudderhorn from 1mm epoxy sheet. I had to attach that to the extra box girder of the elevator.
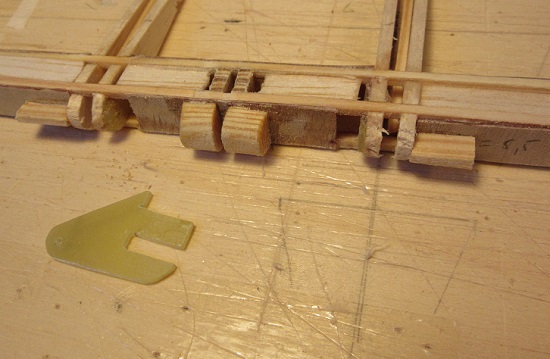
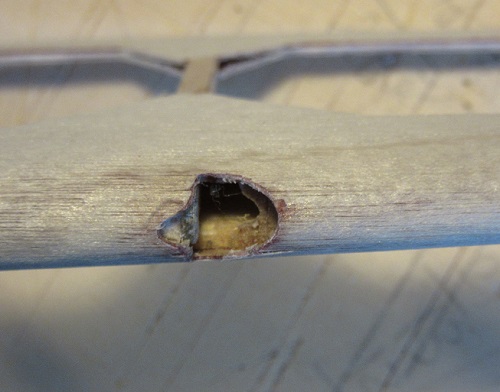
To get a proper bond, I filled the inside of the web plates with spruce strips. I didn't want to glue the rudderhorn in its place yet and stored it . Next was the nose of the rudder combined with the extra box girder. On pre-bent (with boiling water) ply strips I drew the ribs on the inside to make the various gusset plates in one piece.
In reality it was different, but I wanted it to keep it as light as possible. I glued these pre-bent strips over the main spar of the rudder to form a torsionally rigid and round nose. At the location of the hinges I milled openings.
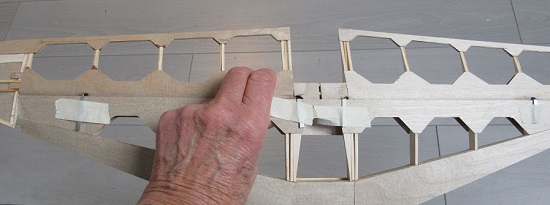
and now the rudder had to fit the fixed part of the horizontal stabilizer. After some fiddling it fitted.
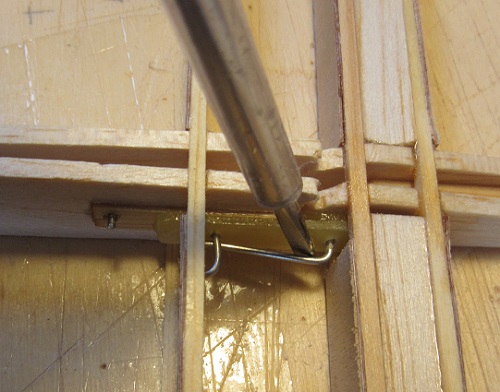
However, once I had glued one capstrip in place , attaching and loosening the elevator with a screwdriver (to keep the spring hinge pins unlocked) turned out to be quite inconvenient. After a night's sleep I made a kind of angled screwdriver from 1mm iron strip, which I could temporarely fix with a piece of tape.
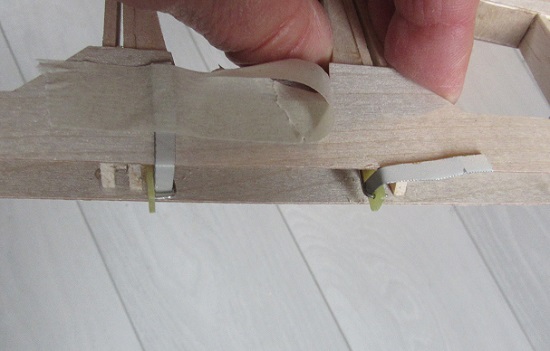
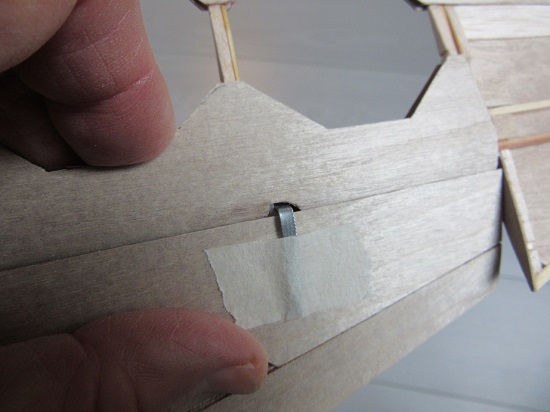
Then I could turn the iron strips back and I could (combined with maximum deflection of the elevator) take them out.
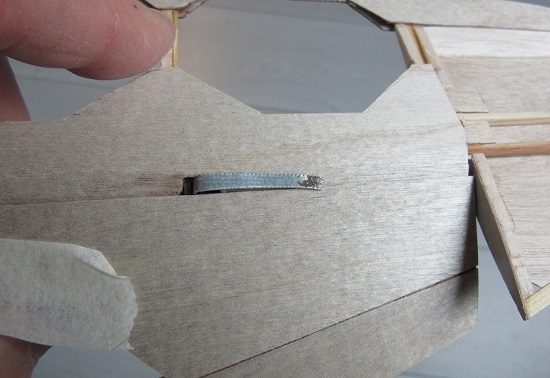
. Now the pivot pins sprung back in place and the rudder was secured. I was very happy with this, because I could also apply this technique to the ailerons. Besides I like to have the rudders removable, its easy with varnishing and covering
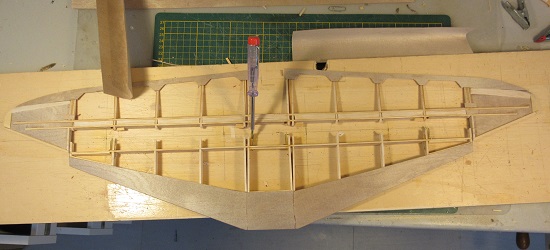
With some clamping the tips were sheeted with ply
Then I sanded all the triangular gusset plates neatly into shape and the stabilizer was more or less ready. It feels very stiff and weighs 118 grams, I cant get it lighter....
To be continued,
Vincent (DB) |
|
| Revenir en haut de page |
|
|
de Schaetzen Harold
Maniaco Posteur
Inscrit le: 06 Avr 2006
Localisation: Schilde
Âge: 80
|
| Posté le: 18/12/2020 10:45 Sujet du message: |
|
|
|
Dear Vincent,
Congratulations for your the interesting construction method.
I believe you don't sleep very well, since tou started this new project. Every night you wake up and come with a new solution.
I am waiting for the new steps.
Best regards.
Harold |
|
| Revenir en haut de page |
|
|
bocorvin
Maniaco Posteur
Inscrit le: 17 Aoû 2015
Localisation: Hillegom
Âge: 79
|
| Posté le: 18/12/2020 12:15 Sujet du message: |
|
|
|
Dear Harold,
Thanks for your nice remarks. Luckily I sleep quite well, I found out that idea's just pop up at moments that you don't think about it .
The problems I like to solve keep slowly nagging at me
Best regards,
Vincent (DB) |
|
| Revenir en haut de page |
|
|
bocorvin
Maniaco Posteur
Inscrit le: 17 Aoû 2015
Localisation: Hillegom
Âge: 79
|
| Posté le: 23/12/2020 13:11 Sujet du message: |
|
|
|
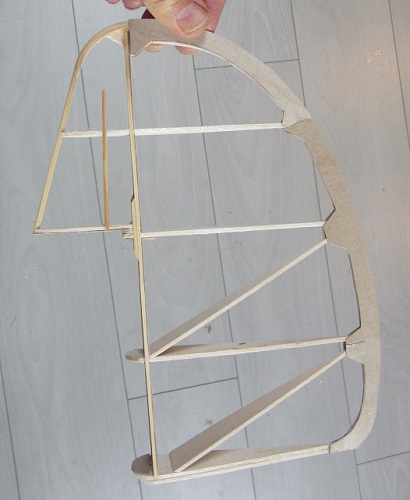
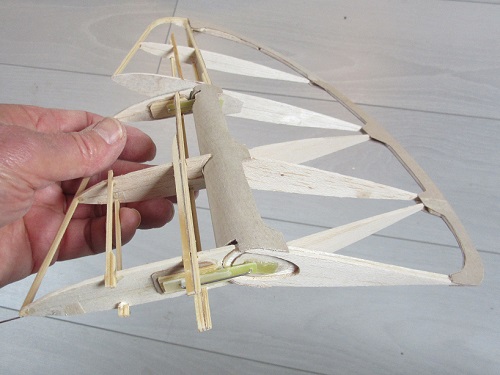
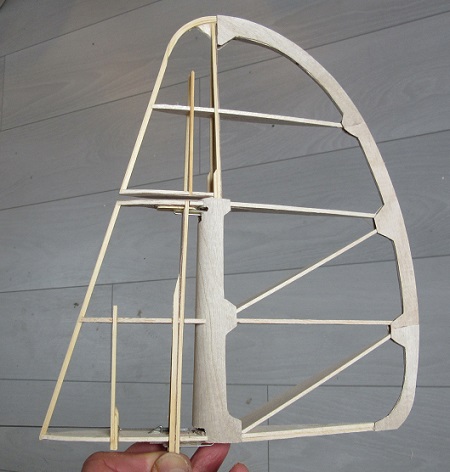
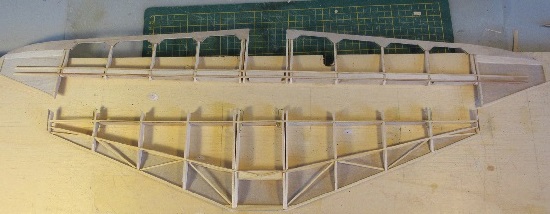
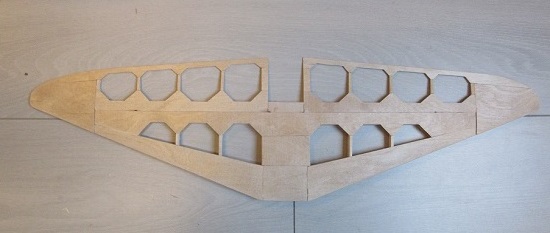
I went on with the vertical tail.
The fin was already ready with one side sheeted, but unfortunately I saw that both on the drawing and on the photos that the vertical tail had a much rounder nose than the profile I had chosen, afterwards that was not the right choice. I had already sheeted one side, so I ripped that off. I glued filler pieces to the ribs
sanded them, along with those of the rudder, with a long sanding batten into a more rounded profile.
With the technique I was familiar with, I bent the plywood into shape
with boiling water. I and sheeted both the fixed part and the rudder itself
Finished it with capstrips on the ribs and sanded the gusset plates in shape
The vertical stabilizer was now roughly ready, and weighs 50 grams.
With the tailplanes in this stage I can slowly start on the fuselage.
Vincent (DB) |
|
| Revenir en haut de page |
|
|
Sed
Maniaco Posteur

Inscrit le: 13 Mai 2015
Localisation: Villeurbanne
Âge: 60
|
| Posté le: 23/12/2020 15:24 Sujet du message: |
|
|
|
Hello Vincent
Very nice job ! And light ![[good]](images/smiles/good.gif) ! !
Now waiting for the fuselage  ! !
Serge |
|
| Revenir en haut de page |
|
|
bocorvin
Maniaco Posteur
Inscrit le: 17 Aoû 2015
Localisation: Hillegom
Âge: 79
|
| Posté le: 31/12/2020 14:39 Sujet du message: |
|
|
|
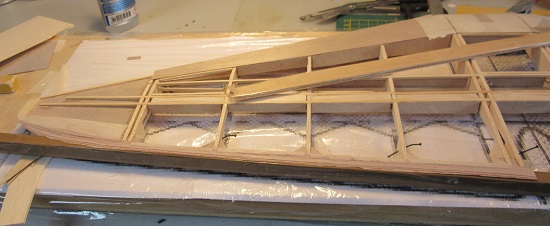
Bonjour a tous,
After finishing the tail planes it was time to digitally draw the fuselage. I decided to having a go at it and bought Devfus, a program that is still affordable for a hobbyist.
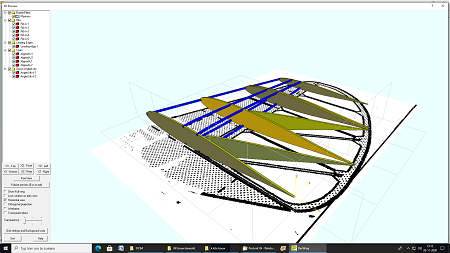
After a lot of messing around with terms on the screen that I had never heard of, I got familiar with some things! Unfortunately, sometimes drawings were suddenly put (by magic??) in a different folder and I could no longer open them in the drawing program (Yes, laugh ...) Thats why I drew the hull about three times, practice makes perfect they say ... Gradually I found out what is possible, it is easier to make a hull straight in a drawing than to sand frames down or glue some extra material on. Here you see some of the drawings of the frames and
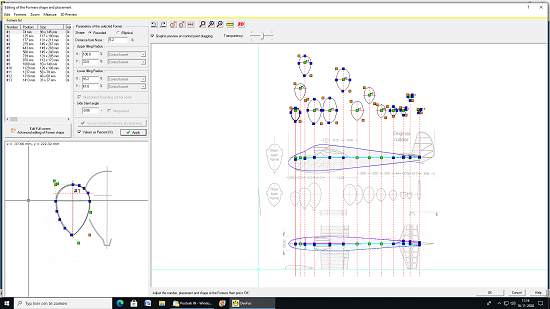
placement of the frames,

the 3d view of the fuselageI
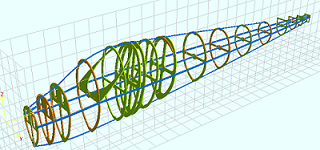
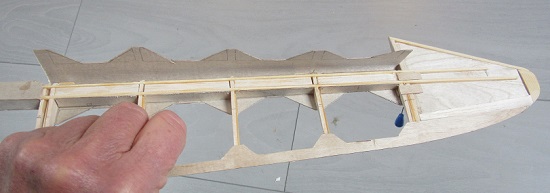
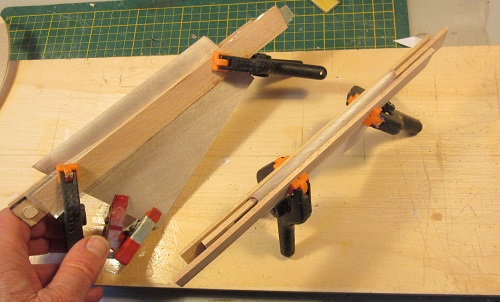
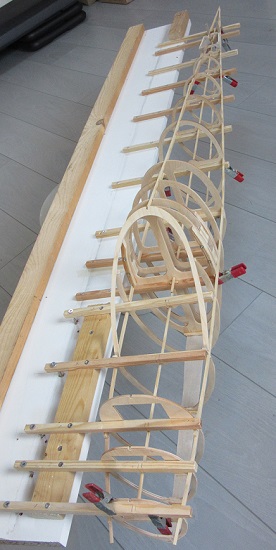
thought it would be convenient to use a central batten to align the frames. My friend Adri was kind enough to CNC the frames and he did it excellent. Just like with the Gull, I made a construction setup of a panel of chipboard to which I screwed 10 x 10mm battens at frame distances. I deliberately made a jump in it because I wanted to sheet parts of the hull on the construction setup. The tail at the top and the nose at the bottom. In this way, it stays nice and straight and the stringers can be as thin as possible, to keep the weight of the tail down
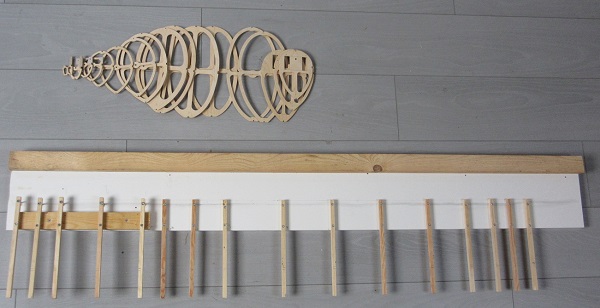
Aligning the frames took a lot of time and I would like to hurry up, but I know sadly that errors in the frame setup are difficult to correct later . One of the two main bulkheads is prepared so the wingjoiner can be slid through it
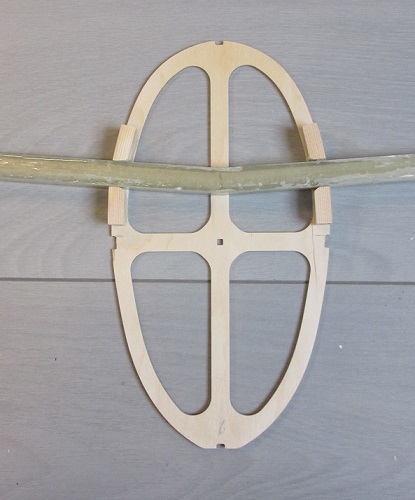
Here is the 3X3mm spruce batten which slides through the centre of the frames,. I first wanted to screw them on the jig, but clamps actually do it better.
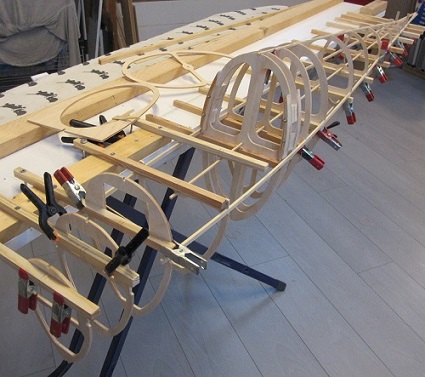
I first glued in both stringers left and right and then made the wide bottom (keel?) stringer, where the landing skate will be attached later.
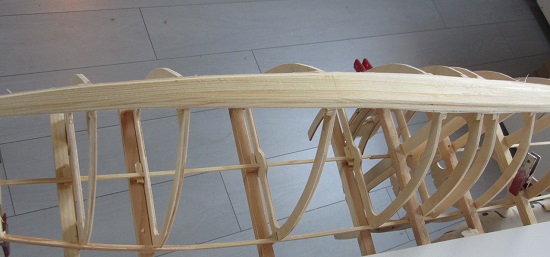
So nice that the frames were aligned ( Icant find the correct word for that), I didn't have to sand them much! Designing took quite a bit of effort, but this was very satisfying
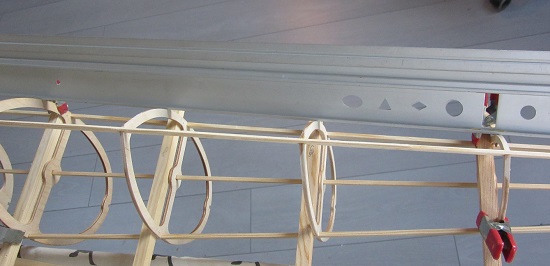
It's starting to look like a fuselage!
Vincent (DB) |
|
| Revenir en haut de page |
|
|
de Schaetzen Harold
Maniaco Posteur
Inscrit le: 06 Avr 2006
Localisation: Schilde
Âge: 80
|
| Posté le: 01/01/2021 12:49 Sujet du message: |
|
|
|
Dear Vincent,
Very nice to discover your construction this 1st of Jan. 2021! A lot of work was done during these last days.
Congratulations for all your research work to find a correct solutions for your hull construction.
I used the same construction lay-out for my Ka2B. Already a few yeas ago.
A very easy system.
I am only a little afraid for the "light construction". (Maybe a fault view, because your pictures are a small size?)
You will have some work for strengthen the fuselage?
Best regards and only good news for 2021. |
|
| Revenir en haut de page |
|
|
|