| Voir le sujet précédent :: Voir le sujet suivant |
| Auteur |
Message |
OliverPrinz
Apprenti Posteur


Inscrit le: 30 Mar 2010

Localisation: Baden-Württemberg
Âge: 60

|
 Posté le: 16/08/2014 16:51 Sujet du message: Jaguár of Paco Modell Posté le: 16/08/2014 16:51 Sujet du message: Jaguár of Paco Modell |
  |
|
|
Salut a tous,
Probably everybody who took part at the last retroplane meeting 2014 saw the wonderful antique modell of Gábor (PacoModell which he was showing around.
I could not resist and ordered already one while returning to Germany.
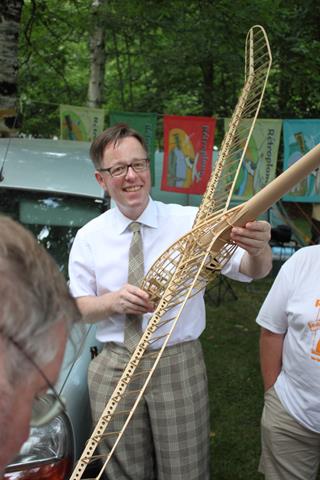
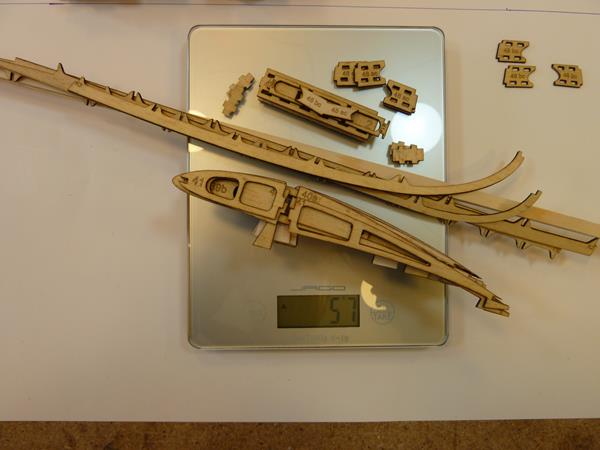
First some data:
wingspan = 2,18m
length = 1,22m
weight = 700g
wing area = 36,8 dm² which makes 19 g/dm²
RC = elevator, rudder, high start hook
Hoping I will find some/many followers, I start a new report about building one wonderful antique glider...
Have fun,
Oliver. |
|
| Revenir en haut de page |
|
 |
VincentB
Serial Posteur


Inscrit le: 23 Jan 2006

Localisation: Hérault
Âge: 62

|
| Posté le: 16/08/2014 17:25 Sujet du message: |
|
|
|
Hi Oliver,
Of course we will follow with interest your building 
(What a pity you was not at the slope the sunday, the Wind was light and perfect for your big Strolch)

Retroplane et modélisme en pause, vanlife à haute dose. |
|
| Revenir en haut de page |
|
|
OliverPrinz
Apprenti Posteur
Inscrit le: 30 Mar 2010
Localisation: Baden-Württemberg
Âge: 60
|
| Posté le: 16/08/2014 19:32 Sujet du message: content of kit |
|
|
|
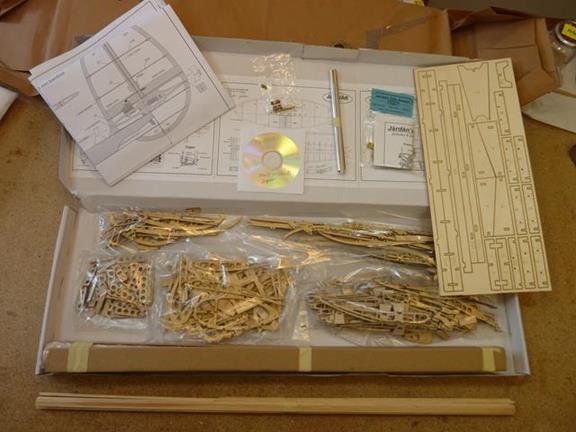
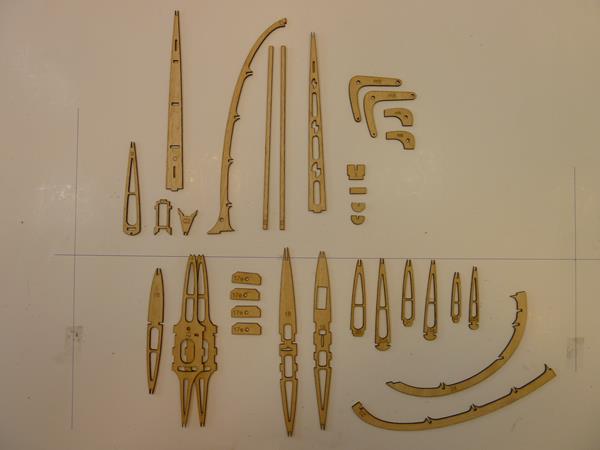
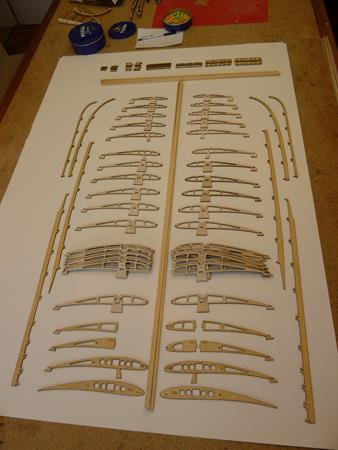
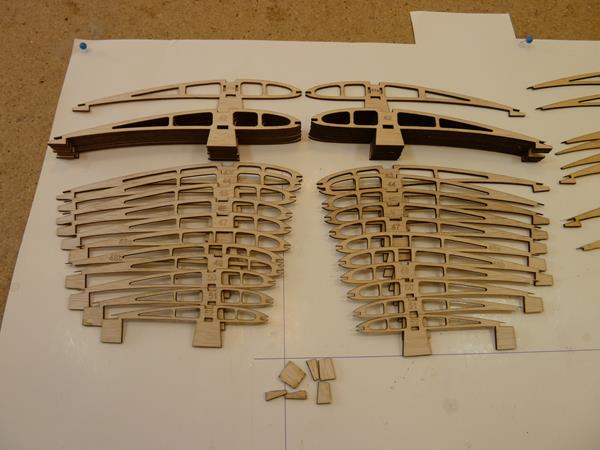
The kits contains all materials which are needed to build this modell.
So you get
- plan
- CD with photos showing different stages of progress
- many plastic bags which contains e.g. parts for the rudder, for the elevator, ...
- the pre-built fuselage to the tail
- light weight PE fabrique
You will miss a description, but it's not necessary: the well designed parts and the photos let you know what to do.
|
|
| Revenir en haut de page |
|
|
OliverPrinz
Apprenti Posteur
Inscrit le: 30 Mar 2010
Localisation: Baden-Württemberg
Âge: 60
|
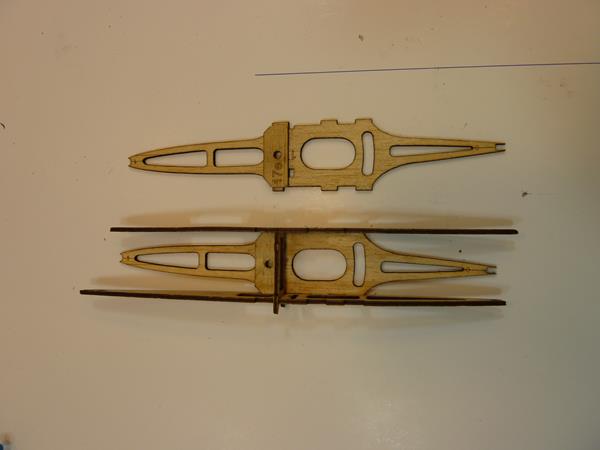
| Posté le: 17/08/2014 13:37 Sujet du message: all-fyling rudder: rips, spar, trailing edge |
|
|
|
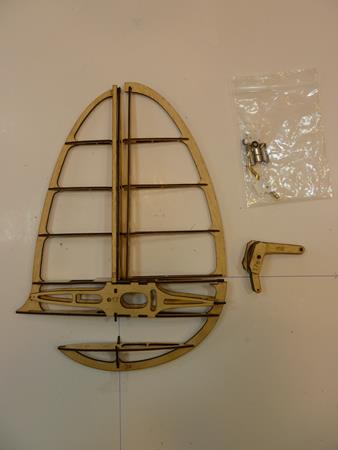
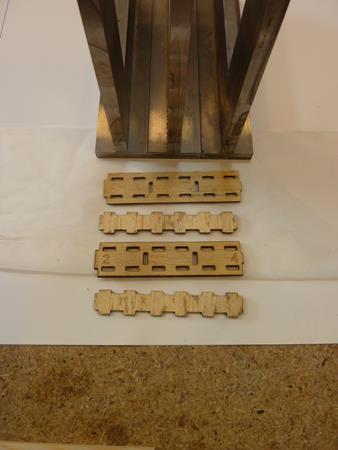
Amazing how few parts are needed for this all-flying rudder
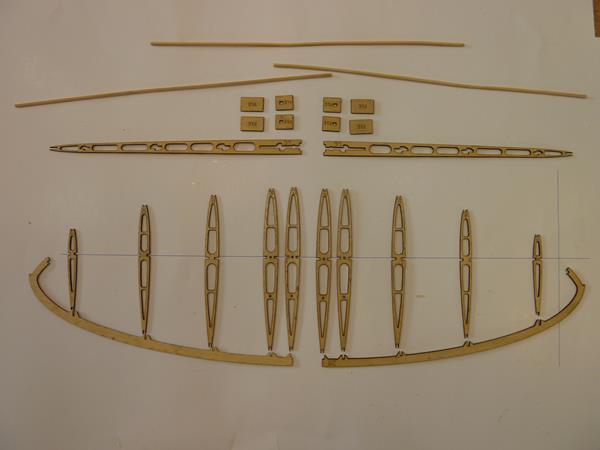
Nice detail: the rips need to be "turned" into the spar.
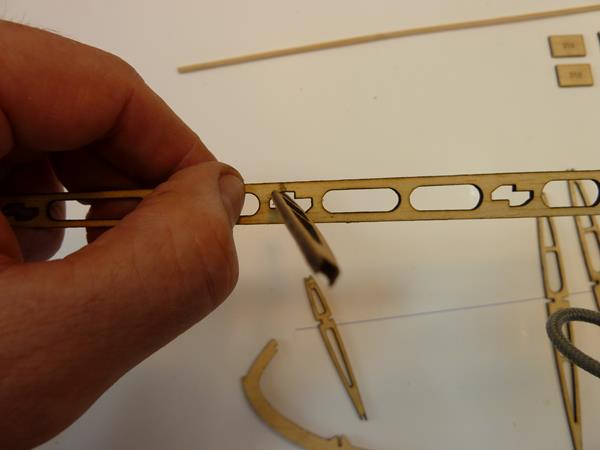
Congratulation for this idea Gábor:
Inbetween the enhancement of the spar there is a piece of rubber pipe. This pipe will provide enough friction to the bar, so the halfs of the rudder won't slip and stay in position during flight, but still you can remove both halfs easily.
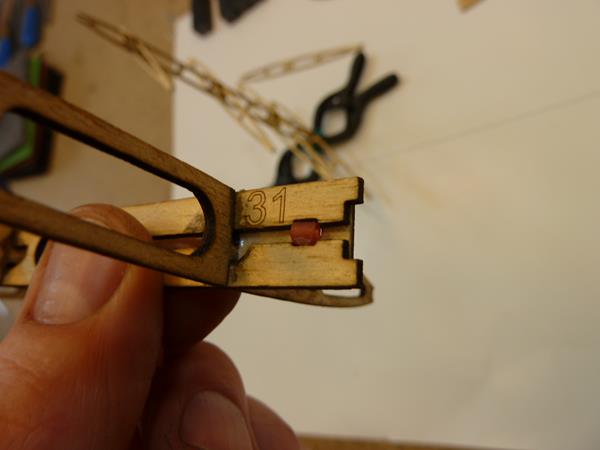
To ensure the right alignmend I've glued in the trailing edge standing upright using angle brakets.
Note:
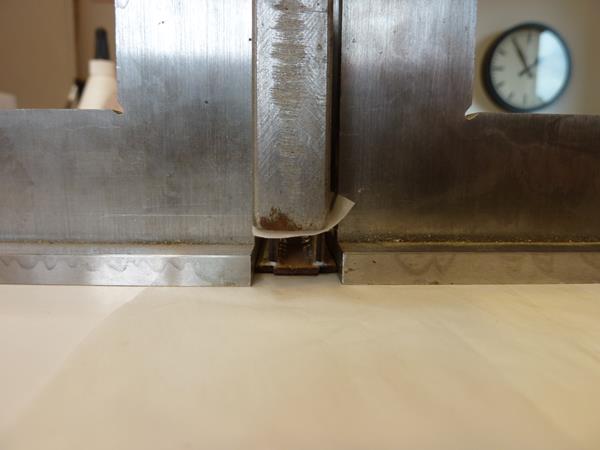
Because these parts are laser cut you have burned wood dust on top of each cut edge. The wood glue needs to be spread using a little wooden piece on each glue position. Otherwise the glue might roll off the burned dust and won't stick the parts well.
A toute à l'heure,
Oliver. |
|
| Revenir en haut de page |
|
|
Roger_Vettorel
Fidèle Posteur

Inscrit le: 07 Nov 2011
Localisation: Montbéliard
Âge: 73
|
| Posté le: 18/08/2014 07:44 Sujet du message: Jaguàr of Paco Model |
|
|
|
Hallo Oliver
Le Jaguar est un planeur très élégant et le kit a l'air très bien conçu.
Un essai a été fait dans la revue "bauen und fliegen" qui n'existe plus aujourd'hui et c'est bien dommage.
Est-ce que tu penses refaire ce modèle à plus grande échelle comme pour le Strolch ?
Bonne construction !
Amicalement
Roger |
|
| Revenir en haut de page |
|
|
OliverPrinz
Apprenti Posteur
Inscrit le: 30 Mar 2010
Localisation: Baden-Württemberg
Âge: 60
|
| Posté le: 18/08/2014 10:24 Sujet du message: bauen&fliegen 5/2012 |
|
|
|
Salut Roger,
Thanks for remembering me. You're right, there's a report in bauen&fliegen 5/2012. I just had a look into it.
Some details have changed/improved to the version I build now. Even if this former construction was perfect already.
About your question "enlarging the Jaguár"... no I will not.
This "little project" is just for a quick period, helping me to get rid of my pause building a 5m Petrel. I needed something to get my brain free again because I got stuck and had no fun any more building the Petrel.
What I will do in future times: I'm already drawing an own construction which will be around 3,5m span and with the shape of a wonderful antique glider.
Oliver. |
|
| Revenir en haut de page |
|
|
OliverPrinz
Apprenti Posteur
Inscrit le: 30 Mar 2010
Localisation: Baden-Württemberg
Âge: 60
|
| Posté le: 18/08/2014 21:08 Sujet du message: rudder (vertical tail) |
|
|
|
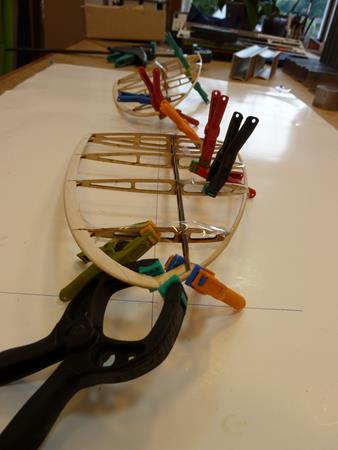
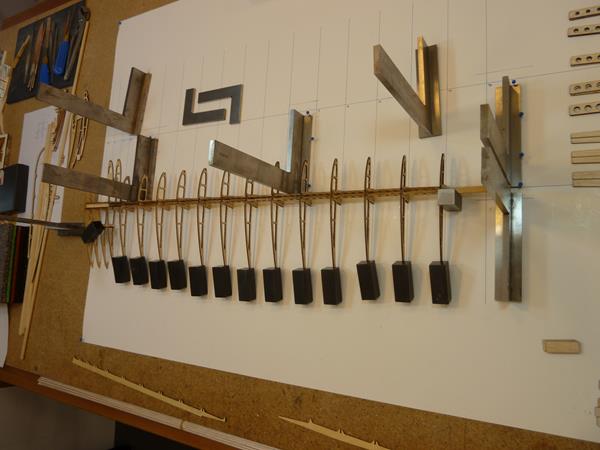
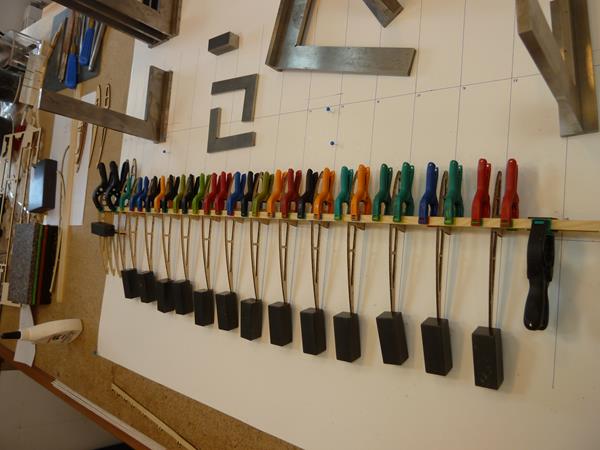
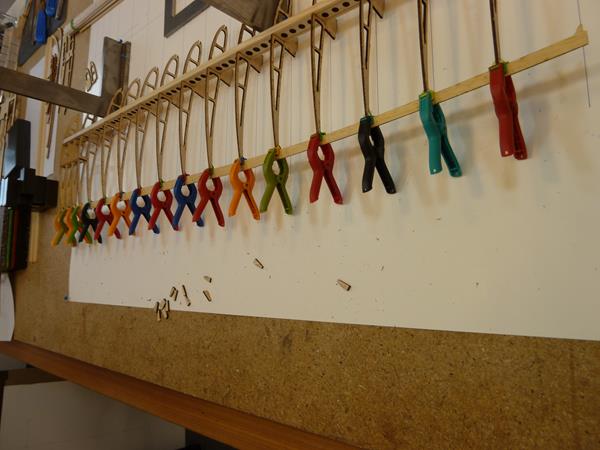
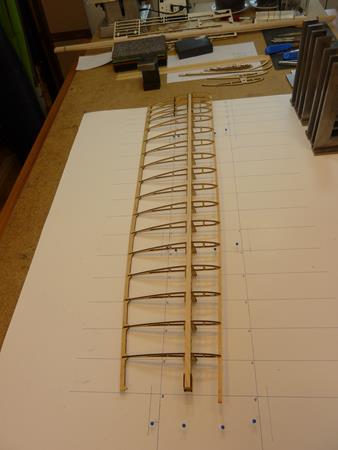
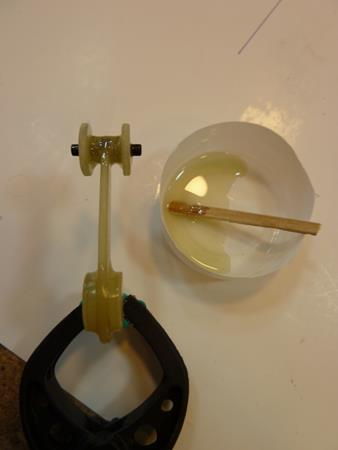
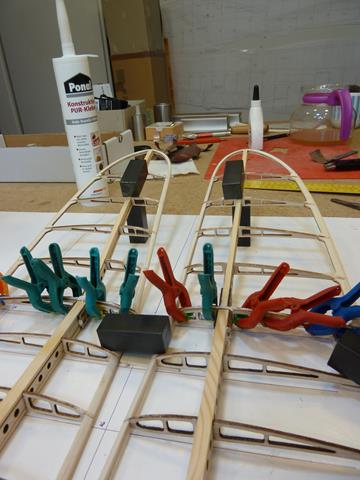
While waiting for the leading edge bar (of the elevator) to be soaked in water, I start with the rudder.
I could not resist and put all parts together.
It's pretty easy again to join all rips and leading/trailing edges. No big deal.
The mechanics or the arm of the elevator should be made out of wood. It will work, but for me this part needs to be made of glass fiber (GFK). So I started to glue the box for the mechanics but did not close the box yet (some parts will be milled and need to be fit in later on).
|
|
| Revenir en haut de page |
|
|
OliverPrinz
Apprenti Posteur
Inscrit le: 30 Mar 2010
Localisation: Baden-Württemberg
Âge: 60
|
| Posté le: 20/08/2014 19:10 Sujet du message: filling gaps |
|
|
|
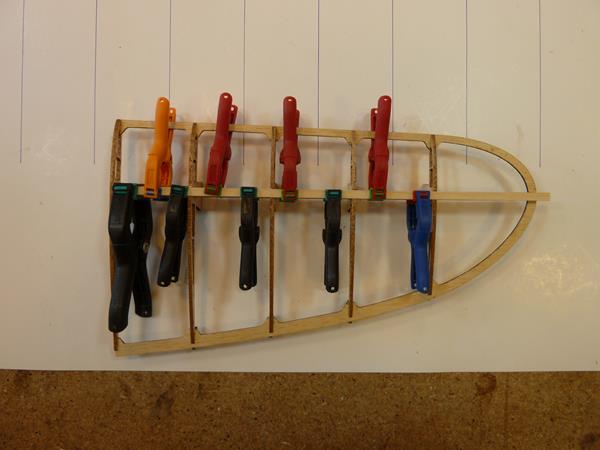
To prevent the fabrique/cover to "fall in" I've decided to fill in all gaps between the rips, as well as the gap between the fixed wing and the rudder
After a short time, let's sand and get wonderful "curves" everywhere

|
|
| Revenir en haut de page |
|
|
Johannes
Serial Posteur

Inscrit le: 23 Juil 2007
Localisation: Leichlingen
Âge: 66

|
| Posté le: 21/08/2014 12:53 Sujet du message: |
|
|
|
Hallo Oliver,
danke für den Baubericht (bei RCN) brauche ich den
nicht zu übersetzten 
Gruß und mach bitte weiter
Johannes |
|
| Revenir en haut de page |
|
|
Orionis
Incurable Posteur


Inscrit le: 31 Aoû 2006
Localisation: Drôme
Âge: 60

|
| Posté le: 21/08/2014 17:49 Sujet du message: |
|
|
|
Hello Oliver,
I'm following (surely along with Claude ) your building with great interest.
It will surely be built with the same accuracy as the Strolch...
Fabrice |
|
| Revenir en haut de page |
|
|
OliverPrinz
Apprenti Posteur
Inscrit le: 30 Mar 2010
Localisation: Baden-Württemberg
Âge: 60
|
| Posté le: 22/08/2014 19:05 Sujet du message: bamboo |
|
|
|
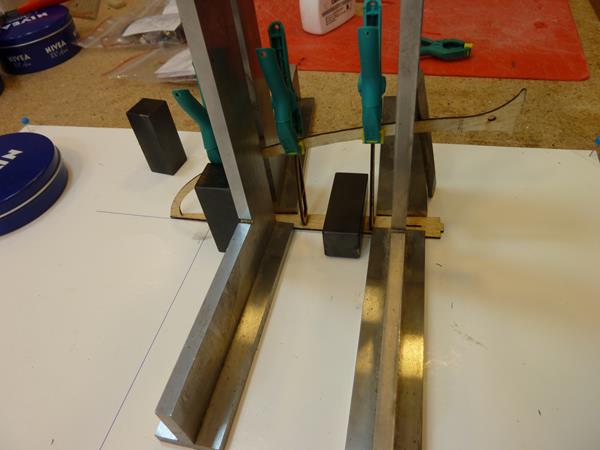
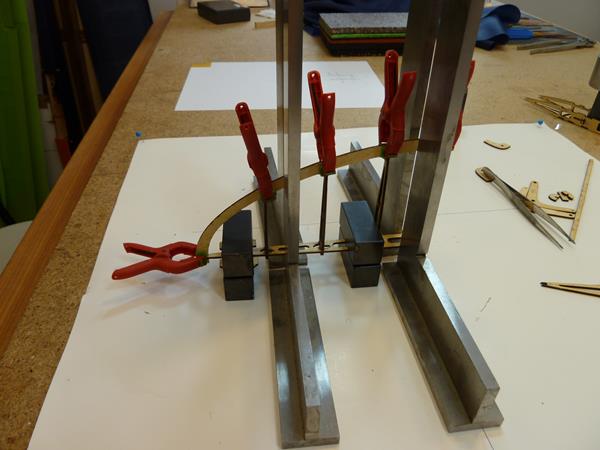
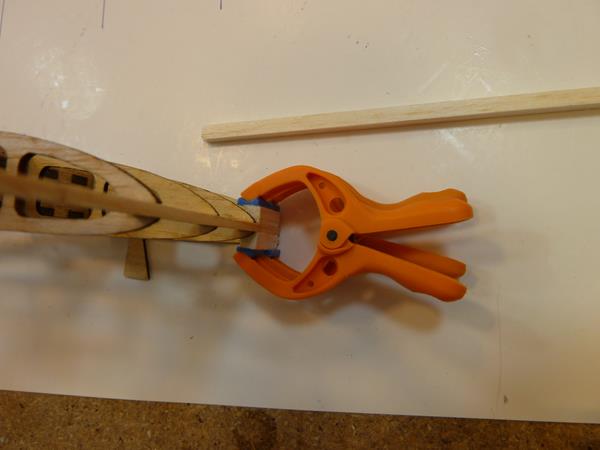
I like the idea of using a little bamboo rod as a leading edge. It would not be my first choice but still fascinating enough to try it out. So, since days the bamboo rods soaked in water.
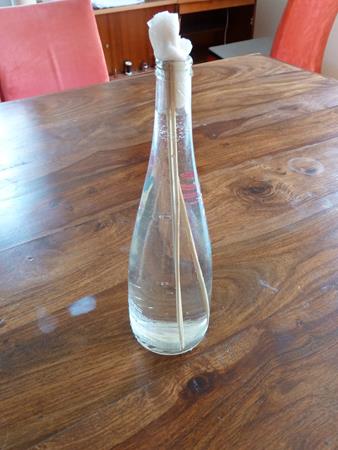
These bamboos are kind of stiff, even after days of soaking. It was necessary to use a line of pins to let the rod dry in shape. Therefore I drafted the outline / the shape of the leading edge on my board.

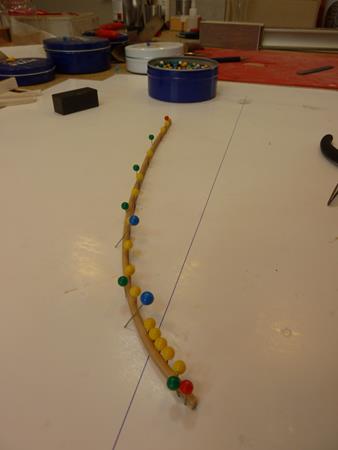
A day later on this bent bamboo still needed to be treated with heat of an iron, otherwise it bends back too much/strong. While pressing the rod onto the iron I could get the bamboo into its final shape.
Using some self-adhesive tapes and a bit more time to pass by...
this result makes it worth all the effort
|
|
| Revenir en haut de page |
|
|
Frank Albrecht
Incurable Posteur

Inscrit le: 09 Juil 2007

Localisation: Burladingen-Stetten, Allemagne
Âge: 60

|
| Posté le: 23/08/2014 09:26 Sujet du message: |
|
|
|
Hallo Oliver,
ich war auch stark verleitet einen Jaguar zu bestellen!
Aber die Vernunft hat (vorerst) gesiegt...
Freue mich auf deinen Baubericht und wenn ich den zeitlichen Aufwand besser abschätzen kann, wer weiss...
Schöner Bericht!
Grüsse,
Frank

Famous last words: "Opfer müssen gebracht werden" Otto Lilienthal |
|
| Revenir en haut de page |
|
|
OliverPrinz
Apprenti Posteur
Inscrit le: 30 Mar 2010
Localisation: Baden-Württemberg
Âge: 60
|
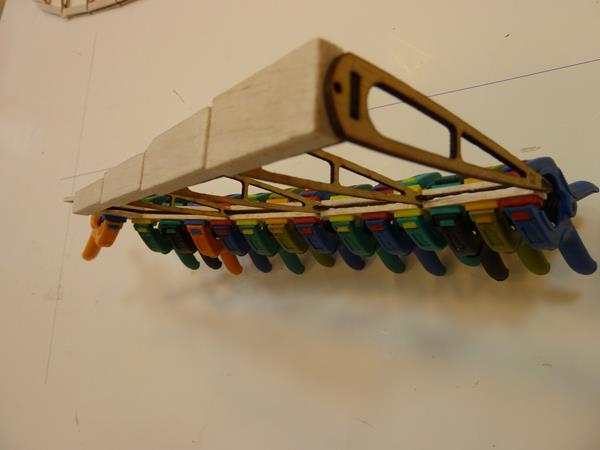
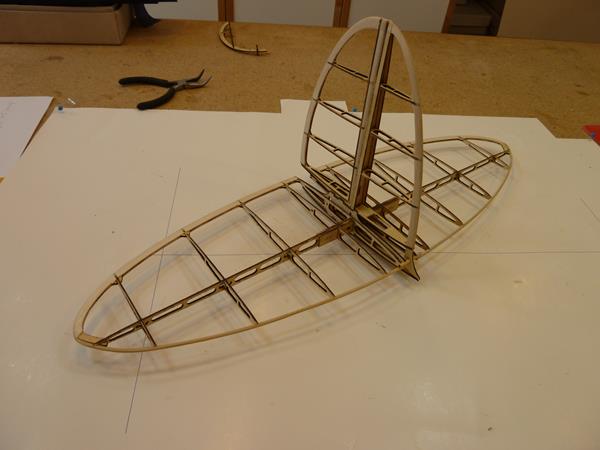
| Posté le: 24/08/2014 10:49 Sujet du message: wing |
|
|
|
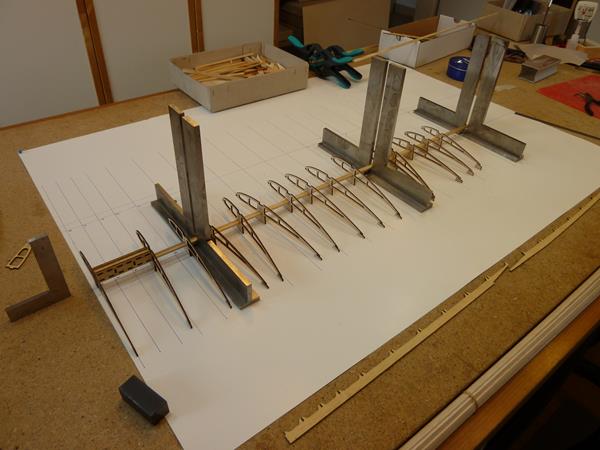
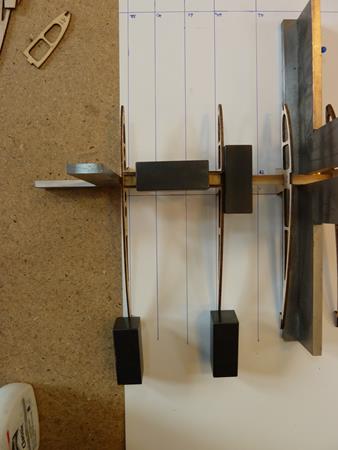
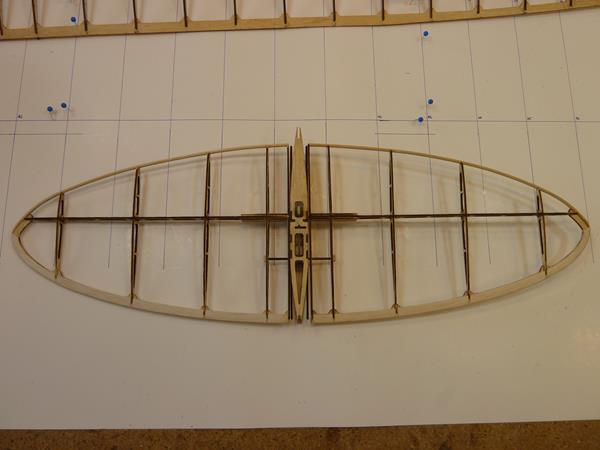
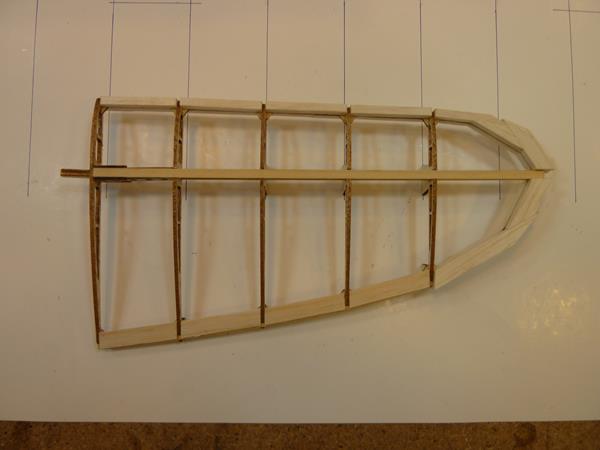
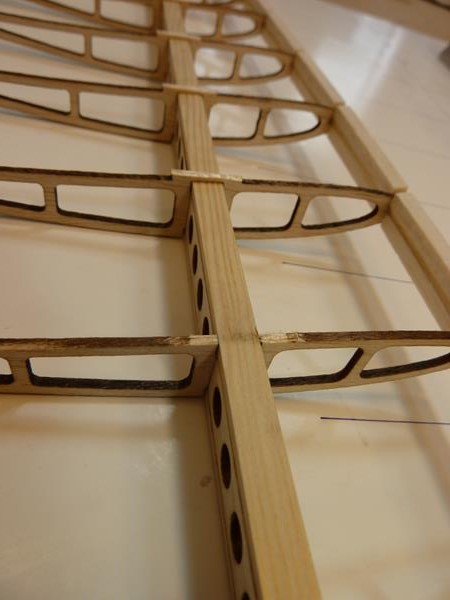
Let's get an overview which parts there are for the wings.
Each rip has "nice stands" which makes it easy to achieve the right alignment.
Before getting started, let's check whether each side weights the same.
In this kit is pretty good: only 3g difference between left and right. Exchanging leading and trailing edge parts equaled out both sides.
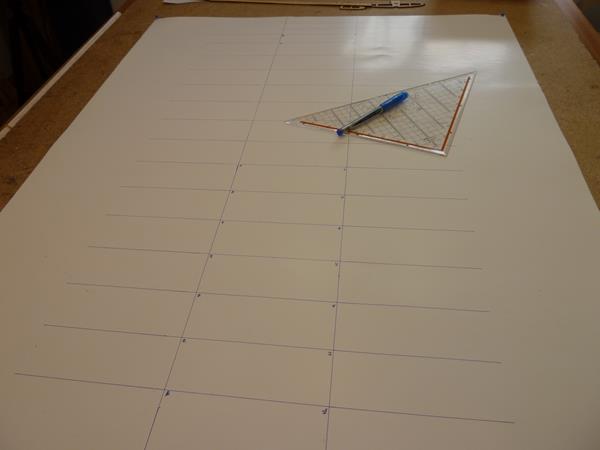
Building wings I like to have a piece of paper underneath with straight lines and right positions to align all rips to the spar. It's a bit more work but easier while gluing in.
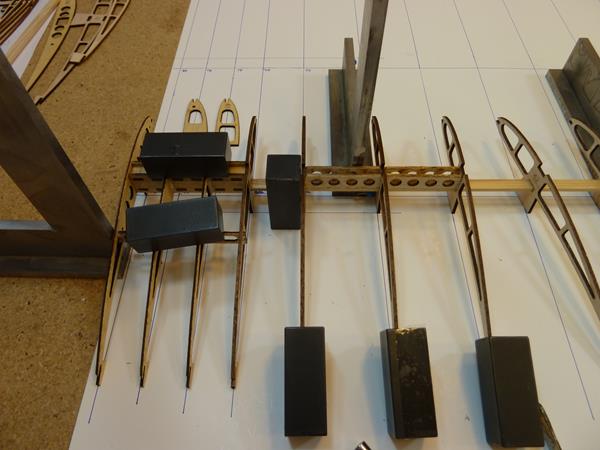
First of all will be the housing of the "connector" between wing and fuselage.
Looking at the plan normally one should establish the outer jacket. But I won't. After wings and fuselage will be ready, I glue in the connectors/plugs because it will be more accurate having all part done and right positioned afterwards.
Now all rips needs to be pushed onto the spar and the spar needs to be aligned to the lines/marks.
Don't worry: the rips are perfectly straight, this is "an optic thing" why they look that much bend 
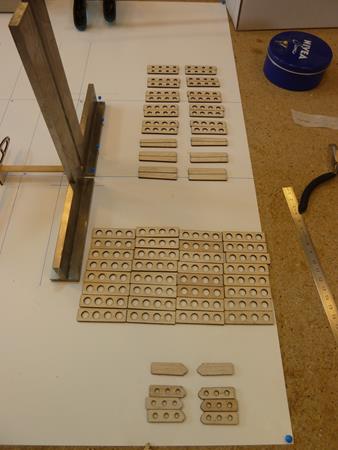
Because the upper and lower spar reduce their distance along the wing, it's necessary having the right filling between each pair of rips. All included in the kit and nicely marked.
Here is my result end of day.
|
|
| Revenir en haut de page |
|
|
OliverPrinz
Apprenti Posteur
Inscrit le: 30 Mar 2010
Localisation: Baden-Württemberg
Âge: 60
|
| Posté le: 25/08/2014 18:29 Sujet du message: leading/trailing edge |
|
|
|
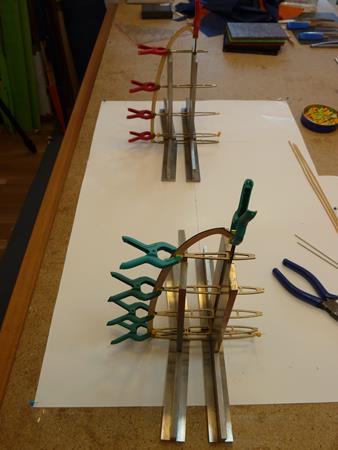
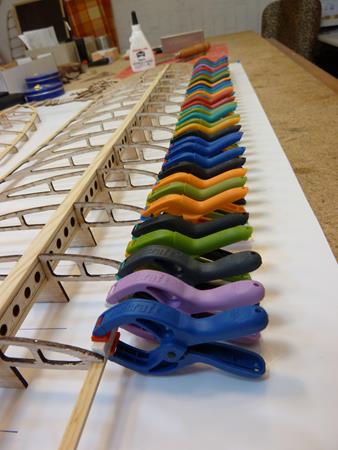
Next step: Gluing in the upper spar with good pressure
Yesterday I've tried to push in all rips into the little gap of the leading and trailing edge. Before I added wood glue to all connections. But the glue made the wood become a bit thicker/swolen. It was nearly impossible to push the rips into position. I broke away nearly every little stand of the rips.
This is the reason why I would recommend cyan-acrylate glue (that I would write things like this  how can I...). If there are modelers to build this kit too: push in all rips into the gaps and add glue (cyan-acrylate) afterwards. how can I...). If there are modelers to build this kit too: push in all rips into the gaps and add glue (cyan-acrylate) afterwards.
At least the result is really nice
|
|
| Revenir en haut de page |
|
|
Beat
Accro Posteur


Inscrit le: 18 Déc 2007

Localisation: Schweiz
Âge: 64
|
| Posté le: 26/08/2014 13:13 Sujet du message: |
|
|
|
Hallo Oliver
Danke für den Baubericht. Grosse Klasse. ![[clap]](images/smiles/Clap.gif)
Ich bin auch ein (stiller) Mitleser, da ich mir den Jaguar noch am Retroplane auf dem Platz vom Gábor (Paco Modells) gekauft habe.
Deine Anleitung wird mir Vorlage sein, wenn ich mit dem Bau beginne.
(Muss erst noch 'schnell' den Rhönsperber fertigkonstruieren und bauen.) 
Viel Erfolg,
Beste Grüsse,
Beat
www.segelflugmodell.ch |
|
| Revenir en haut de page |
|
|
OliverPrinz
Apprenti Posteur
Inscrit le: 30 Mar 2010
Localisation: Baden-Württemberg
Âge: 60
|
| Posté le: 26/08/2014 16:56 Sujet du message: |
|
|
|
Hallo Beat,
If you will prefer reading in German ... have a look here: rc-network.de
Much success with your Sperber,
Oliver. |
|
| Revenir en haut de page |
|
|
AlainB
Fidèle Posteur

Inscrit le: 15 Sep 2012
Localisation: Montagne noire (11)
|
| Posté le: 26/08/2014 18:07 Sujet du message: |
|
|
|
Beau méccano
Alain A+ |
|
| Revenir en haut de page |
|
|
Beat
Accro Posteur
Inscrit le: 18 Déc 2007
Localisation: Schweiz
Âge: 64
|
| Posté le: 26/08/2014 18:13 Sujet du message: |
|
|
|
Hallo Oliver
Danke für den deutschen Link ins RC-Network.
(Ich spreche einige Sprachen, doch deutsch ist am einfachsten )
Viel Spass beim Bau des schönen Modells.
Meine Aufmerksamkeit ist dir gewiss.
Gruss,
Beat
www.segelflugmodell.ch |
|
| Revenir en haut de page |
|
|
OliverPrinz
Apprenti Posteur
Inscrit le: 30 Mar 2010
Localisation: Baden-Württemberg
Âge: 60
|
| Posté le: 28/08/2014 19:49 Sujet du message: GFK mechanics |
|
|
|
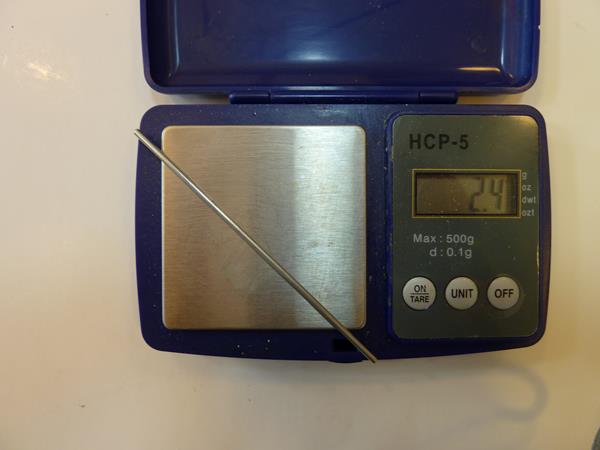
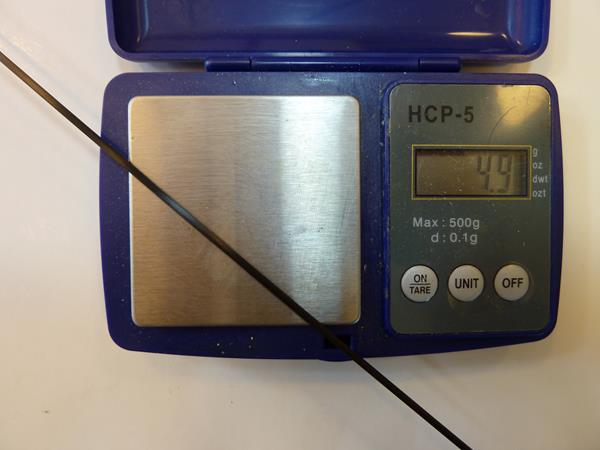
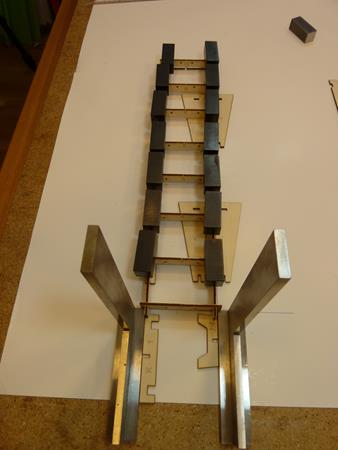
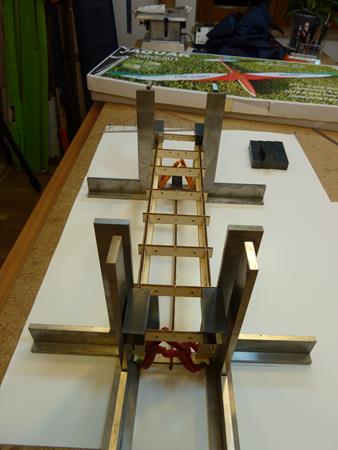
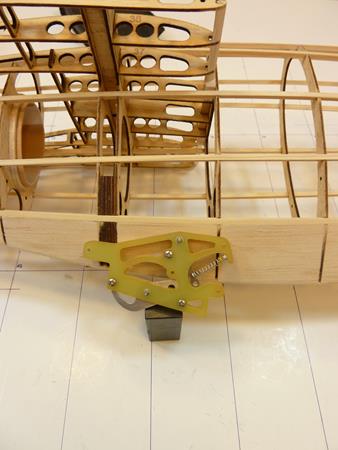
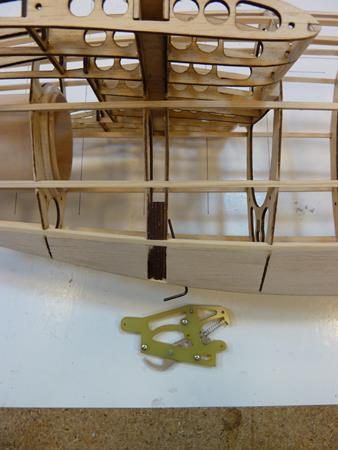
As posted earlier the arm or the mechanics of the elevator should be made out of wood. But I want to have parts made out of fiber. A friend of mine (Thanks to Alex) milled these parts for me.
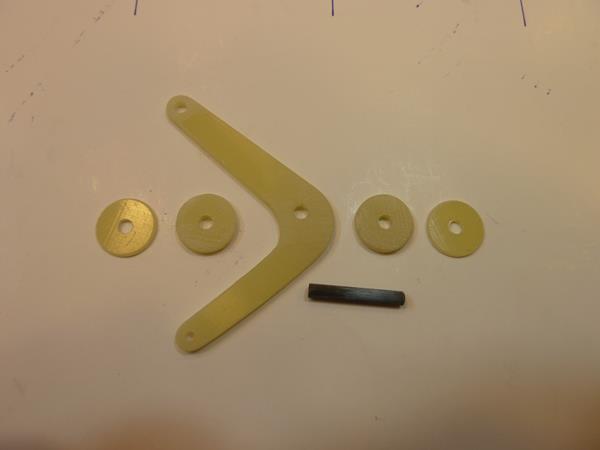
And another change: the iron axis will be fiber too. Look why: the 96mm steel axis weighs 2,4g, but a fiber axis 1m long (!) only 4,9g.
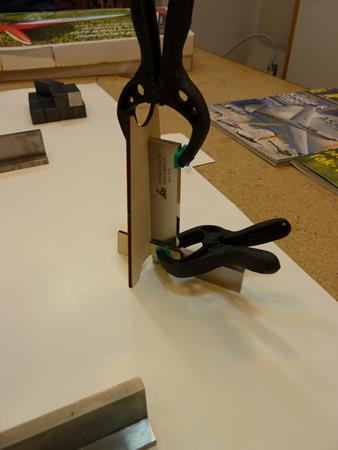
To align all (still loose) parts right, I've put them together, aligned well and applied just a single drop of cyanacrylate glue. Only for a brief fixation.
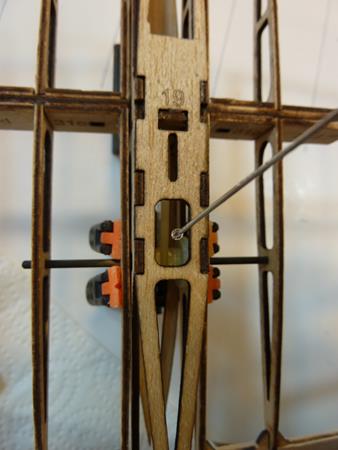
All parts unmounted again and sealed in with resin, ready to find there final place in "the mechanical box".

Good result which makes me happy
|
|
| Revenir en haut de page |
|
|
OliverPrinz
Apprenti Posteur
Inscrit le: 30 Mar 2010
Localisation: Baden-Württemberg
Âge: 60
|
| Posté le: 02/09/2014 19:57 Sujet du message: end of wing, fillings |
|
|
|
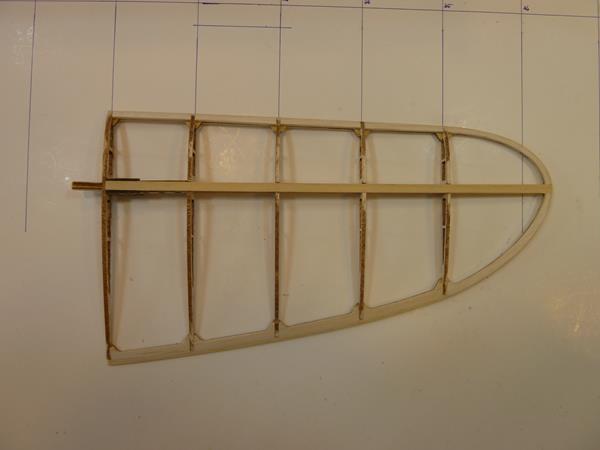
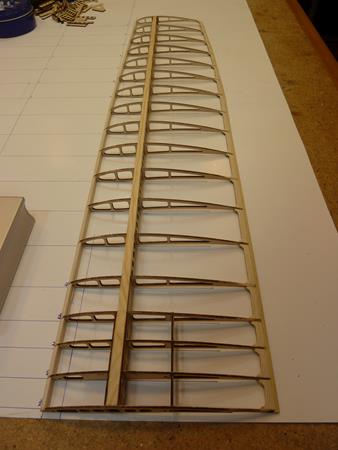
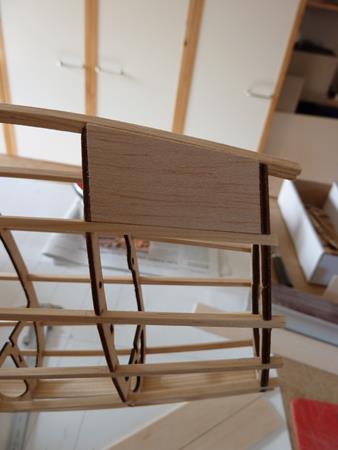
The end of the wing is pretty easy to do. Leading and trailing edges are pre-cut which makes it easy to glue the rips in right.
The lower spar can be prepared as well.
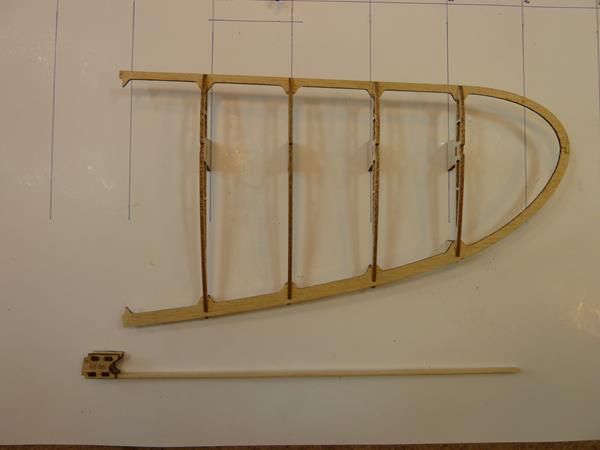
To align the end rip (the next one to the middle part of the wing) I used a meter. The right angle to the spar is predetermined of the spar webbing (right word? I'm not sure).

Different to the middle part of the wing, I've glued in all rips first and afterwards added the fillings. Good to do so because the spaces of the rips are predetermined by the leading and trailing edge parts.
The upper spar needs to be glue in well too.
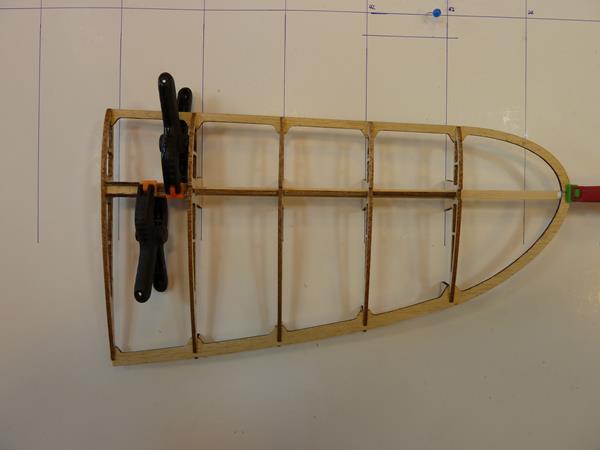
Now endurance is needed: all spaces between rips I've filled with balsa blocks and sanded them down to be in the same shape as the rips. A lot of work but still worth it. Have a look:
Same thing for the middle wing.
The little stands ("feet") of the rips I've cut away.
Good idea of the constructor: just cut them off roughly, then sand them down to the "level" of the spar.
Let's celebrate the "roofing ceremony" of the wing the left wing is pretty much ready for cover!
Please be patient and stay with me, but now my next part of report will take a while. I will build the right wing without reporting.
So long, Oliver. |
|
| Revenir en haut de page |
|
|
Orionis
Incurable Posteur
Inscrit le: 31 Aoû 2006
Localisation: Drôme
Âge: 60
|
| Posté le: 04/09/2014 11:57 Sujet du message: |
|
|
|
Nice and quick building, Oliver!
Fabrice |
|
| Revenir en haut de page |
|
|
OliverPrinz
Apprenti Posteur
Inscrit le: 30 Mar 2010
Localisation: Baden-Württemberg
Âge: 60
|
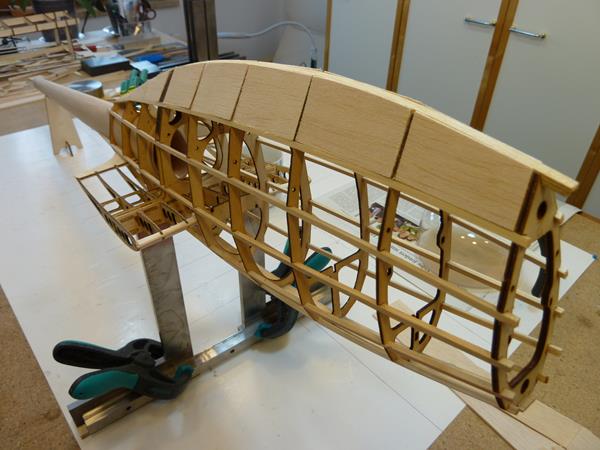
| Posté le: 24/09/2014 18:08 Sujet du message: wings done |
|
|
|
Hi,
Time passes by so quickly, but at least the two wing parts are ready.
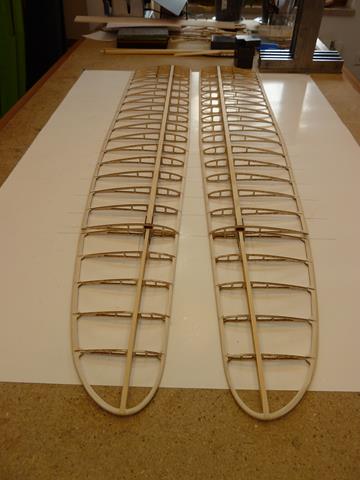
To glue the outer wing parts to the main wings I used a PUR-glue.
This sort expands while "drying" and fills out all gaps.
Nice to handle (but use gloves) and not so much rush as I expected.
|
|
| Revenir en haut de page |
|
|
OliverPrinz
Apprenti Posteur
Inscrit le: 30 Mar 2010
Localisation: Baden-Württemberg
Âge: 60
|
| Posté le: 27/09/2014 17:08 Sujet du message: rack for the fuselage cone |
|
|
|
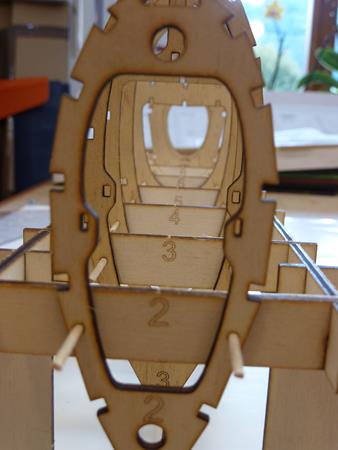
It's quite easy to establish the rack for the fuselage cone
(if one keep everything straight and rectangular)
There is even a little stand for the end of the fuselage. Very good idea.
This way cone and end can be aligned really well (you will see later on).
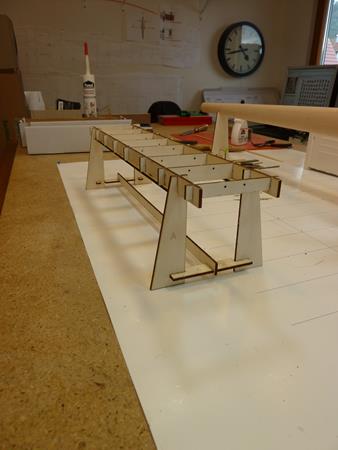
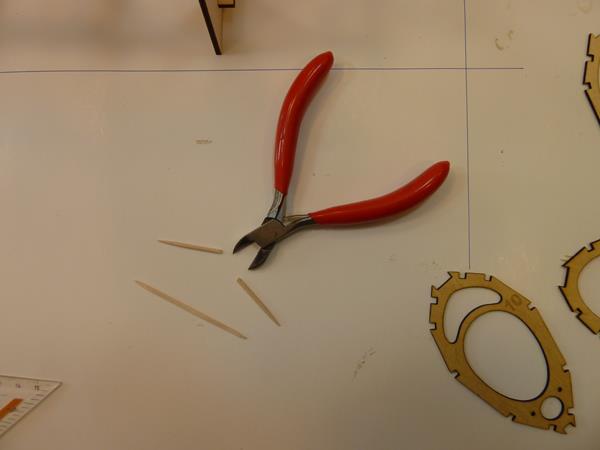
Another nice idea is using tooth picks to plug the former onto the rack.
|
|
| Revenir en haut de page |
|
|
OliverPrinz
Apprenti Posteur
Inscrit le: 30 Mar 2010
Localisation: Baden-Württemberg
Âge: 60
|
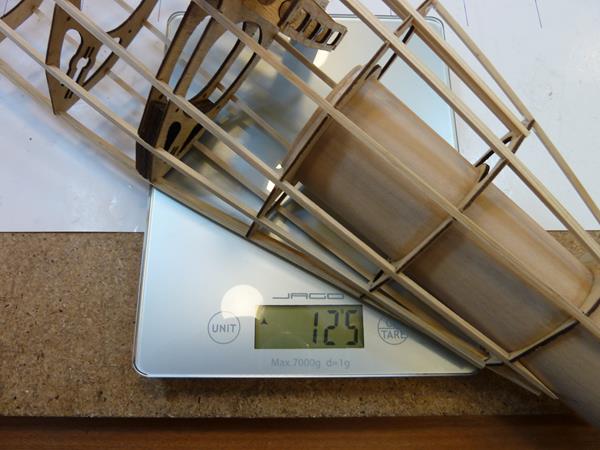
| Posté le: 28/09/2014 15:44 Sujet du message: fuselage on its way |
|
|
|
Using a few (12) pine strips the fuselage is coming up
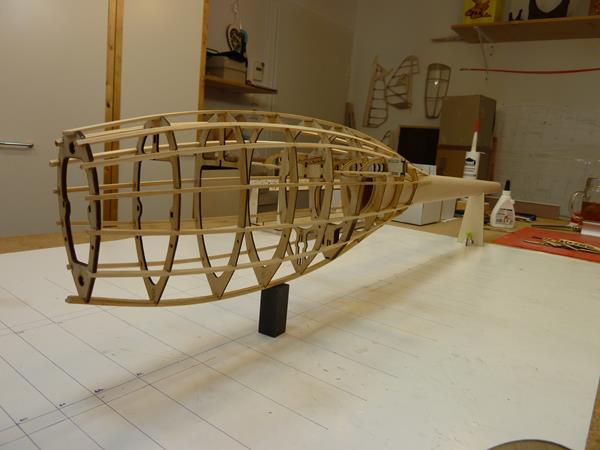
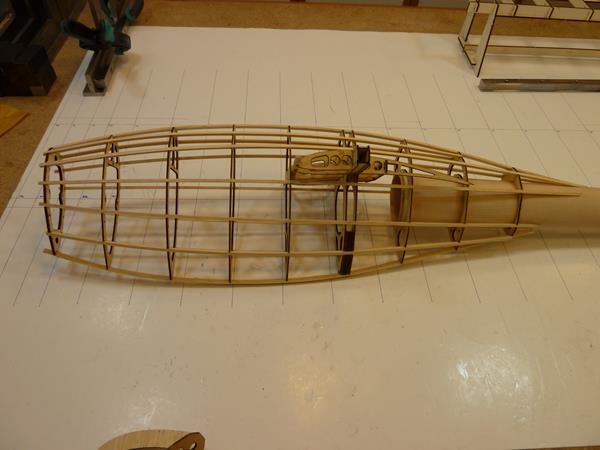
the weight so far for the fuselage
|
|
| Revenir en haut de page |
|
|
Beat
Accro Posteur
Inscrit le: 18 Déc 2007
Localisation: Schweiz
Âge: 64
|
| Posté le: 28/09/2014 16:44 Sujet du message: |
|
|
|
Hallo Oliver
Wow! Das ging aber schnell!!
Ist bei Dir Material für die Rumpfnase im Baukasten dabei?
(Bei mir ist nix im vorahnden)
Beste Grüsse,
Beat
www.segelflugmodell.ch |
|
| Revenir en haut de page |
|
|
OliverPrinz
Apprenti Posteur
Inscrit le: 30 Mar 2010
Localisation: Baden-Württemberg
Âge: 60
|
| Posté le: 28/09/2014 17:27 Sujet du message: no additional balsa in the kit |
|
|
|
Hi Beat,
Please don't mind if I stay to English (for all international readers/followers).
Your're right, there is no balsa for fillings like for leading/trailing edges and nothing for the "nose" in the kit.
But this kit I would recommend for experienced builders only. And "they" have balsa pieces "on stock" (like me ).
Oliver. |
|
| Revenir en haut de page |
|
|
Beat
Accro Posteur
Inscrit le: 18 Déc 2007
Localisation: Schweiz
Âge: 64
|
| Posté le: 28/09/2014 20:04 Sujet du message: |
|
|
|
Hi Oliver
Thanks for the advice. Sure I have some wooden blocks in stock 
I just was not sure, if there is no wood included because my Jaguar box was opened and examinated more then once at the Retroplane event.
I will go with some pine block instead of balsa. Actually I didnt start (I have to finish my Rhonsperber first)
Thanks a lot for all your building advice, it will be of great use at the time.
Best regards and greetings to your stewardes 
Beat
www.segelflugmodell.ch |
|
| Revenir en haut de page |
|
|
OliverPrinz
Apprenti Posteur
Inscrit le: 30 Mar 2010
Localisation: Baden-Württemberg
Âge: 60
|
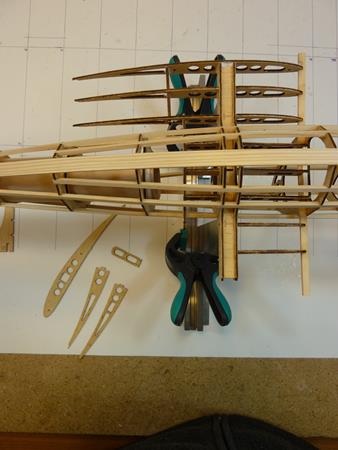
| Posté le: 04/10/2014 20:03 Sujet du message: few inner rips |
|
|
|
Gluing in the rips starting off the fuselage.
And again filling up the gaps with balsa.
|
|
| Revenir en haut de page |
|
|
Anonyme
Serial Posteur

Inscrit le: 26 Jan 2006

|
| Posté le: 04/10/2014 20:19 Sujet du message: |
|
|
|
| The Jaguar will be surely an impressive beast in the air, quite a clean, neat and delicate work ! |
|
| Revenir en haut de page |
|
|
OliverPrinz
Apprenti Posteur
Inscrit le: 30 Mar 2010
Localisation: Baden-Württemberg
Âge: 60
|
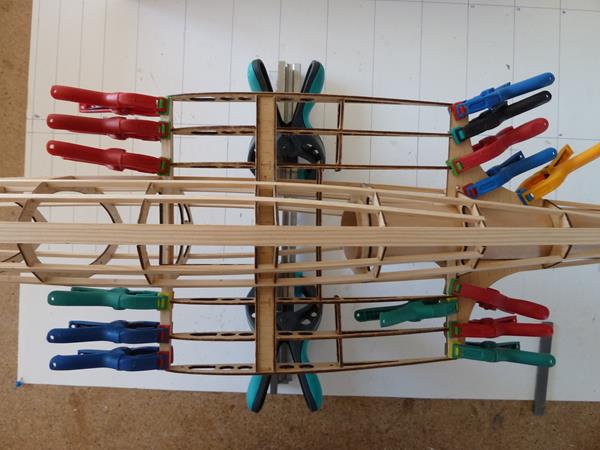
| Posté le: 09/10/2014 19:00 Sujet du message: fill-ins, hook |
|
|
|
Having only pine strips will be not enough for a bit rougher landing. So there is the need of fill-ins between the ribs
Some hours later, all parts fit in with right angles to each strip ... good feeling
In the kit there is a mechanic for the tow-hook. It's a very nice thing, but it needs a servo too.
I'm going to save this weight in install a common hook.
Therefor I use a normal inbus tool and glue it in using resin.
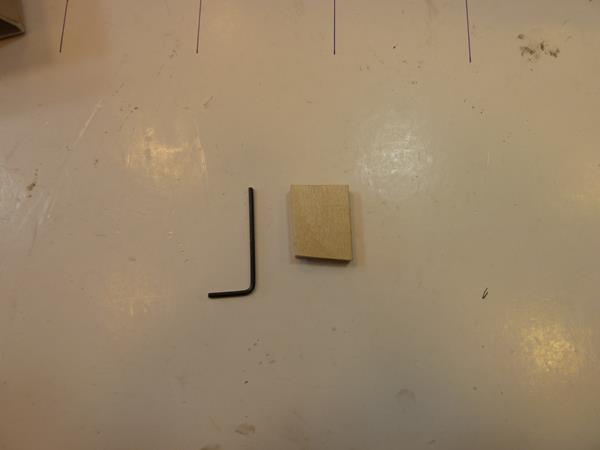
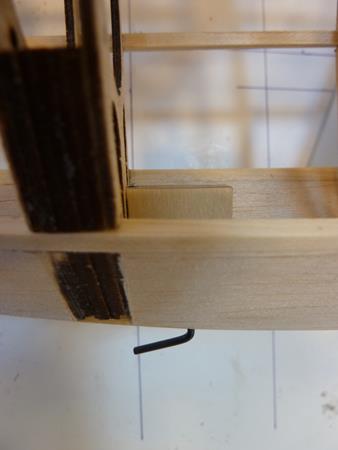
|
|
| Revenir en haut de page |
|
|
|