| Voir le sujet précédent :: Voir le sujet suivant |
| Auteur |
Message |
sebastian92
Serial Posteur


Inscrit le: 01 Sep 2015

Localisation: Hauts de seine
Âge: 60

|
 Posté le: 23/01/2021 15:02 Sujet du message: Posté le: 23/01/2021 15:02 Sujet du message: |
  |
|
|
Hello Vincent,
great work and clever ideas ![[good]](images/smiles/good.gif)
you speed to build !

Pourvu que ça vole, roule, flotte ! normalement j'ai tout bien fait pour
Un bel avion est un avion qui vole bien ! Marcel Dassault
Sebastian
Vends module émission 2.4 ghz pour Futaba, Hitec TZ-FM + 2 récepteurs corona 8 voies (contact en MP) |
|
| Revenir en haut de page |
|
 |
Sed
Maniaco Posteur


Inscrit le: 13 Mai 2015
Localisation: Villeurbanne
Âge: 57

|
| Posté le: 23/01/2021 15:13 Sujet du message: |
|
|
|
Hi Vincent,
What a beautiful work ![[clap]](images/smiles/Clap.gif) ! !
The canopy is magnificent ![[amen]](images/smiles/amen.gif) ! !
Serge |
|
| Revenir en haut de page |
|
|
bocorvin
Maniaco Posteur

Inscrit le: 17 Aoû 2015

Localisation: Hillegom
Âge: 77

|
| Posté le: 23/01/2021 15:14 Sujet du message: |
|
|
|
Thanks Sebastian, about the idea's; I can't stop thinking...... 
Vincent (DB) |
|
| Revenir en haut de page |
|
|
sebastian92
Serial Posteur
Inscrit le: 01 Sep 2015
Localisation: Hauts de seine
Âge: 60
|
| Posté le: 23/01/2021 16:04 Sujet du message: |
|
|
|
So continue !
what kind of servos do you use ? they seems smaller
are there strong enough ?
Pourvu que ça vole, roule, flotte ! normalement j'ai tout bien fait pour
Un bel avion est un avion qui vole bien ! Marcel Dassault
Sebastian
Vends module émission 2.4 ghz pour Futaba, Hitec TZ-FM + 2 récepteurs corona 8 voies (contact en MP) |
|
| Revenir en haut de page |
|
|
bocorvin
Maniaco Posteur
Inscrit le: 17 Aoû 2015
Localisation: Hillegom
Âge: 77
|
| Posté le: 23/01/2021 16:13 Sujet du message: |
|
|
|
Sed, thanks for your nice remarks 
Sebastian, the servo's are Corona (![[chut]](images/smiles/chut.gif) ) from HK, type CS238MG, double ball bearing, analog, 4kg.cm ) from HK, type CS238MG, double ball bearing, analog, 4kg.cm
The weight of the plane is also about 4kg, so I think they are Ok. Dimensions 29x13x30mm.They are quiet and have lots of favourable comments. I Have thew same type for the wings, the only difference is the housing. Dimensions of the wing servo is 29x10x34.5
Vincent (DB) |
|
| Revenir en haut de page |
|
|
mainsd'or
Stagiaire Posteur


Inscrit le: 27 Fév 2008

Localisation: Liège
Âge: 60

|
|
| Revenir en haut de page |
|
|
bocorvin
Maniaco Posteur
Inscrit le: 17 Aoû 2015
Localisation: Hillegom
Âge: 77
|
| Posté le: 23/01/2021 19:54 Sujet du message: |
|
|
|
Hello Mainsd'or,
Thanks very much for your input .
To begin with, I have no theoretical education in this field, only the things I have learned myself and a lot of experience with wood and fibres.
From the (interesting) study you send me (in French,which is a foreign language for me) I found the E-modus of glass is about 5 times higher than wood, it means its 5 times "stiffer". Carbon has an E- modus about 13 times higher than wood.
So, in theory, the glass would take all the load till it breaks and the the wood should take all the load.
In full size small experimental sailing boats I reinforced some high loaded wooden parts with UD glass and had no ruptures or breakages in those parts. (I had other problems ).
Maybe you are right, time will learn and I hope it stays in one piece!
Vincent (DB) |
|
| Revenir en haut de page |
|
|
mainsd'or
Stagiaire Posteur
Inscrit le: 27 Fév 2008
Localisation: Liège
Âge: 60
|
|
| Revenir en haut de page |
|
|
bocorvin
Maniaco Posteur
Inscrit le: 17 Aoû 2015
Localisation: Hillegom
Âge: 77
|
| Posté le: 24/01/2021 16:51 Sujet du message: |
|
|
|
Hello Mainsd'or,
Thank you for the your well thouight out answer, I am not sure if I understand it all, sorry.
Maybe you can have a look at the fuselage,
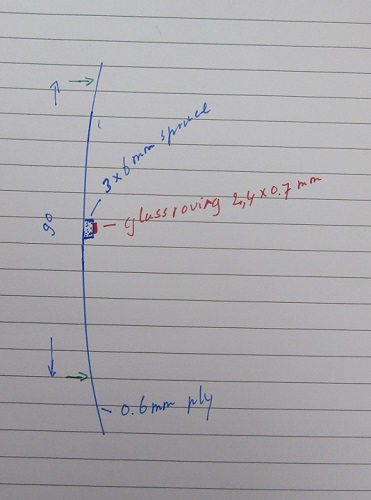
The sketch represents about 1/4 of the side of the tailboom. The wood surface is; (from the ply taken only the innner and outer layer, parallel to the grain) 2/3 x 0.6mm x 90mm= 36mm2
the spruce stringer;
3mmx6mm= 36 mm2, total 54mm2
the glass is 2.4mmx .7mm= 1.7mm2.
I just estimate what I did, maybe you can tell me if I have to add more glass, or that it is in proportion
Regards,
Vincent(DB) |
|
| Revenir en haut de page |
|
|
sebastian92
Serial Posteur
Inscrit le: 01 Sep 2015
Localisation: Hauts de seine
Âge: 60
|
| Posté le: 24/01/2021 17:39 Sujet du message: |
|
|
|
Bonjour,
merci mainsd'or pour le partage de ces documents !
in my opinion, sincerely, if you double the section of wooden stick
it will be quite rigid enough for
without complicated practice fiberglass.
The bending will make too the rigidity, well bonded in pressure.
Anyway, in case of a strong landing ... it will break the same 
Pourvu que ça vole, roule, flotte ! normalement j'ai tout bien fait pour
Un bel avion est un avion qui vole bien ! Marcel Dassault
Sebastian
Vends module émission 2.4 ghz pour Futaba, Hitec TZ-FM + 2 récepteurs corona 8 voies (contact en MP) |
|
| Revenir en haut de page |
|
|
mainsd'or
Stagiaire Posteur
Inscrit le: 27 Fév 2008
Localisation: Liège
Âge: 60
|
|
| Revenir en haut de page |
|
|
bocorvin
Maniaco Posteur
Inscrit le: 17 Aoû 2015
Localisation: Hillegom
Âge: 77
|
| Posté le: 24/01/2021 20:24 Sujet du message: |
|
|
|
Hello All,
Thanks for the reactions, it keeps me learning .
I ll leave it like this and I will try to land gently 
Now I go on with the cabin of the King Kite.
Regards,
Vincent (DB) |
|
| Revenir en haut de page |
|
|
bocorvin
Maniaco Posteur
Inscrit le: 17 Aoû 2015
Localisation: Hillegom
Âge: 77
|
| Posté le: 30/01/2021 14:38 Sujet du message: |
|
|
|
Hello everyone,
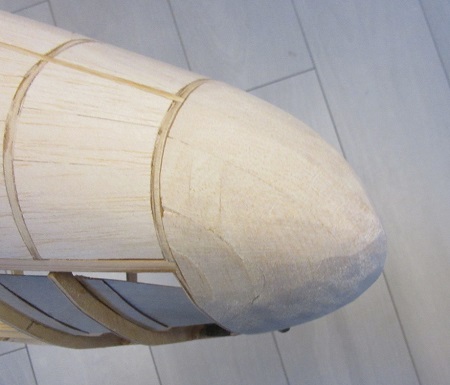
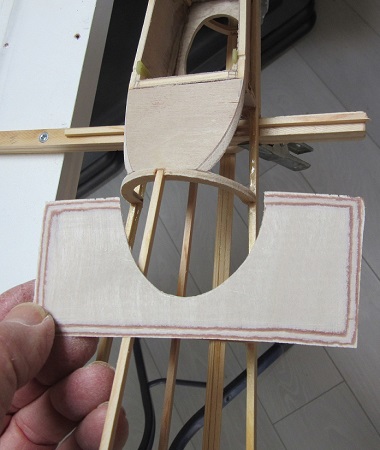
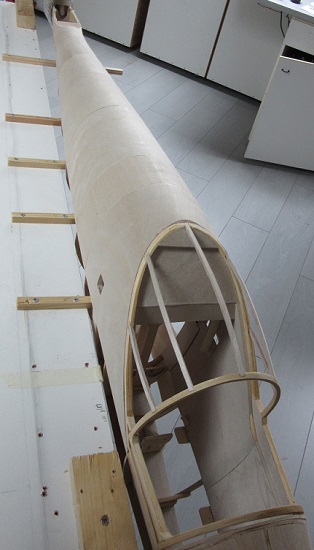
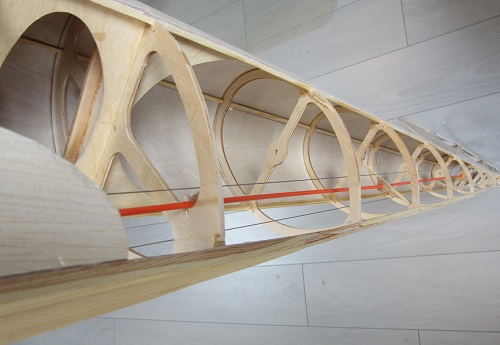
Before I was able to sheet the fuselage with ply, I had to do some preparatory work; the topside of the fuselage ahead of the cockpit will be sheeted with narrow strips (like the real one) so I had to fill it with thick balsa

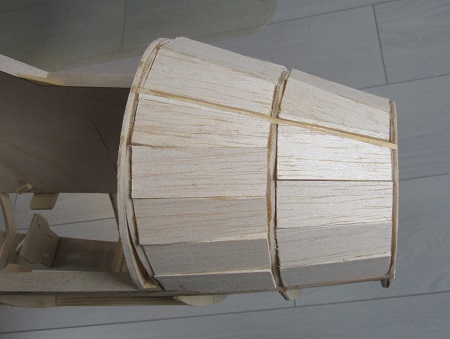
and sand it smooth
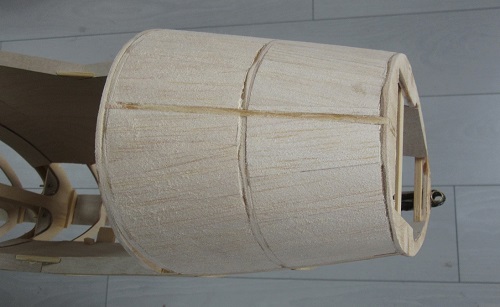
I built the nose itself from 20mm balsa, sanded the side view first, then the top view
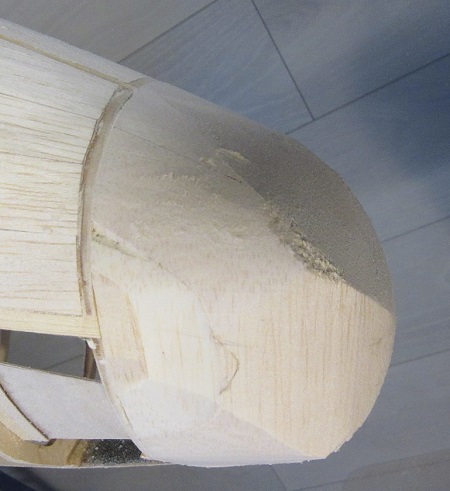
and then roughly into shape
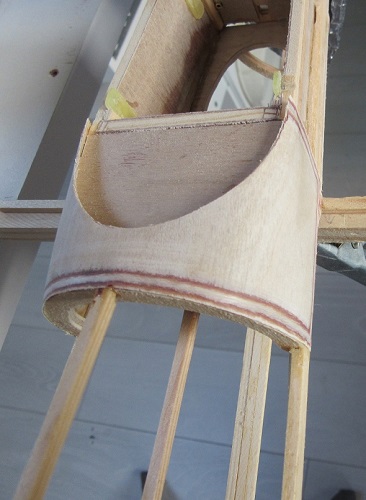
I hollowed out the inside further (I had already partially done the gluing of the balsa together) and glued a plastic jar in it. That jar can hold 170 grams of lead.
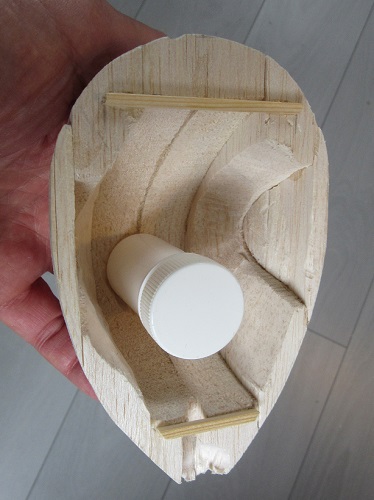
What I'm planning is this; when the plane is ready I put the 170gr lead in the jar, I measure how much ballast is needed and then fill the nose with lead snippets and epoxy resin. Then I have the option of removing ballast without cutting it out.
I glued in plywood reinforcements for the rear of the wing mount and 10mm balsa at the bottom of the fuselage where you grab it when you handtoss it.
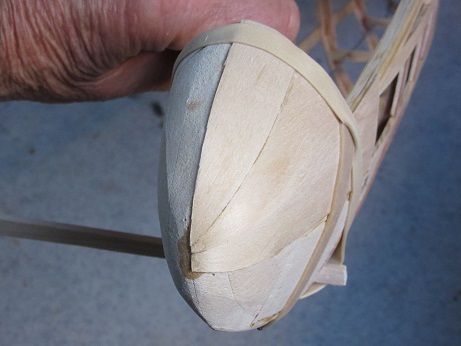
Now I could sheet the fuselage with 0.6mm plywood. Until now I glued the plywood with thick cyano, but this time I wanted to try the white glue and iron technique. This is done as follows, you smear both adhesive surfaces with PVA and let it dry. Then you put it together and press it together with a hot iron, the glue becomes soft due to the heat, and it is fixed. I had already made a few test pieces and it turned out to work.
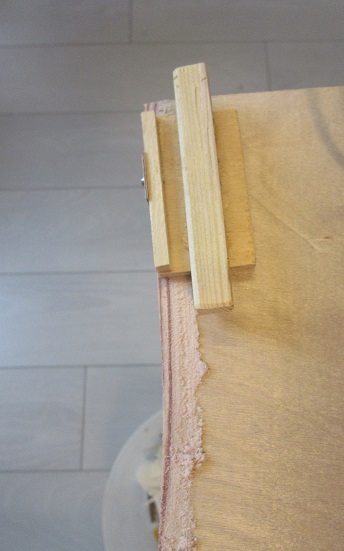
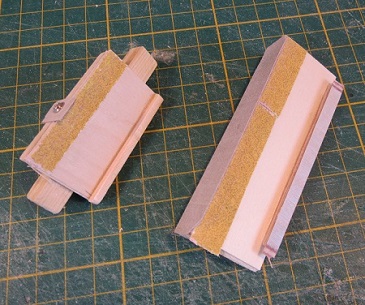
Because the fuselage at this stage is still very flexible I put it back in the construction frame. I started with a tricky piece, first chamfer the edges with this set-up
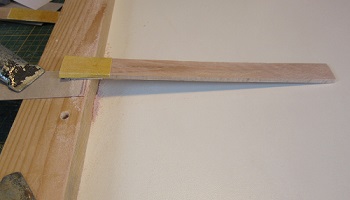
then smear the glue surface with PVA and let it dry
. I could now place the piece exactly in place, fix it with clamps and iron it on
To be sure, I later applied extra glue on the inside, you never know, this technique is new for me.....
Vincent(DB) |
|
| Revenir en haut de page |
|
|
Sed
Maniaco Posteur
Inscrit le: 13 Mai 2015
Localisation: Villeurbanne
Âge: 57
|
| Posté le: 30/01/2021 15:59 Sujet du message: |
|
|
|
Hello Vincent,
Good job and very nice, your tricky piece ! This iron technique is very interesting .
A little question : the nose will also be sheet with 0.6mm plywood ? I ask myself a lot of questions about this for the Pavelek P-2 ![[humm]](images/smiles/humm.gif) ... ...
Serge |
|
| Revenir en haut de page |
|
|
bocorvin
Maniaco Posteur
Inscrit le: 17 Aoû 2015
Localisation: Hillegom
Âge: 77
|
| Posté le: 30/01/2021 16:54 Sujet du message: |
|
|
|
Hello Serge,
Thanks for your nice comments and yes its an interesting technique, I am still a bit afraid if its strong enough.....
About the nose, I will use veneer, thats 0.6mm wood, no layers, so sanding does not show . Its on my Nemere 1/6 http://www.retroplane.net/forum/viewtopic.php?t=4645&postdays=0&postorder=asc&start=0 and also my Gull 1/4.
The restauration of the nose of a real Petrel (almost identical nose as the Gull) took a year......
Vincent (DB) |
|
| Revenir en haut de page |
|
|
bocorvin
Maniaco Posteur
Inscrit le: 17 Aoû 2015
Localisation: Hillegom
Âge: 77
|
| Posté le: 05/02/2021 14:45 Sujet du message: |
|
|
|
Bonjour a tous,
After that tricky first piece of sheeting, I went on with the top of the fuselage, which was still temporarily attached to the building jig. Scarfing the thin plywood is a time-consuming job, especially if the panels are not straight. I made up a few sanding tools in the hope that I would make fewer mistakes
By the way, the self-adhesive sandpaper easy-touch is really great
A little more about this glue technique, I found info on Retroplane and also on SSUK.
After sanding and fitting, apply glue to
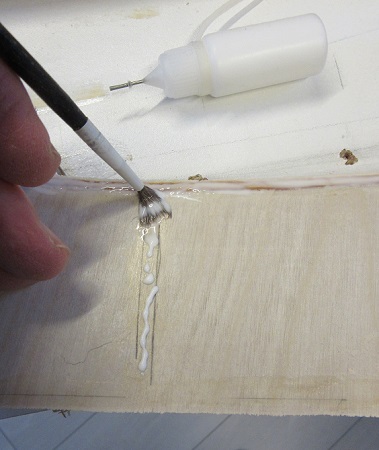
and let it dry until it is no longer white. After drying I have repeated the process to get more glue thickness. The fit with the scarfed joints, which are also curved, is critical and I don't know if I can work accurately enough. Another problem was that the horizontal (longitudinal) seam was difficult to straighten, I found it difficult to get each panel exactly in place. I temporarily fixed with it clamps
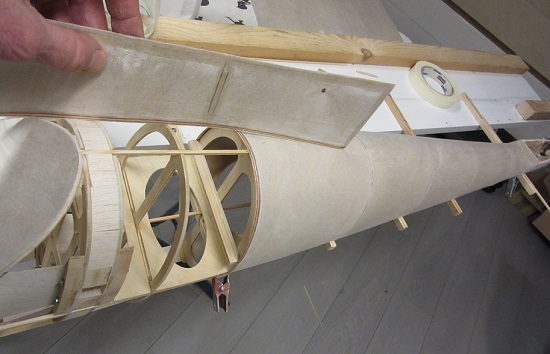
and glued it with a iron (middle position, 150gr). I decided to make the remaining panels a bit too long and later sand them to the correct length, with another sanding tool


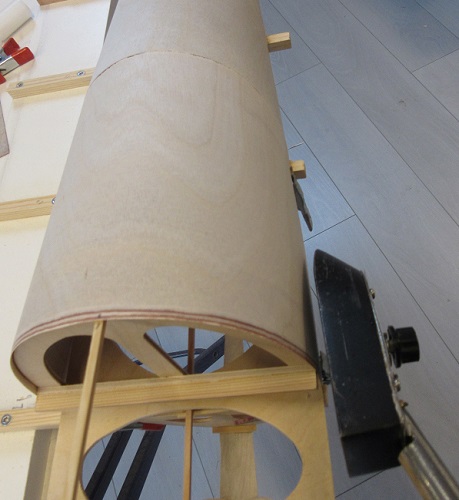
On the same picture the connection horizontal stabiler / fin is done . A picture of the top of the fuselage,
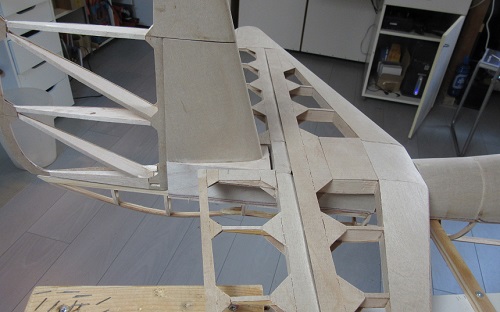
The fuselage is now stiff enough to remove it from the building jig.
Vincent (DB) |
|
| Revenir en haut de page |
|
|
Sed
Maniaco Posteur
Inscrit le: 13 Mai 2015
Localisation: Villeurbanne
Âge: 57
|
| Posté le: 05/02/2021 17:50 Sujet du message: |
|
|
|
Bonjour Vincent,
Superbe ce fuselage, du très beau travail !
Je ferai peut-être un essai avec cette méthode de collage au fer, ça a l'air de bien fonctionner .
Bonne continuation.
Serge |
|
| Revenir en haut de page |
|
|
bocorvin
Maniaco Posteur
Inscrit le: 17 Aoû 2015
Localisation: Hillegom
Âge: 77
|
| Posté le: 05/02/2021 19:27 Sujet du message: |
|
|
|
Bonjour Sed,
Thanks for your nice comments
About the glueing technique; I find it hard to believe that it is as strong as thick cyano, but hopefully I am wrong!
After the panels are fixed, I put thick cyano on the inside, just to be sure. The glueing itself is much less hectic and that a big plus!
Vincent (DB) |
|
| Revenir en haut de page |
|
|
patte de loup
Incurable Posteur


Inscrit le: 25 Jan 2006
Localisation: Alsace (Strasbourg)
Âge: 65

|
| Posté le: 05/02/2021 20:24 Sujet du message: |
|
|
|
nice job , Vince
Pat'
Un "prédateur" des pentes de France et de Navarre |
|
| Revenir en haut de page |
|
|
texier
Accro Posteur


Inscrit le: 02 Mar 2006
Localisation: Monbrun (32)
Âge: 50
|
| Posté le: 09/02/2021 20:21 Sujet du message: |
|
|
|
« bocorvin » a écrit: Bonjour Sed,
Thanks for your nice comments
About the glueing technique; I find it hard to believe that it is as strong as thick cyano, but hopefully I am wrong!
After the panels are fixed, I put thick cyano on the inside, just to be sure. The glueing itself is much less hectic and that a big plus!
Vincent (DB)
Hello Vincent,
Your work looks really fine I like it For those like me (and Sed may be) who never practiced the "iron glueing" (even if I was aware such process works) could you explain which kind of glue you use? wood glue "vinylique" ?
Sylvain.
On appelle idées claires celles qui sont au même degré de confusion que les siennes. |
|
| Revenir en haut de page |
|
|
bocorvin
Maniaco Posteur
Inscrit le: 17 Aoû 2015
Localisation: Hillegom
Âge: 77
|
|
| Revenir en haut de page |
|
|
bocorvin
Maniaco Posteur
Inscrit le: 17 Aoû 2015
Localisation: Hillegom
Âge: 77
|
| Posté le: 10/02/2021 11:37 Sujet du message: |
|
|
|
Hi Texier,
about the glue; I use ordinary PVA, I think that is the cheap white woodglue, indeed vinelique. In the tutorial he says at a certain moment that the heat activates the glue, so don't let it dry completely.
Bonjour a tous,
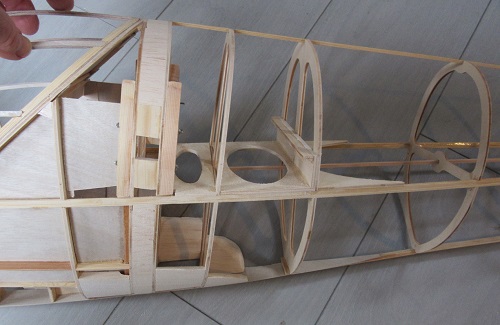
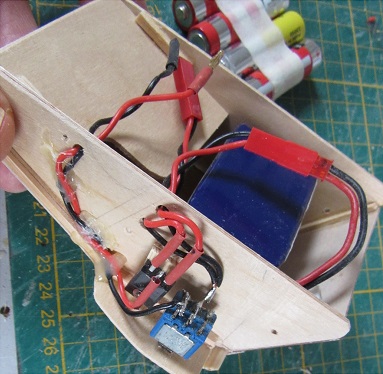
After the fuselage was detached from the construction setup, I decided to do the rc part first. It's tempting to continue building, but now everything is much more accessible. I had already more or less made the servo tray and the battery box. To be able to get the latter one out easily I made a kind of clip from 2 layers of 0.6 plywood and a short piece of spruce, which you can unlock with one finger
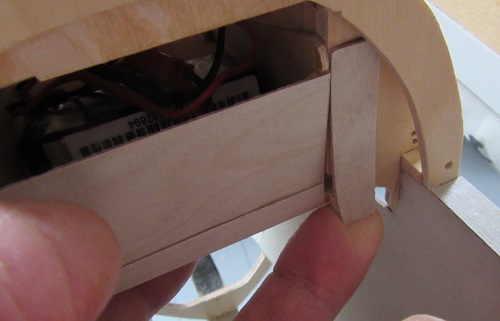
. Next to the switch I placed the shottky diode, made two plugs for both receiver batteries and plugs for the lead to the receiver placed more to the rear of the fuselage.
. I ran this wire between the inner and (not yet in place) outer skin
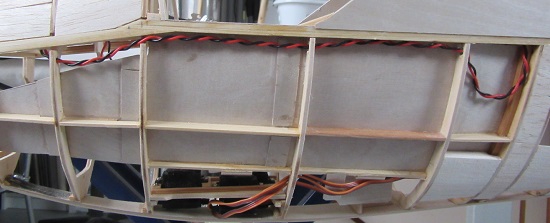
. Behind the backrest of the pilot I made an holder for the receiver, antennas and space for the vario
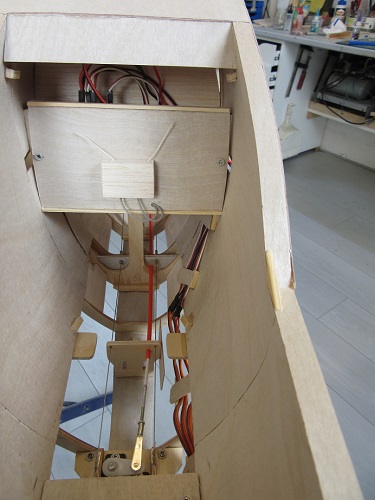

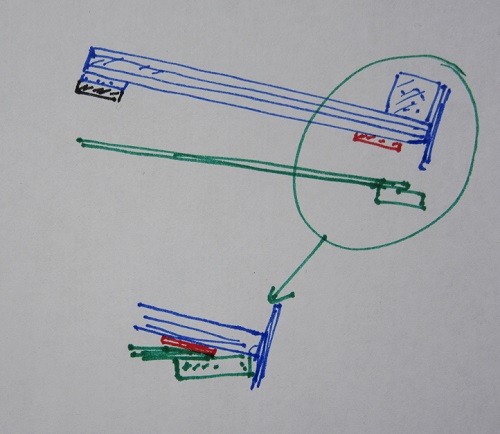
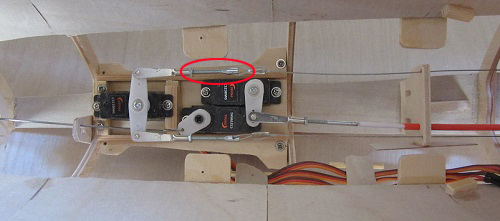
I had already made the servo tray, I had to glue 2mm extra strips under the rudder servo to make enough vertical space between the actuation cables and rods.
The elevator actuation works with a 1mm steel wire pull / push rod, in a double plastic guide
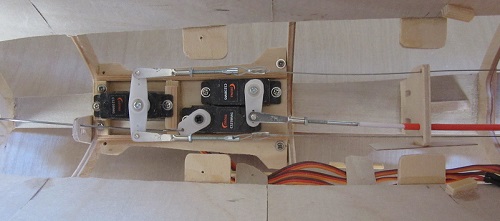
To be able to mount and dismount the horizontal stabiler, I made the last 70mm of this rod hinged. I bent a very small eye in the 1mm rod, in which the pin of the quicklink fitted tightly. Just bend a slightly too big eye and carefully make it smaller with pliers until it fits exactly.
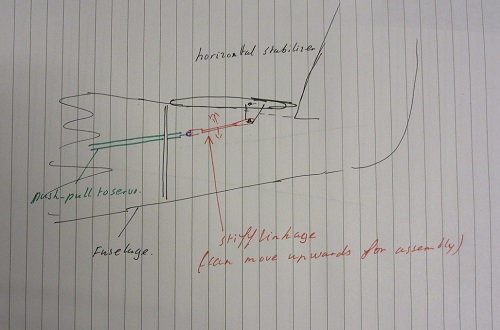
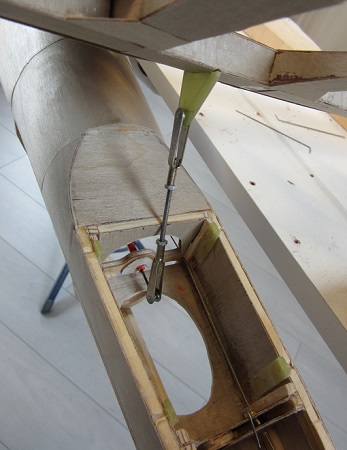
I can lift that moveble part and then attach the other quicklink to the rudderhorn of the elevator. Then the whole stabiler can be lowered in place and the moveble part of the actuation rod comes in line and operates without any slop.
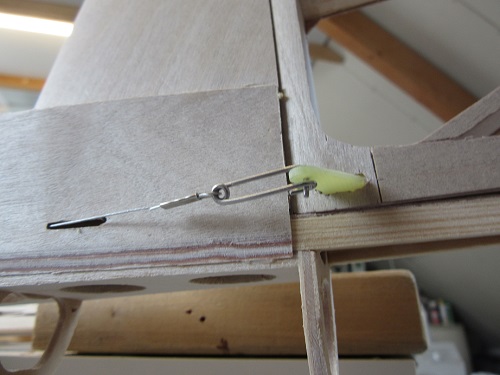
The rudder is operated with two pull / pull cables (20kg strong). They are attached to the rudderhorns of the rudder with self-locking steel wire hooks, so that the rudder can easily be disassembled for transport
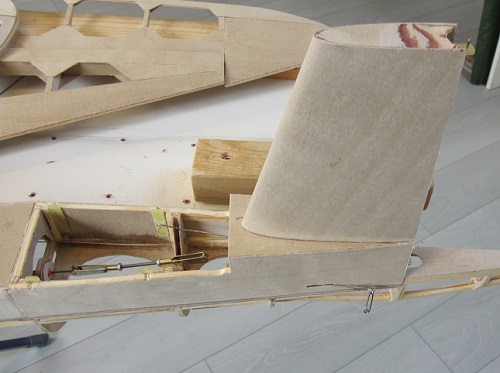
The controls are moving nicely, now I can go on sheeting the fuselage
Vincent (DB) |
|
| Revenir en haut de page |
|
|
de Schaetzen Harold
Maniaco Posteur
Inscrit le: 06 Avr 2006
Localisation: Schilde
Âge: 78

|
| Posté le: 11/02/2021 12:23 Sujet du message: |
|
|
|
Dear Vincent,
Congratulations for your "every day" new construction solution.
This time the connection with your horizontal stabiliser. Simple and easy!
Congratulation for your idea to hidden, in the cockpit, the electrical wiring between 2 panels. They are defintively glued?
I am waiting for your next building solution.
Best regards.
Harold |
|
| Revenir en haut de page |
|
|
bocorvin
Maniaco Posteur
Inscrit le: 17 Aoû 2015
Localisation: Hillegom
Âge: 77
|
| Posté le: 11/02/2021 14:22 Sujet du message: |
|
|
|
Dear Harold,
Glad you liked the idea of the horizontal stabilizer:D .
I had no intention glueing the wire between the in and outside of the nose of the fuselage. I can put the surplus of wire just in that space, always nice when a connector is broken or someting like that.
Best regards,
Vincent |
|
| Revenir en haut de page |
|
|
sebastian92
Serial Posteur
Inscrit le: 01 Sep 2015
Localisation: Hauts de seine
Âge: 60
|
| Posté le: 11/02/2021 18:35 Sujet du message: |
|
|
|
Hello Vincent,
always you have interesting solutions
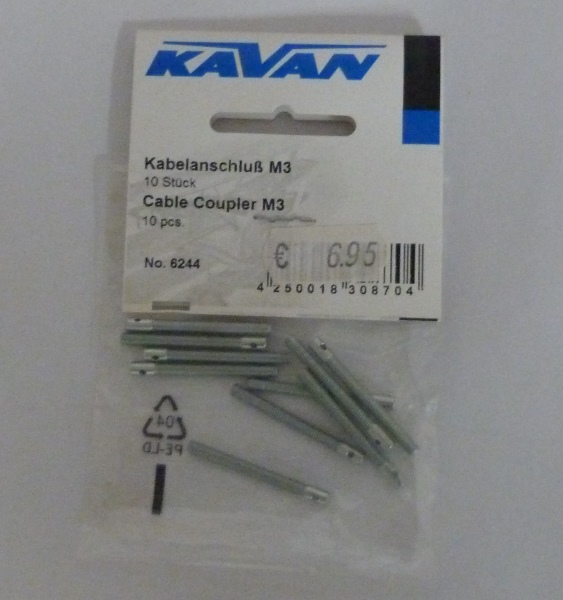
a question : where do you find this so longers parts ?
I coud do it by myself
but if it's not too expensive
you have an address ?
Continue like this
Pourvu que ça vole, roule, flotte ! normalement j'ai tout bien fait pour
Un bel avion est un avion qui vole bien ! Marcel Dassault
Sebastian
Vends module émission 2.4 ghz pour Futaba, Hitec TZ-FM + 2 récepteurs corona 8 voies (contact en MP) |
|
| Revenir en haut de page |
|
|
bocorvin
Maniaco Posteur
Inscrit le: 17 Aoû 2015
Localisation: Hillegom
Âge: 77
|
| Posté le: 11/02/2021 19:00 Sujet du message: |
|
|
|
Hi Sebastian,
Here is the link to the shop, in the Netherlands,
https://hobbyin.nl/
I try to find these items, put I couldn't find them. Its M2.
Tomorrow I have to order some things, I can ask if he still has them.
Vincent (DB) |
|
| Revenir en haut de page |
|
|
sebastian92
Serial Posteur
Inscrit le: 01 Sep 2015
Localisation: Hauts de seine
Âge: 60
|
| Posté le: 11/02/2021 19:19 Sujet du message: |
|
|
|
I don't find it too
perhaps out of sale ?
But I don't think they post to France
and they have no PayPal.
Don't bother with that, I'll make it with threaded rod, or turning it
Many thanks !
Pourvu que ça vole, roule, flotte ! normalement j'ai tout bien fait pour
Un bel avion est un avion qui vole bien ! Marcel Dassault
Sebastian
Vends module émission 2.4 ghz pour Futaba, Hitec TZ-FM + 2 récepteurs corona 8 voies (contact en MP) |
|
| Revenir en haut de page |
|
|
bocorvin
Maniaco Posteur
Inscrit le: 17 Aoû 2015
Localisation: Hillegom
Âge: 77
|
| Posté le: 11/02/2021 19:42 Sujet du message: |
|
|
|
I bought these for my FG-2, thats 4 years ago....
Maybe you can silver solder an eyelet to een piece of M2...
I'll ask hem tomorrow.
Vincent (DB) |
|
| Revenir en haut de page |
|
|
VincentB
Serial Posteur

Inscrit le: 23 Jan 2006

Localisation: A la playa, bajo el sol
Âge: 60
|
| Posté le: 11/02/2021 19:50 Sujet du message: |
|
|
|
Ca va très vite à fabriquer, je me les fait, tige filetée de 3mm, quelques coups de marteau sur le bout pour aplanir, et perçage... voir par exemple bas de page www.retroplane.net/bydgoszczanka/page1.htm
Retroplane et modélisme en pause, vanlife à haute dose.
|
|
| Revenir en haut de page |
|
|
ThomasF
Incurable Posteur

Inscrit le: 16 Jan 2010

Âge: 64
|
| Posté le: 11/02/2021 20:48 Sujet du message: |
|
|
|
Ich habe für den gleichen Zweck gekauft.
Gruß
Thomas |
|
| Revenir en haut de page |
|
|
|