| Voir le sujet précédent :: Voir le sujet suivant |
| Auteur |
Message |
Clifton
Psycho Posteur


Inscrit le: 07 Mai 2014

Localisation: Anjou
Âge: 61

|
 Posté le: 23/11/2015 00:01 Sujet du message: Posté le: 23/11/2015 00:01 Sujet du message: |
  |
|
|
Very nice work, I like very much your model.

Slingsby Petrel, à mon gout le plus beau de tous, quoi que le Fafnir ... Ah ces ailes en mouette, un jour ....
Rien de ce qui est fini n'est jamais achevé tant que tout ce qui est commencé n'est pas totalement terminé (Pierre Dac) |
|
| Revenir en haut de page |
|
 |
stéphane monot
Accro Posteur

Inscrit le: 08 Mai 2010
Localisation: Domloup (35)
Âge: 55

|
| Posté le: 24/11/2015 08:18 Sujet du message: |
|
|
|
Bonjour,
joli ![[clap]](images/smiles/Clap.gif)
Stéphane |
|
| Revenir en haut de page |
|
|
LEROY
Maniaco Posteur


Inscrit le: 21 Juil 2011
Localisation: Maurepas 78
Âge: 71

|
| Posté le: 24/11/2015 21:57 Sujet du message: |
|
|
|
Bravo for these mounting tips, I continue to follow your building with great interest
Michel.L
Ceux qui s'avancent trop précipitamment reculeront encore plus vite |
|
| Revenir en haut de page |
|
|
bocorvin
Maniaco Posteur

Inscrit le: 17 Aoû 2015

Localisation: Hillegom
Âge: 77

|
| Posté le: 28/11/2015 12:46 Sujet du message: |
|
|
|
Merci pour tous les encouragements!
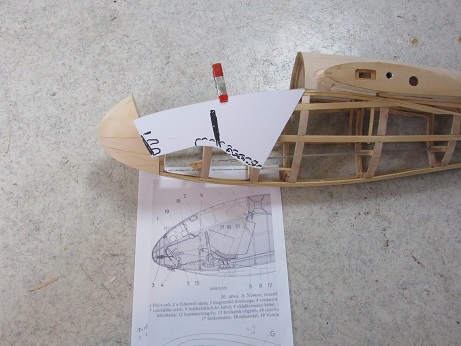
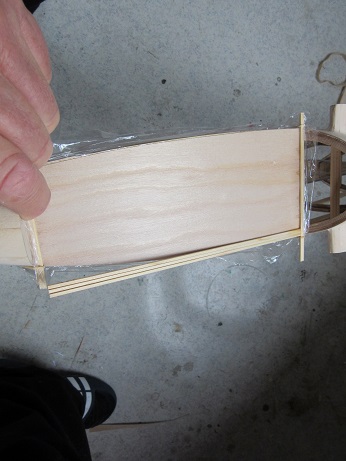
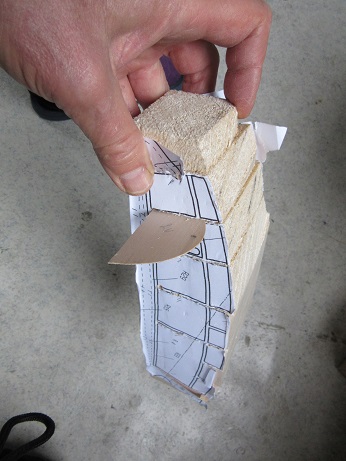
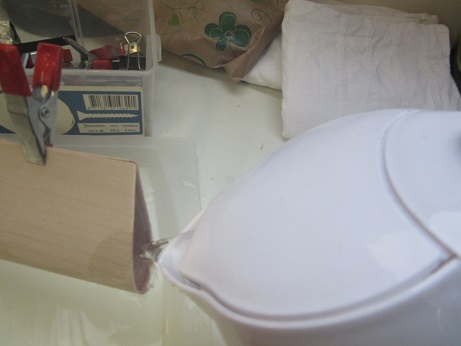
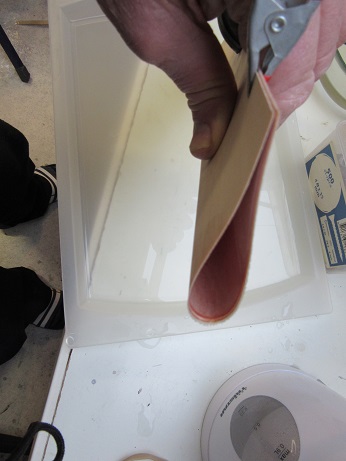
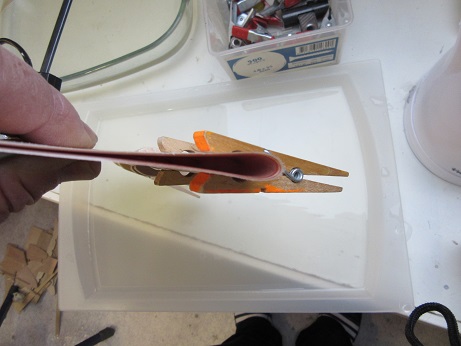
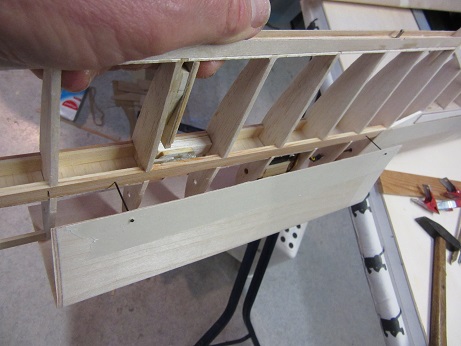
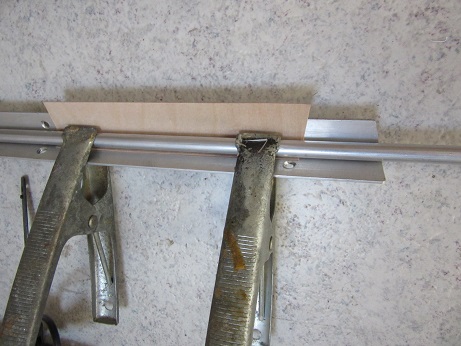
The last week I tried to make the fairings between the wing and fuselage.
I wanted to make these out of veneer, because you can sand it and it keeps the same colour. I already had done the nose with that, but I ran into problems. I soaked the veneer in hot water

and dried it with a hairdryer. I glued these pieces on the balsa supporting structure. Well, that just didn't work javascript:emoticon(' ') (no picture!) So I ripped it out and started over again. First I sanded a rebate in the balsa and then made a ply "underlay". Then I covered that part of the fuselage with ply, in which I left space for the veneer fairing. ') (no picture!) So I ripped it out and started over again. First I sanded a rebate in the balsa and then made a ply "underlay". Then I covered that part of the fuselage with ply, in which I left space for the veneer fairing.
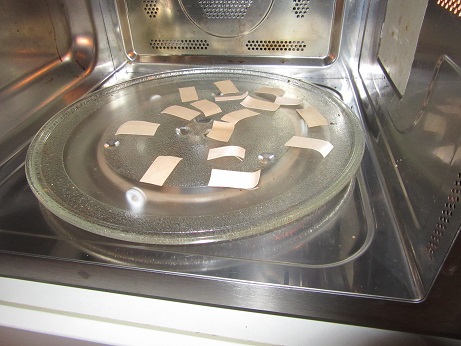
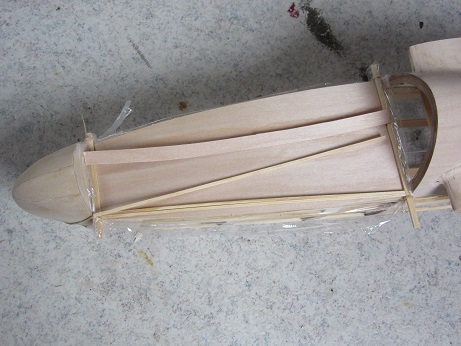
I also discovered that the veneer expanded with about 10% when wetted,
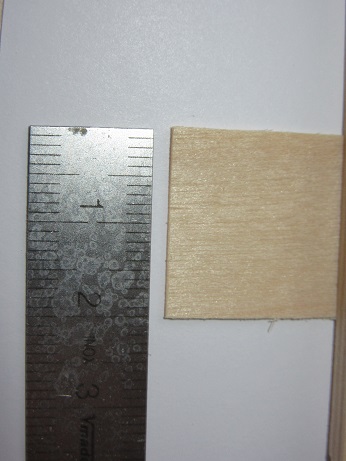
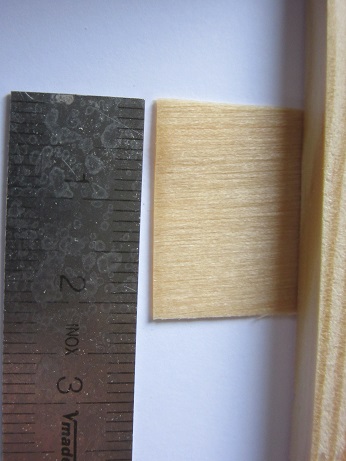
so I dried the veneer in the oven.
Now I glued all the pieces in place.....
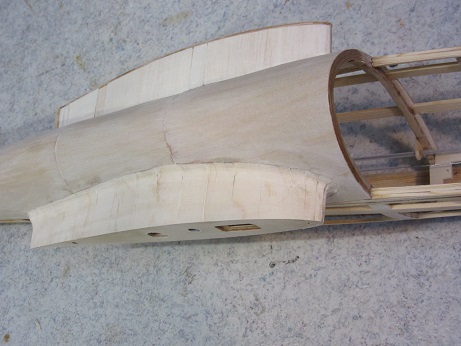
I didn't get it perfect, but its the best I could do.
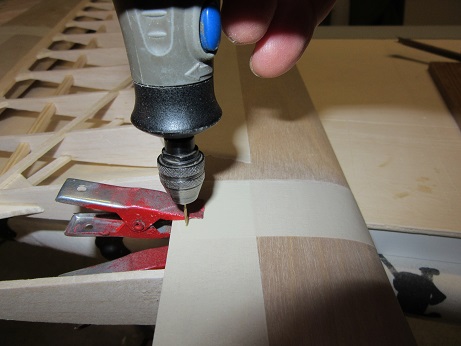
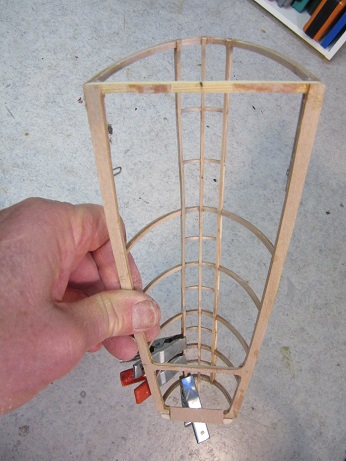
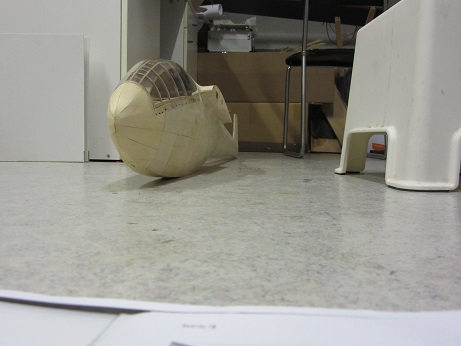
Next is the frame and mold for the canopy.
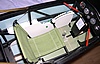
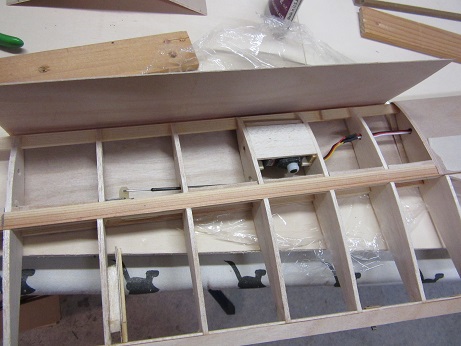
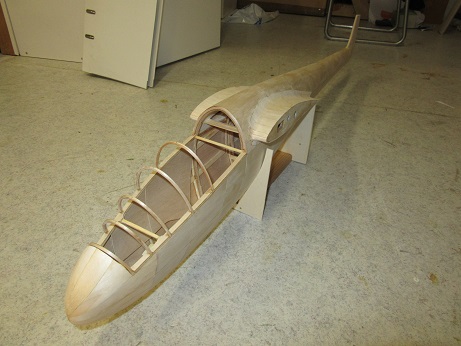
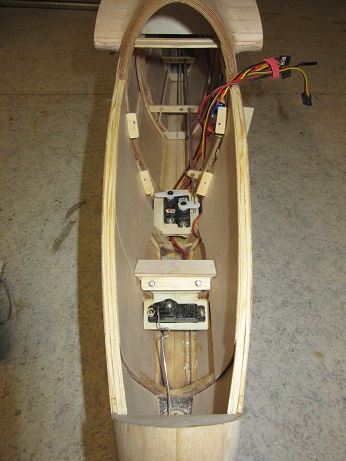
This is an impression of the planned interior, the receiver battery fits between the front (coupling) and rear (elevator and rudder) servo mounts.
I had only a side view of the canopy'swo I had to make things just fit on the fuselage.
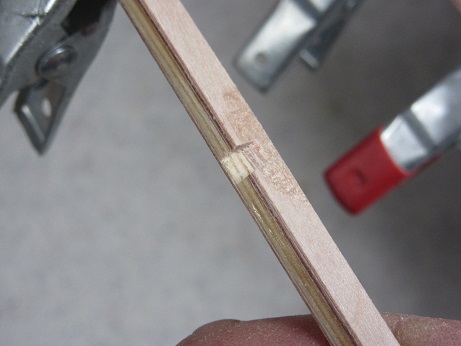
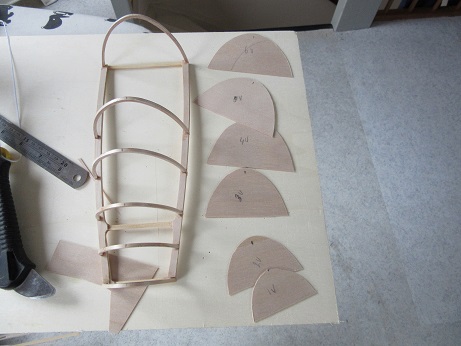
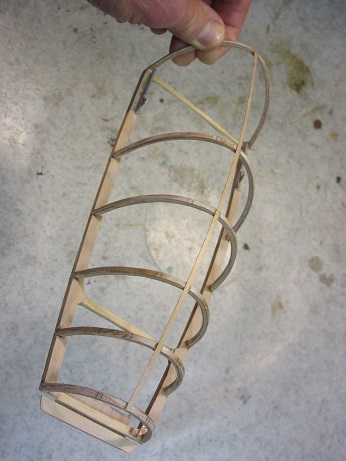
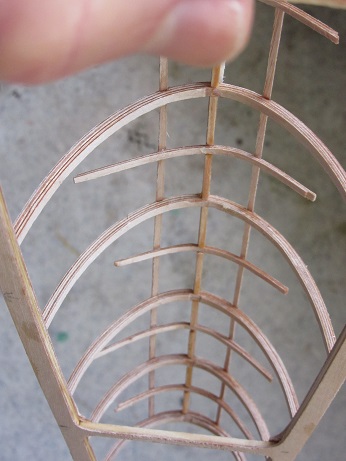
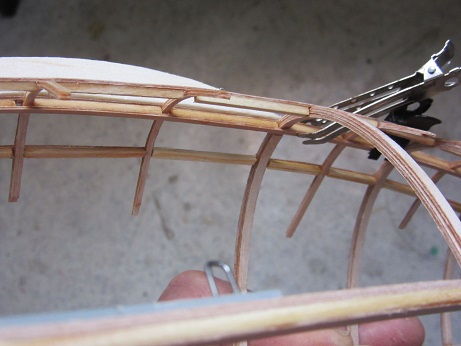
I had now the bottom of the canopy, took front and rear dimensions from the fuselage and with the dimensions of the side view I made a plan for the other franes of the canopy. Laminated the frames out of 0.6 ply, 3 mm wide strips.
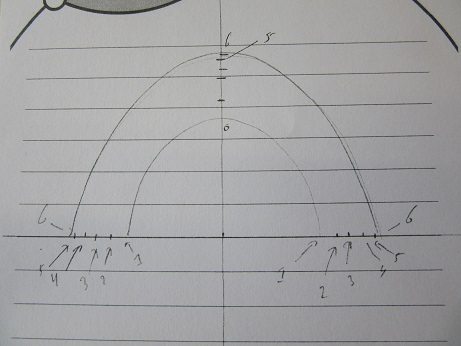
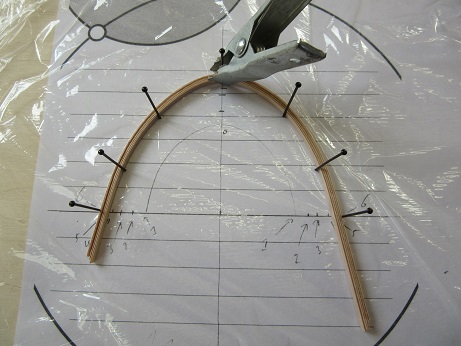
, made rebates in the bottom frame
and glued it together.
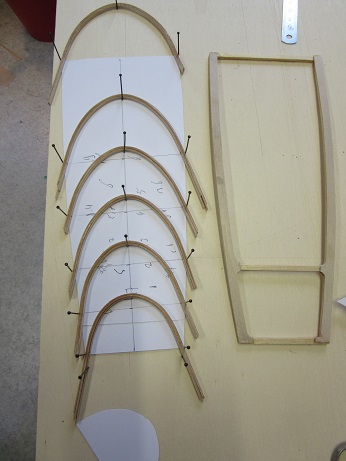
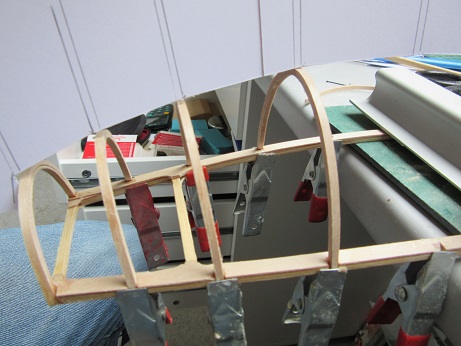
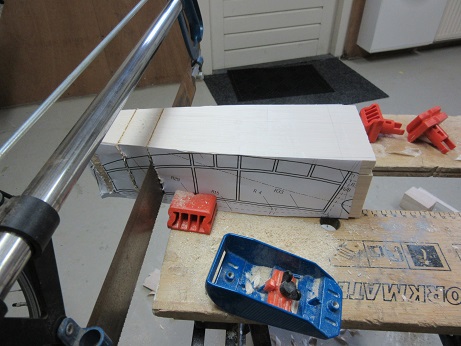
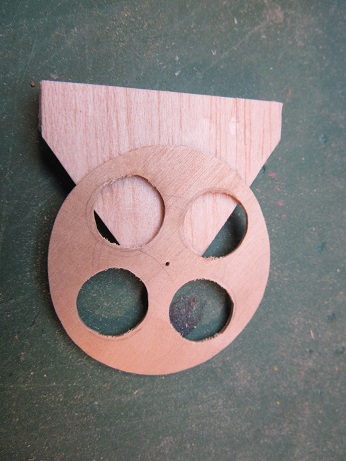
To make the mold or plug I made a block balsa
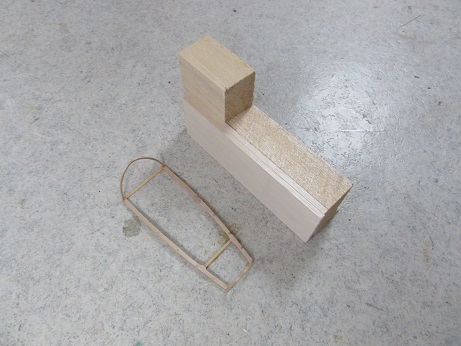
drawed and sawed the bottom, glued copy's of the side views on it and made saw cuts on the frame markings.
From the canopy frame I copied in ply the frames and put them in the sawcuts (not as easy as I write!)
After some planing..
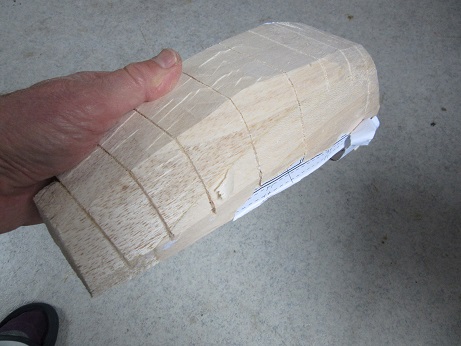
Still needs some more planing and sanding! To be continued! |
|
| Revenir en haut de page |
|
|
bocorvin
Maniaco Posteur
Inscrit le: 17 Aoû 2015
Localisation: Hillegom
Âge: 77
|
| Posté le: 03/12/2015 23:14 Sujet du message: |
|
|
|
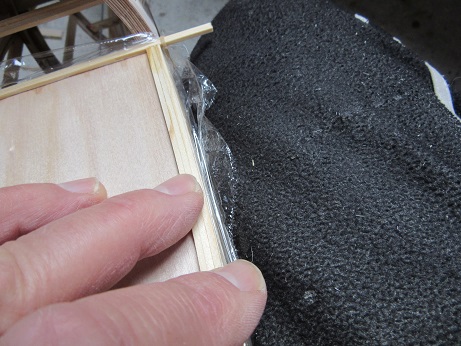
Last week I did the rest of the covering of the fuselage with 0.6 ply. It found it sometimes quite difficult and a couple of times had had to redo a piece. ('![[argh]](images/smiles/argh.gif) ') ')
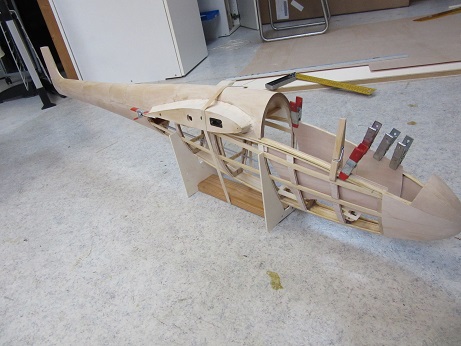
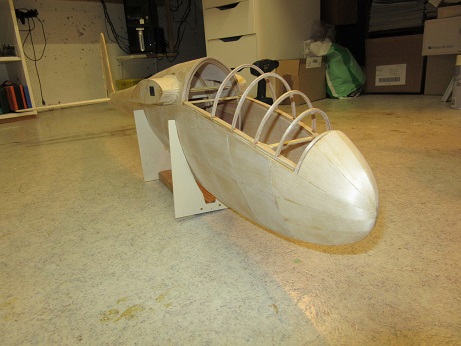
. I also covered the visible part of the inside of the cockpit.

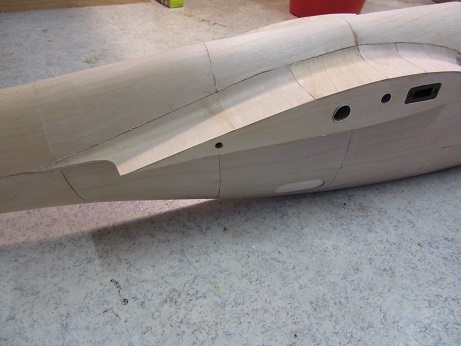
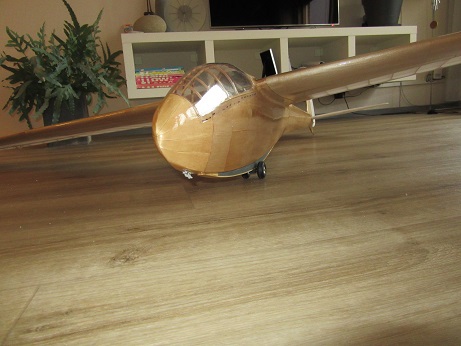
Slowly the fuselage took shape. Just behind the main frame there are inspection hatches in the real thing (it has a mechanism for aileron differential and raising and lowering both ailerons simultaniously). I wanted to make those hatches, but it is precisely at the spot you grab when you hand launch it , so I made a sandwich there.
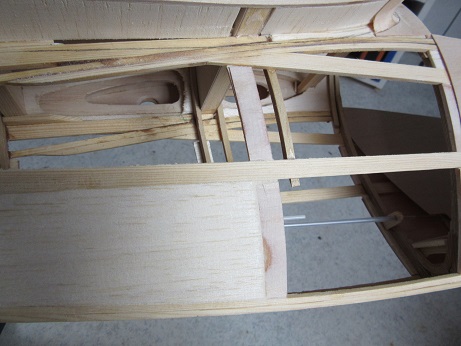
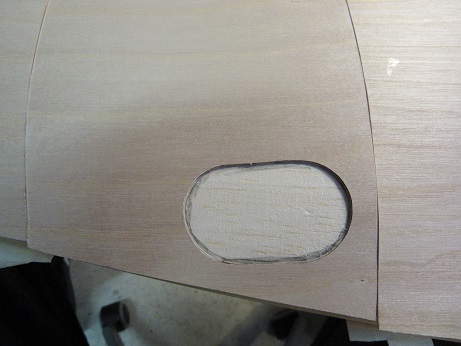
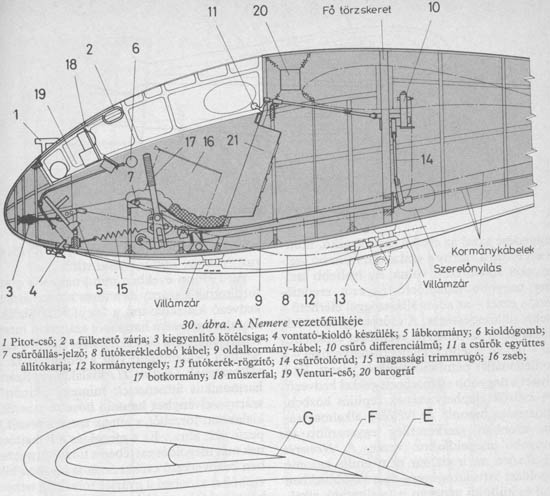
You can see the hatches on the plans.
I am still not satisfied with the wing-fuselage fairing and I doubt if I wil redo that. (' ') ')
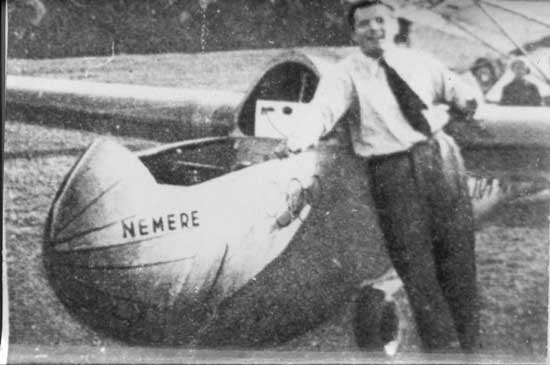
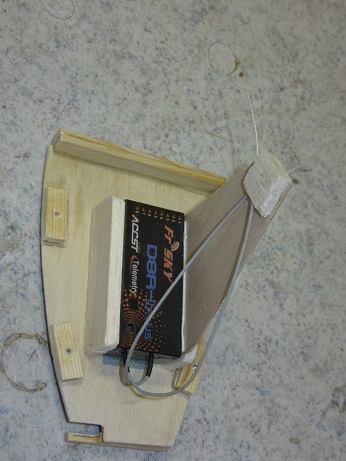
I have a question; on the next picture there is a white box behind the pilot (when he is in the plane) . It looks to me like a radio, but it is only a guess. Has anyone an idea what it is?
To be continued. |
|
| Revenir en haut de page |
|
|
VincentB
Serial Posteur

Inscrit le: 23 Jan 2006

Localisation: A la playa, bajo el sol
Âge: 60

|
|
| Revenir en haut de page |
|
|
bocorvin
Maniaco Posteur
Inscrit le: 17 Aoû 2015
Localisation: Hillegom
Âge: 77
|
| Posté le: 04/12/2015 09:49 Sujet du message: |
|
|
|
| Peut etre vous avez raison, quand je regarde le photo encore une fois, c'est bien possible que ce truc blanc est plus en arriere et dans une coffre. |
|
| Revenir en haut de page |
|
|
filotto78
Apprenti Posteur


Inscrit le: 09 Déc 2012

Localisation: Novara
Âge: 45

|
| Posté le: 04/12/2015 12:42 Sujet du message: |
|
|
|
« bocorvin » a écrit: Peut etre vous avez raison, quand je regarde le photo encore une fois, c'est bien possible que ce truc blanc est plus en arriere et dans une coffre.
My compliments Vincent for this really nice job. I'm following your progress with interest.
Are that plans still available? I was always fascinated by the gorgeous silhouette of this glider but so far I only found a plan on eBay for a 4 meters model that is actually too big for me (and for the "health" my wedding too)...
Great job!
Let's us updated as usual.
Alessandro |
|
| Revenir en haut de page |
|
|
bocorvin
Maniaco Posteur
Inscrit le: 17 Aoû 2015
Localisation: Hillegom
Âge: 77
|
| Posté le: 04/12/2015 18:09 Sujet du message: |
|
|
|
Dear Alessandro,
Thanks for your interest, that encourages me!
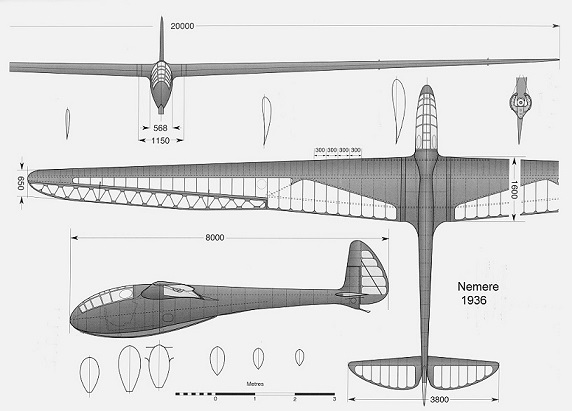
The drawing I used for the Nemere scale 1 : 6 is an enlarged drawing scale 1 : 8.
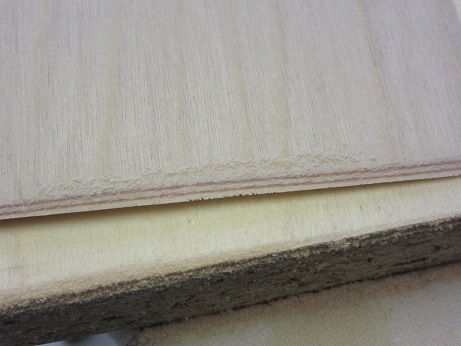
I bought this ( 1: 8 ) drawing (together with a set of ribs and frames, but you can buy that seperately) from AR Flugmodele, costs 29.50 (ex postage) . The drawings were enlarged (by 33%) in a local copy shop. Beware!, these plans are made to cover the plane with 2mm balsa, so had to change a lot of things. (it is in the beginning of this article). On the pictures of making the frames, I use the original outline, but instead of 2mm balsa, (scaled op about 3mm), I put on girders and ply ( 3mm and 0.6), so the outside is about right.
If you want to know more of that, I'am happy to inform you.
Regards, Vincent |
|
| Revenir en haut de page |
|
|
filotto78
Apprenti Posteur
Inscrit le: 09 Déc 2012
Localisation: Novara
Âge: 45
|
| Posté le: 05/12/2015 00:15 Sujet du message: |
|
|
|
« bocorvin » a écrit: Dear Alessandro,
Thanks for your interest, that encourages me!
The drawing I used for the Nemere scale 1 : 6 is an enlarged drawing scale 1 : 8.
I bought this ( 1: 8 ) drawing (together with a set of ribs and frames, but you can buy that seperately) from AR Flugmodele, costs 29.50 (ex postage) . The drawings were enlarged (by 33%) in a local copy shop. Beware!, these plans are made to cover the plane with 2mm balsa, so had to change a lot of things. (it is in the beginning of this article). On the pictures of making the frames, I use the original outline, but instead of 2mm balsa, (scaled op about 3mm), I put on girders and ply ( 3mm and 0.6), so the outside is about right.
If you want to know more of that, I'am happy to inform you.
Regards, Vincent
Hello Vincent,
Many thanks for your indications. Unfortunately I absolutely don't speak German and I'll ask to some of my multi-language colleagues ;-)
I'm interested of 1:8 scale that is more suitable for the slope where I usually fly. Is the original plan designed to have a detachable elevator ?
No problem to make some modification. As far as I remember I never built a model without doing some modification :-)
In any case now I'm busy with the model for Retroplane 2017, so I don't think that I'll begin this model in a short time.
I'm continuing to follow your adventure.
Bye
Alex |
|
| Revenir en haut de page |
|
|
bocorvin
Maniaco Posteur
Inscrit le: 17 Aoû 2015
Localisation: Hillegom
Âge: 77
|
| Posté le: 05/12/2015 00:44 Sujet du message: |
|
|
|
Hello Alex,
Yes the model has an detachebel elevator.
On the website of AR flugmodelle are some pictures, so you can get an idea of what you get.
If you plan to build it I can send you some pictures of building mine and if you look at "atelier reparation" you will find the repair of my 1 : 8 Nemere .
Bye,
Vincent. |
|
| Revenir en haut de page |
|
|
bocorvin
Maniaco Posteur
Inscrit le: 17 Aoû 2015
Localisation: Hillegom
Âge: 77
|
| Posté le: 13/12/2015 20:49 Sujet du message: |
|
|
|
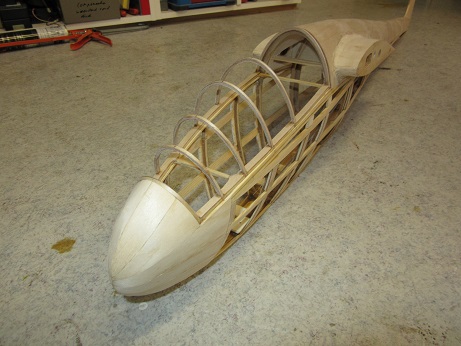
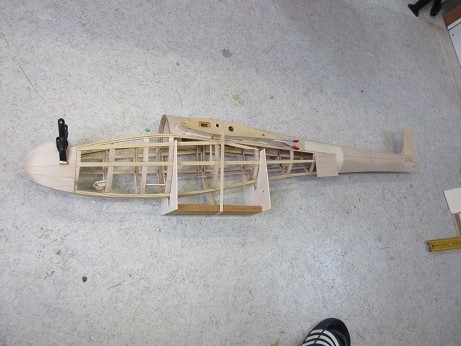
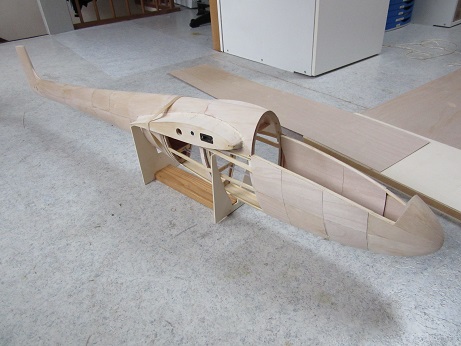
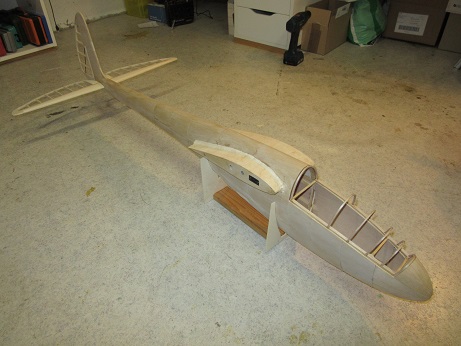
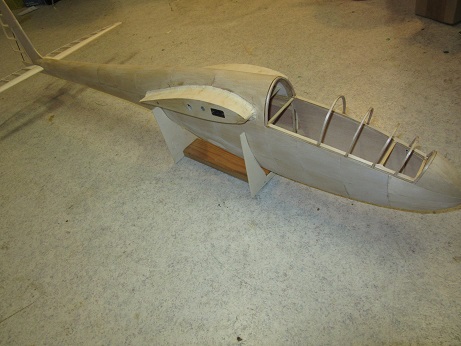
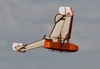
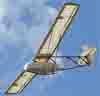
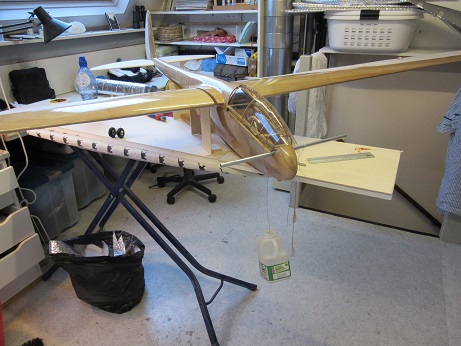
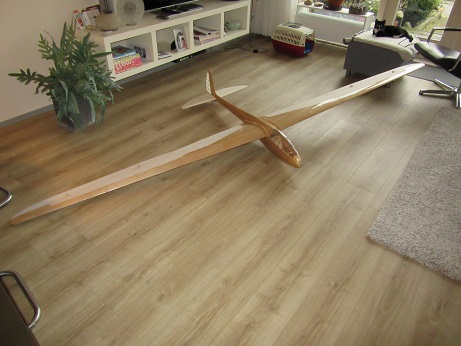
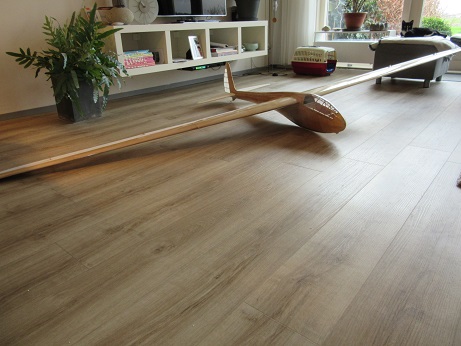
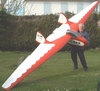
To begin with, a photo of the assembled model
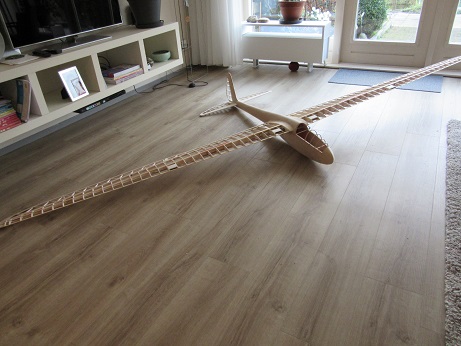
This was (of course also for fun) and to adjust the ribs at the root of the wing to check with the fuselage if there wasn't a gap. I had to correct a bit on one side.
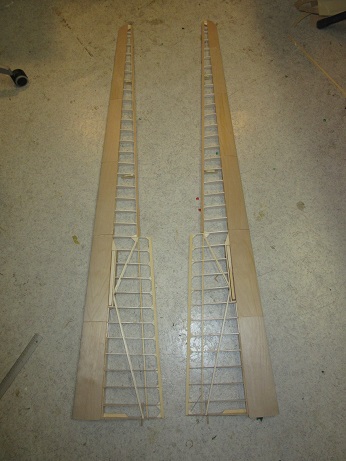
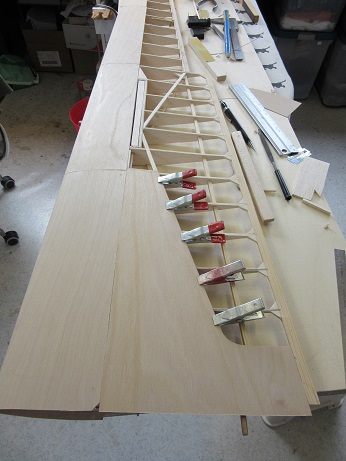
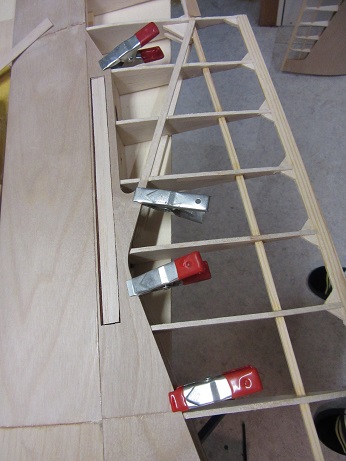
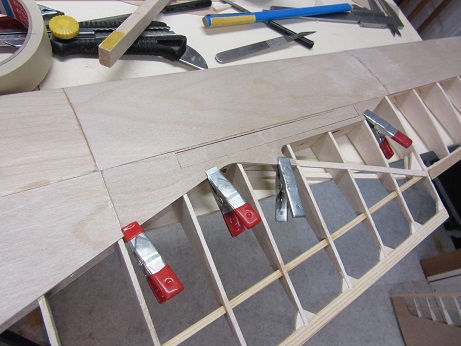
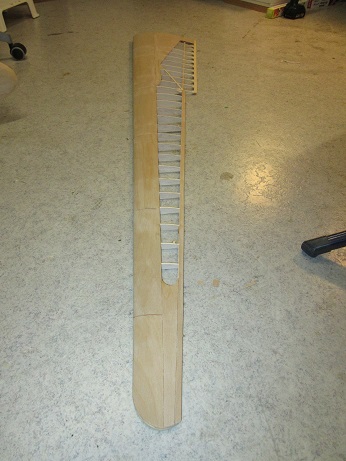
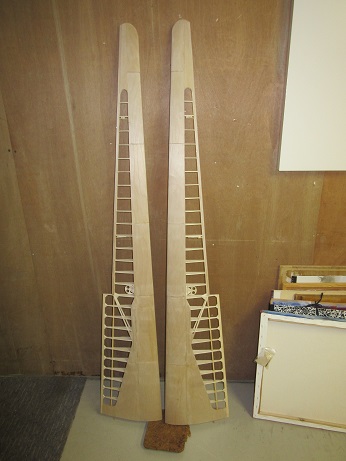
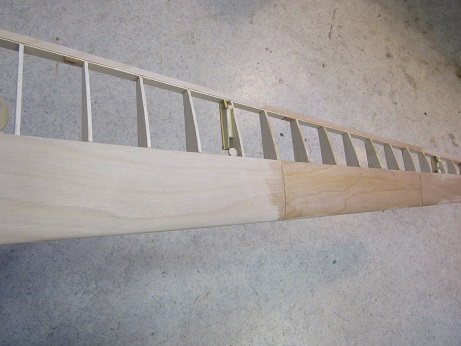
I went on with the wings, made the tips and the aileron things, to close the gap between wing and aileron, it took some time...

and the result.
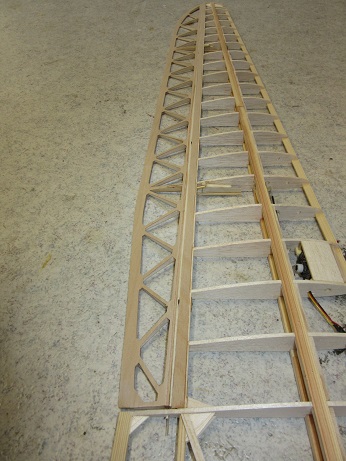
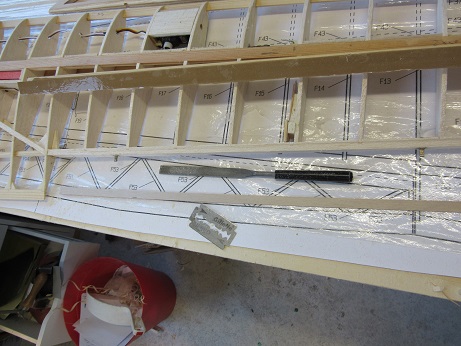
I slowly started with the ply covering of the wing, which I had never done First I did a lot of little things and then I made a beginning, the scarfs
Then the bending of the 0.6 mm ply, in the end I did it as you can seen on the pictures, using boiling water, when the water is that hot you feel the ply weakening instantly
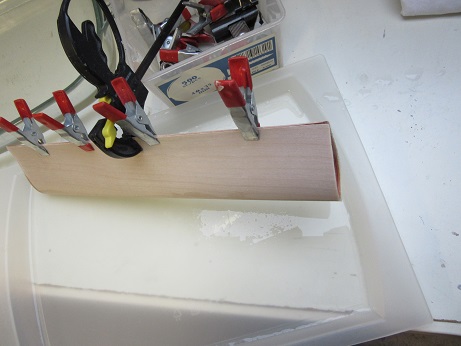
I read a lot on the forum about covering the wings with ply, it is quite stressfull! I messed up some panels and came to the following method (it's almost the same as Eric Spore uses on his 1/4 Nemere) for exact location of the first side of gluing I used pins (yes it gives holes....)
Using thick cyano, glide the panel along the pins to its exact spot, after 10 seconds I remove the pins, turn the wing over (plastic under it..)
I bent it open, put glue under the ribs, leading edge and scarf joint and the upper girder, wrap the panel around the ribs and close it, I'am glad its done...
Next is putting the rest the ply on the wings and preparing the canopy mold. |
|
| Revenir en haut de page |
|
|
bocorvin
Maniaco Posteur
Inscrit le: 17 Aoû 2015
Localisation: Hillegom
Âge: 77
|
| Posté le: 27/12/2015 22:05 Sujet du message: |
|
|
|
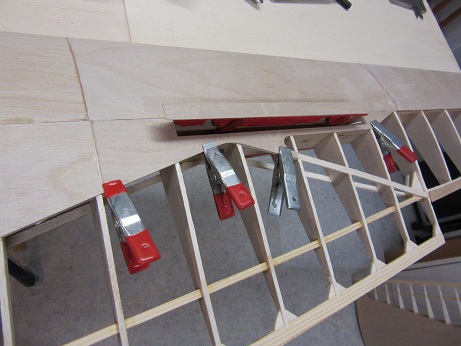
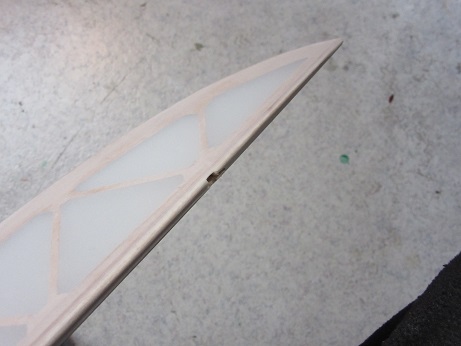
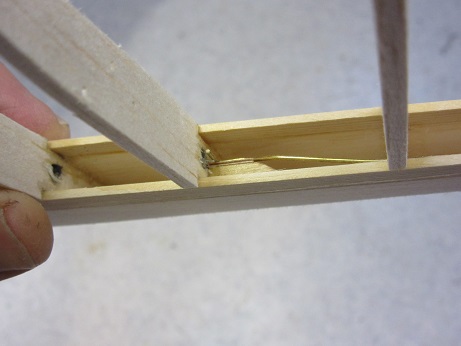
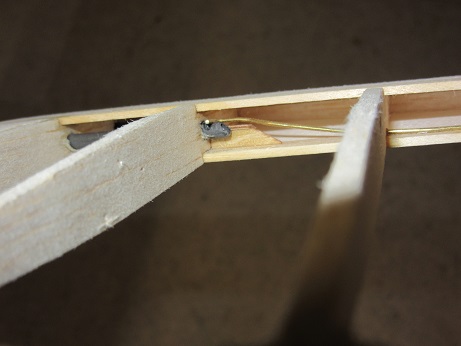
I went on with the covering of the wing with ply. First the inner parts. The reinforcements on the rib at the root of the wing is to attach a hook which hold the wing in its place.
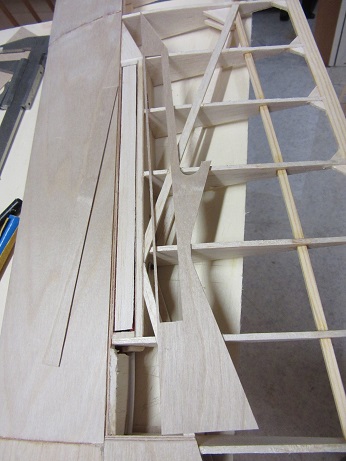
I had to incorporate the spoilers.
and check if they still worked (they did!)
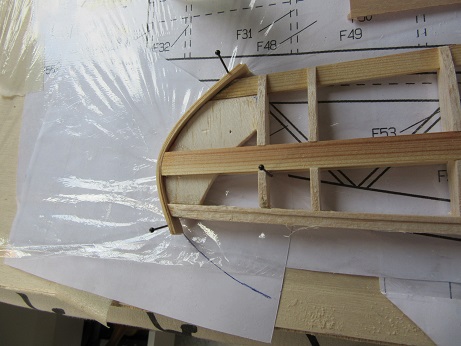
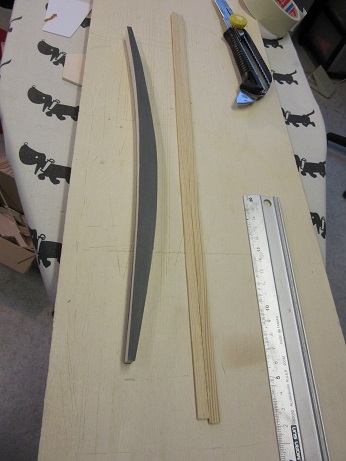
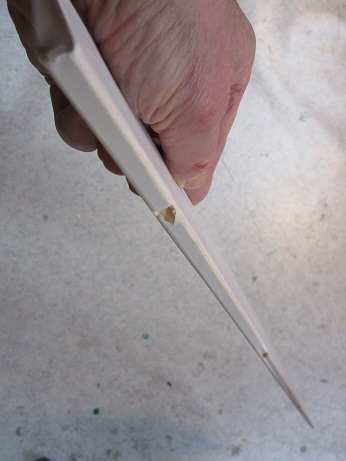
Next I bent spruce around the tips and then covered them with ply.

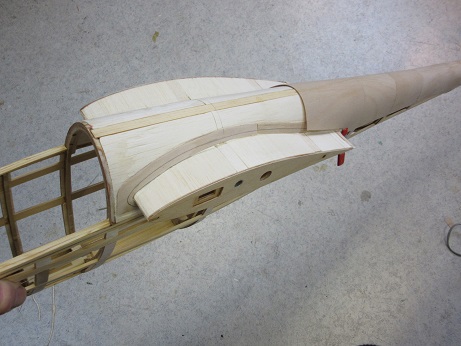
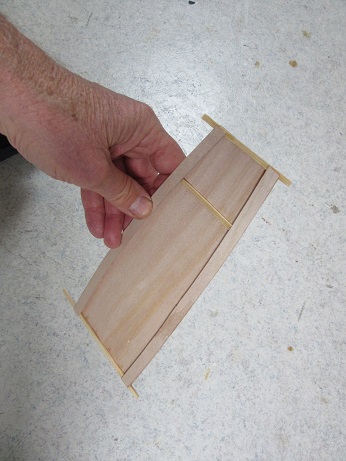
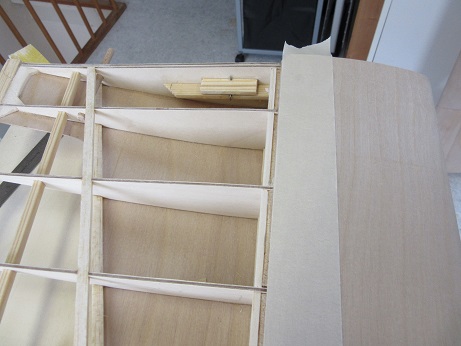
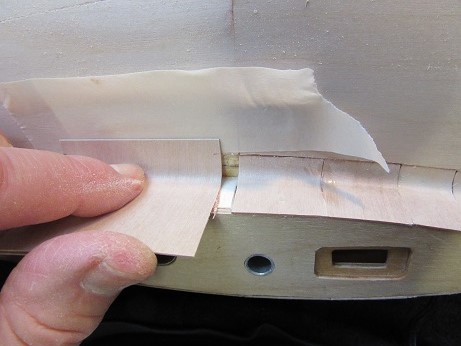
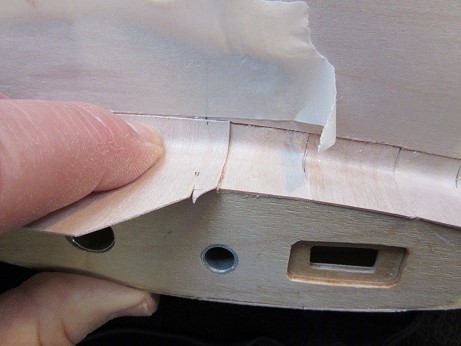
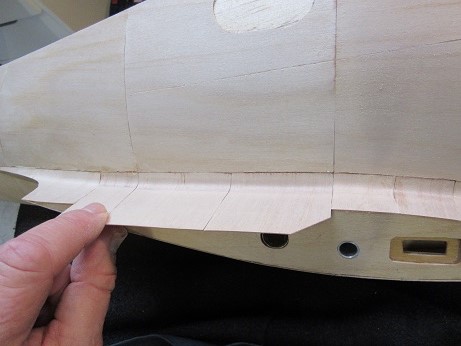
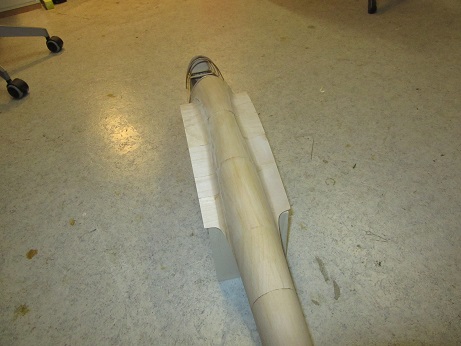
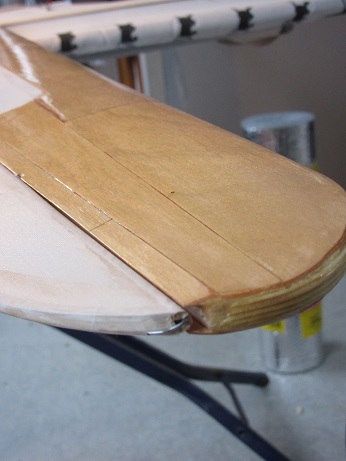
. Now back to the fuselage, especially the wing fairing. I made it first with 0.6 mm veneer, but I didn't like the result, so I took the veneer out and started with ply.
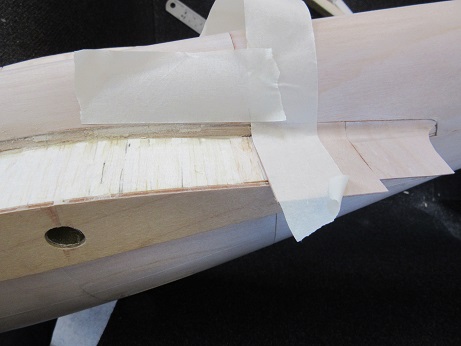
Then there was someting wrong with the fairing on the trailing side of the wing. After a lot of thinking I hope I got it right now.
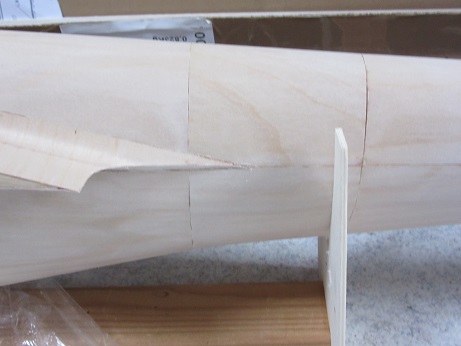
I had also used a too small radius for the fairing, so I took a bigger one and so I had to take out a strip of ply out of the fuselage Not a pleasant job hacking out ply! I prebent the wet ply
also with a bigger pipe (15mm dia) and let it dry overnight.
.
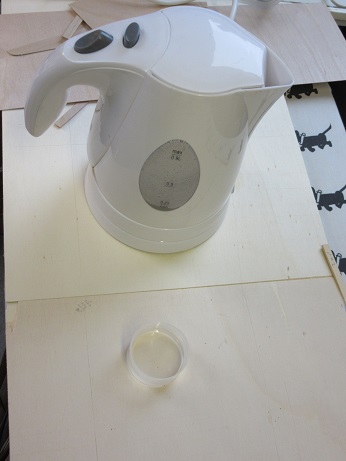
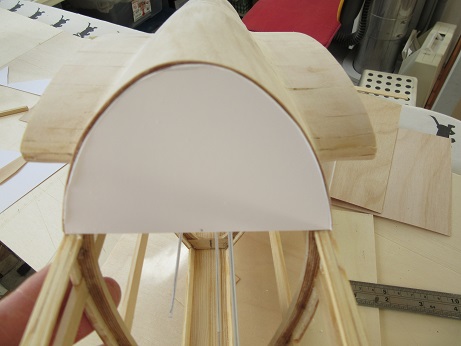
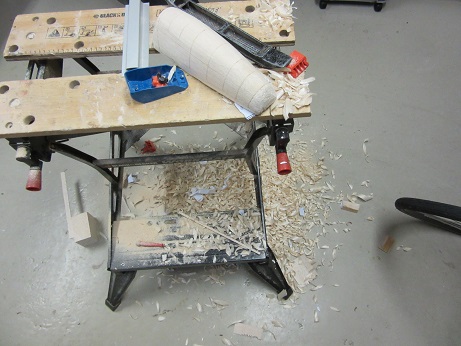
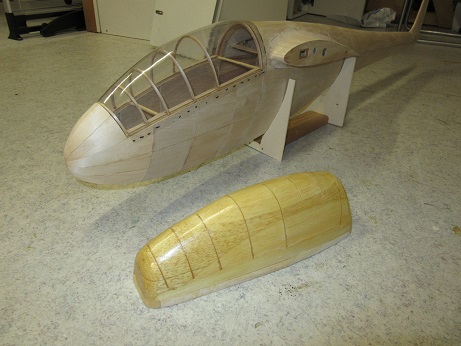
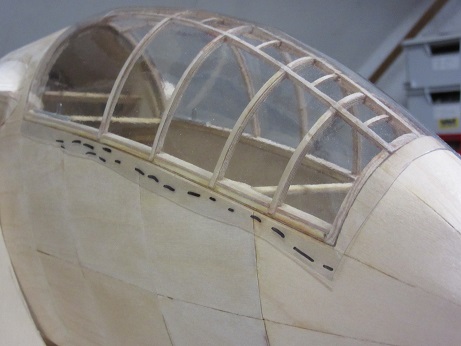
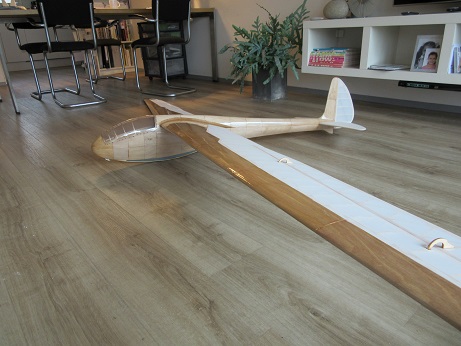
In the meantime and finished of the master for the canopy and had the canopy vacuumformed from 0.5 mm .
to be continued. |
|
| Revenir en haut de page |
|
|
Clifton
Psycho Posteur
Inscrit le: 07 Mai 2014
Localisation: Anjou
Âge: 61
|
| Posté le: 28/12/2015 00:00 Sujet du message: |
|
|
|
Very nice job. Congratulations for the farings, they look very beautiful.
Slingsby Petrel, à mon gout le plus beau de tous, quoi que le Fafnir ... Ah ces ailes en mouette, un jour ....
Rien de ce qui est fini n'est jamais achevé tant que tout ce qui est commencé n'est pas totalement terminé (Pierre Dac) |
|
| Revenir en haut de page |
|
|
bocorvin
Maniaco Posteur
Inscrit le: 17 Aoû 2015
Localisation: Hillegom
Âge: 77
|
| Posté le: 28/12/2015 01:03 Sujet du message: |
|
|
|
| Thank you! It was the third attempt..... : |
|
| Revenir en haut de page |
|
|
Anonyme
Serial Posteur

Inscrit le: 26 Jan 2006

|
| Posté le: 28/12/2015 10:20 Sujet du message: |
|
|
|
Nice plywood working !  |
|
| Revenir en haut de page |
|
|
DOMINIQUE DIOT
Incurable Posteur


Inscrit le: 03 Nov 2013
Localisation: Somme
Âge: 70
|
| Posté le: 28/12/2015 10:46 Sujet du message: |
|
|
|
![[good]](images/smiles/good.gif) nickel nickel
Lorsque on est encore en l'air, c'est qu'il est encore entier.
Dominique |
|
| Revenir en haut de page |
|
|
GARCIA
Psycho Posteur
Inscrit le: 25 Juil 2010
Localisation: COTE D'OR
Âge: 65
|
| Posté le: 28/12/2015 15:07 Sujet du message: |
|
|
|
C'est beau
José |
|
| Revenir en haut de page |
|
|
Andreas Brunner
Apprenti Posteur
Inscrit le: 08 Déc 2014

Localisation: 7201 Neudörfl a d Leitha
Âge: 61

|
| Posté le: 29/12/2015 19:32 Sujet du message: |
|
|
|
nice,nice,nice ![[bave]](images/smiles/bave.gif)
|
|
| Revenir en haut de page |
|
|
LEROY
Maniaco Posteur
Inscrit le: 21 Juil 2011
Localisation: Maurepas 78
Âge: 71
|
| Posté le: 30/12/2015 12:33 Sujet du message: |
|
|
|
I watch with interest your building is full of tricks , and the choice for Nemere amazing !!
Michel.L
Ceux qui s'avancent trop précipitamment reculeront encore plus vite |
|
| Revenir en haut de page |
|
|
caralp_laurent
Psycho Posteur

Inscrit le: 30 Jan 2006
Localisation: La Houssaye en Brie 77
Âge: 51

|
| Posté le: 31/12/2015 00:30 Sujet du message: |
|
|
|
Great ! ![[amen]](images/smiles/amen.gif)
Lolo
Lolométéo, rétro addict ;o)
"On commence à vieillir quand on remplace ses rêves par des regrets"
Sénèque |
|
| Revenir en haut de page |
|
|
bocorvin
Maniaco Posteur
Inscrit le: 17 Aoû 2015
Localisation: Hillegom
Âge: 77
|
| Posté le: 31/12/2015 11:57 Sujet du message: |
|
|
|
Thanks for all the nice comments!
Merci a tous! 
amicalement, Vincent |
|
| Revenir en haut de page |
|
|
Miguel Gil
Apprenti Posteur
Inscrit le: 13 Oct 2008

Localisation: Madrid
Âge: 67
|
| Posté le: 01/01/2016 21:31 Sujet du message: |
|
|
|
| Un travail très joli |
|
| Revenir en haut de page |
|
|
bocorvin
Maniaco Posteur
Inscrit le: 17 Aoû 2015
Localisation: Hillegom
Âge: 77
|
| Posté le: 04/01/2016 21:50 Sujet du message: |
|
|
|
Merci pour votre commentaire, Miguel!
Je continue en Anglais, first I did some detailing on the wings; in the original Nemere the ailerons were actuated with wires and pully's (see the description of the "Nemere 1936"of Eric Spore on this forum). I made only a non functional pully
and put it in the wing

. Onother 4 small pully's wil come close to the ailerons, but they can't be fitted at this stage.
When the wing is covered with Oratex they are noticeble, surely against the light.
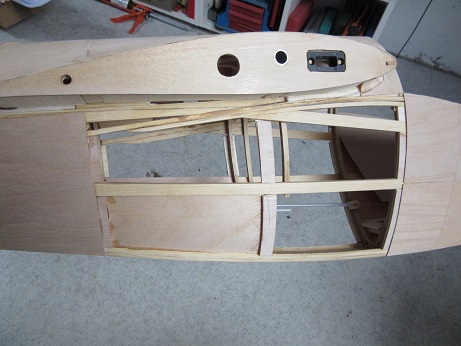
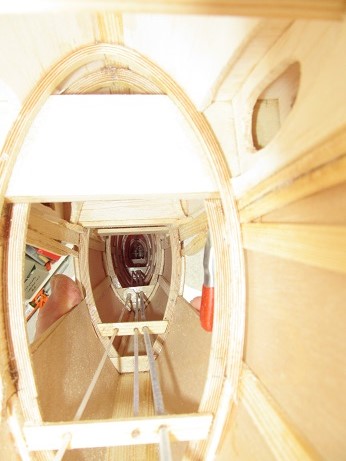
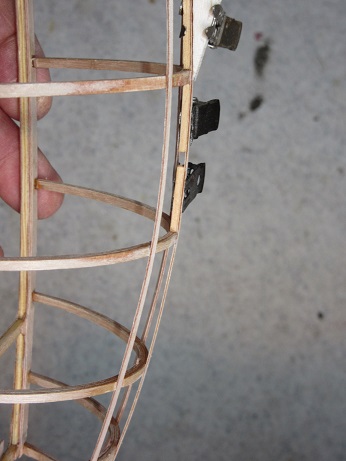
Next I went on with the canopy, put a ply strip over the middle of the frames
added partial frames
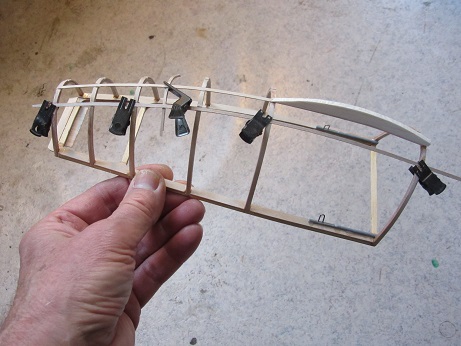
The balsa piece on top is temporary to get the girder in the correct shape. I added stringers on both sides and put 2 mm X 2 mm spruce pieces between the frames. Later I glued another ply strip on the bottom to get a rigid structure.
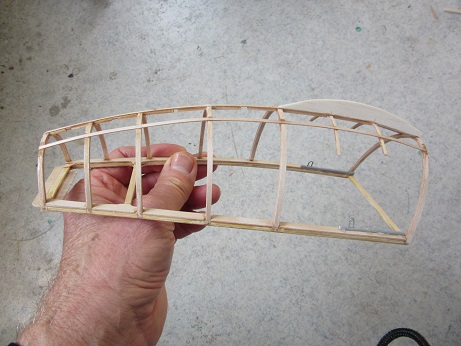
I checked the canopy on the fuselage
To my great relief it all fitted.
I went on with the fuselage, started with the coupling.
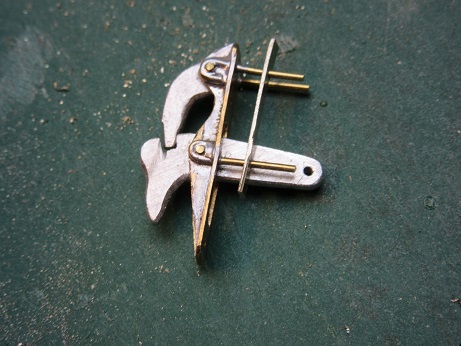
For safety I soldered some brass on the inside of the fuselage and glued it too with thin cyano. I made a jig for the push-pull rod of iron wire
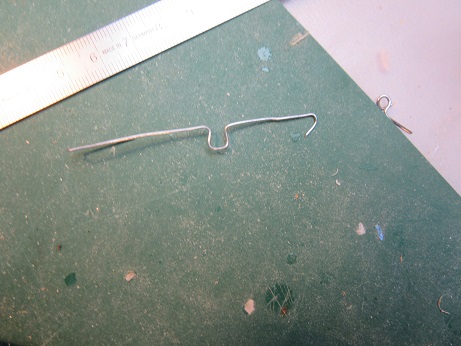
and bended a 1 mm steel wire .
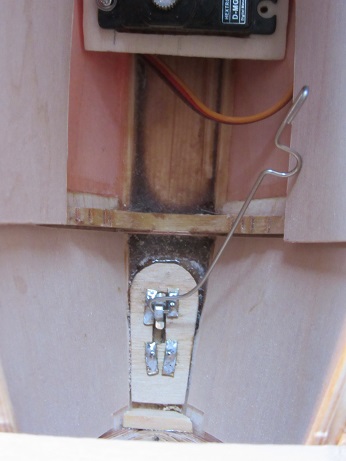
after hooking it in I could just straighten it.

Just behind the coupling servo fits the 4 cell reciever pack.
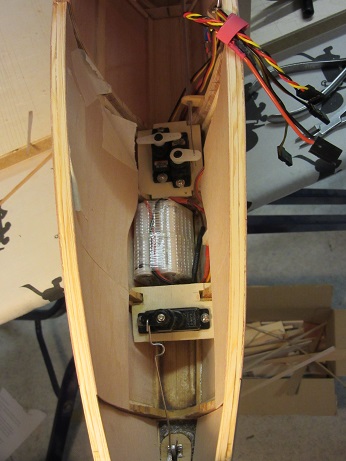
with velcro on the bottom. The receivers fits behind the backrest which is removable
I puzzled a whole day to get the seat together
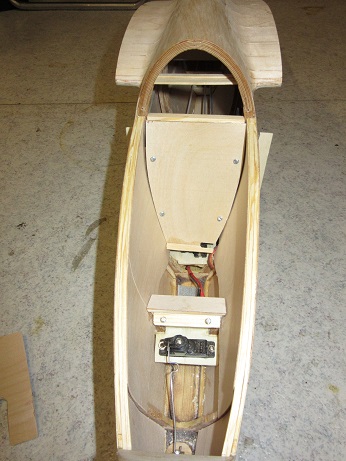
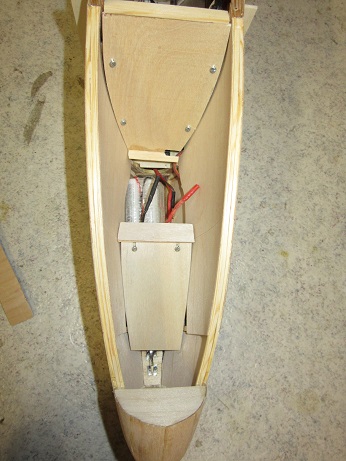

The seat itself is locked with a not visible magnet.
The on- off switch is just behind the backrest on the left side.
To be continued, Vincent.
|
|
| Revenir en haut de page |
|
|
DOMINIQUE DIOT
Incurable Posteur
Inscrit le: 03 Nov 2013
Localisation: Somme
Âge: 70
|
| Posté le: 05/01/2016 09:22 Sujet du message: |
|
|
|
nickel bravo
Lorsque on est encore en l'air, c'est qu'il est encore entier.
Dominique |
|
| Revenir en haut de page |
|
|
CHAUSSEBOURG
Maniaco Posteur
Inscrit le: 22 Sep 2010
Localisation: Touraine
Âge: 85
|
| Posté le: 05/01/2016 15:36 Sujet du message: |
|
|
|
Beautiful work! Congratulations,
Pierre
Lorsqu'on est toujours en l'air, c'est qu'on n'est pas encore posé.
Johannes Walkowiak
LDC |
|
| Revenir en haut de page |
|
|
bocorvin
Maniaco Posteur
Inscrit le: 17 Aoû 2015
Localisation: Hillegom
Âge: 77
|
| Posté le: 12/01/2016 15:24 Sujet du message: |
|
|
|
Merci Dominique et Pierre pour votre commentaire!
Je continue en Anglais;
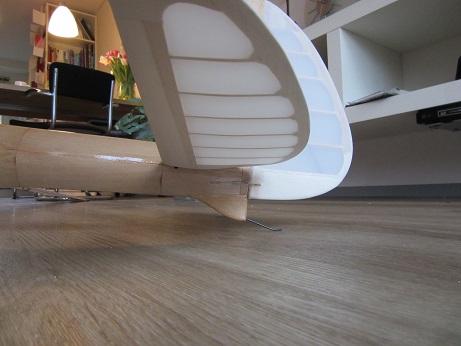
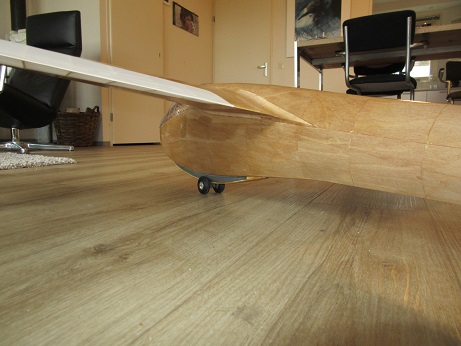
I laminated 4 layers of 4mm balsa to make the landing skid, covered it with Oratex and painted it grey. I prepositioned it with two pins with the heads snipped off.

Later I glued two 8 mm X 2 mm spruce battens on top.
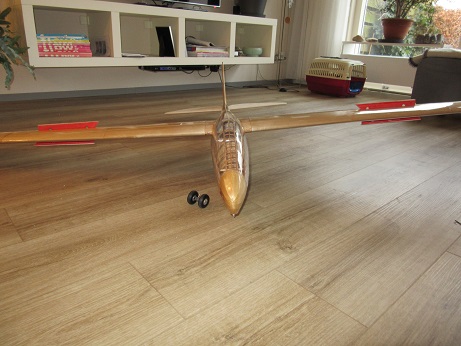
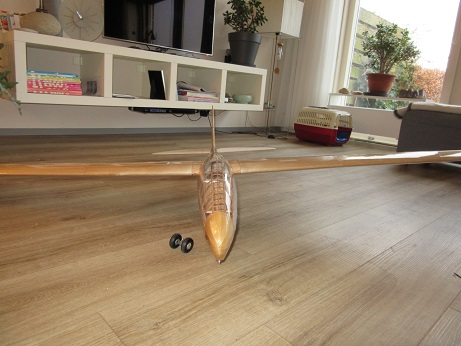
After some detailing on the wings they were ready for couloring, covering with Oratex and varnishing. That was difficult, the materials used on the forum aren't sold over here, so I needed onother solution. My wife came up with Bister (dutch name) and obtaineble in art shops, which is brown, water soluable and can also be washed out. I tried a lot of different concentrations on scrap ply and choose to use a rather light colour.
Same with the Oratex colour, the yellowish one or the neutral??? I choose the neutral.
.
I put two layers of cellulose with (porenfuller in German) and one layer boatvarnish.
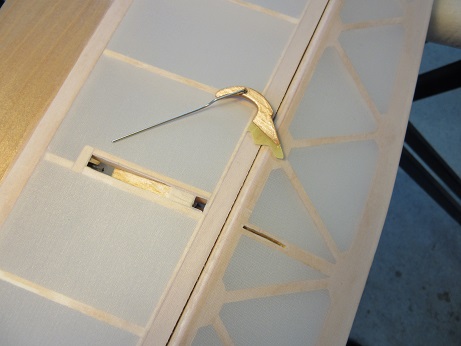
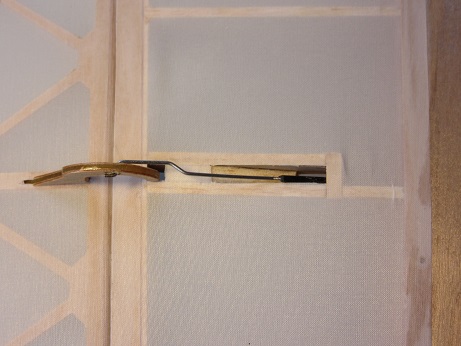
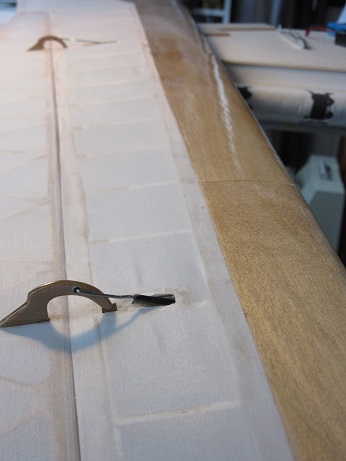
Put on the ailerons (you can just see the bent end of the steelwire on which it hinges)
glued the actuation segments and push/pull rods.
.
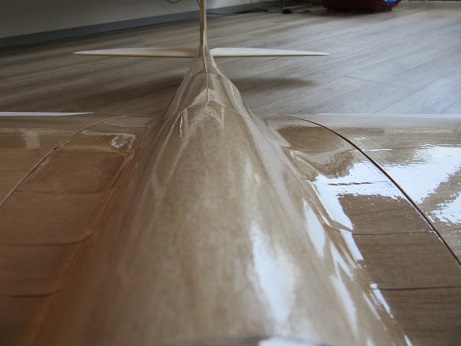
Made a fairing on the verical stabilizer
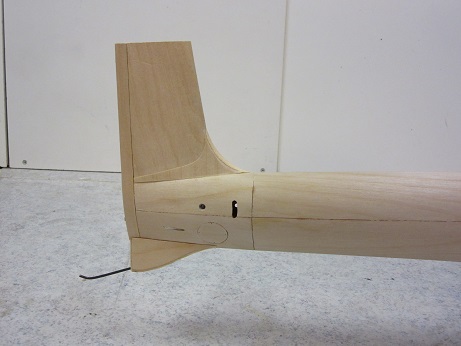
and a locking mechanism for the tailplane.
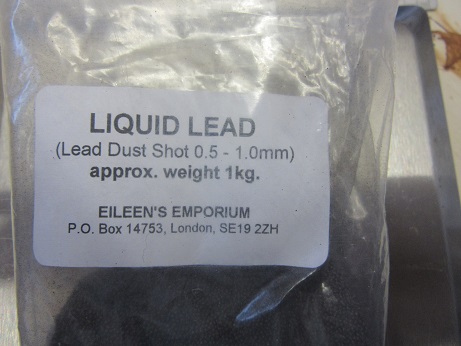
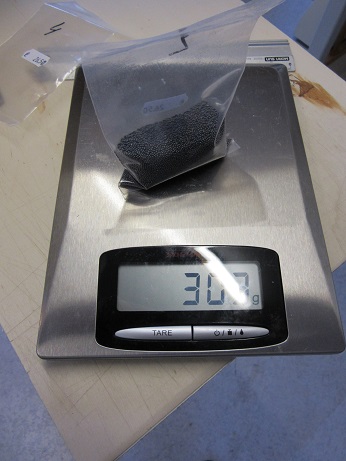
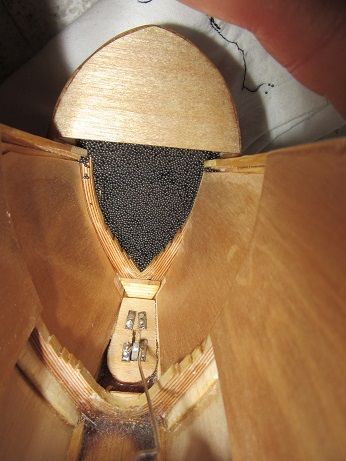
Figured out how much lead should go in the nose to get the correct CG.
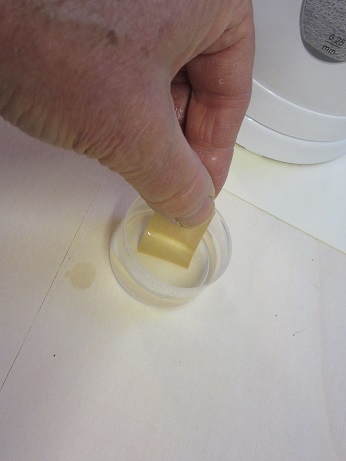
I use this stuff, pour in about 20mml slow curing epoxy and pour in the "liquid lead"
The pull/ pull wires on the verical tailplane
The tailplane needs still to be sprayed in the colours of the Hungarian flag.. and the ply looks pale, but the colour is the same as the interior in the previous picture!. Made some shots of the plane , couldn't do it outside, raining and stormy and the colour of the floor is a bit distracting.
After the detailig of the canopy I glue the "glass" on .
checked if the spoilers worked OK
a suivre,
Vincent
|
|
| Revenir en haut de page |
|
|
VincentB
Serial Posteur
Inscrit le: 23 Jan 2006
Localisation: A la playa, bajo el sol
Âge: 60
|
| Posté le: 12/01/2016 16:15 Sujet du message: |
|
|
|
Bravo Vincent, très belle finition
Je viens d'aller voir le plomb en bille chez eileensemporium.com c'est bien comme matériaux et c'est plus pratique et moins dangereux que d'ouvrir des cartouches de chasse 
Retroplane et modélisme en pause, vanlife à haute dose. |
|
| Revenir en haut de page |
|
|
DOMINIQUE DIOT
Incurable Posteur
Inscrit le: 03 Nov 2013
Localisation: Somme
Âge: 70
|
| Posté le: 12/01/2016 16:41 Sujet du message: |
|
|
|
bravo,tres tres beau
Lorsque on est encore en l'air, c'est qu'il est encore entier.
Dominique |
|
| Revenir en haut de page |
|
|
DELRIEUPierre
Psycho Posteur
Inscrit le: 28 Jan 2006
Localisation: Arvert 17530
Âge: 74

|
| Posté le: 12/01/2016 17:26 Sujet du message: |
|
|
|
![[good2]](images/smiles/good2.gif) Joli ce Nemere avec sa belle finition Joli ce Nemere avec sa belle finition
Pierre

Vieilles toiles à Peyresourde et Papy's Flying Club 17 à la Madeleine
Signé les copains |
|
| Revenir en haut de page |
|
|
|